
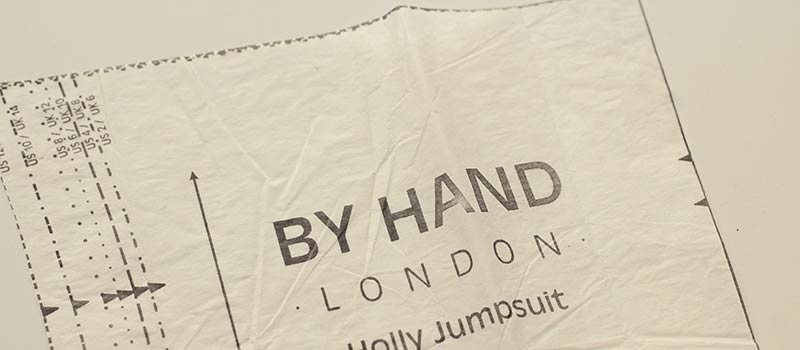
How To Read Sewing Patterns: The Ultimate Guide
Sewing beginners can look at a sewing pattern and feel overwhelmed.
With so many pattern symbols, knowing how to read sewing patterns probably feels a little like reading Dutch.
Then there’s the instructions (or lack of them!) that come with sewing patterns too!
This guide to reading sewing patterns should help clear up any confusion you may have about pattern symbols, fabric lay plans, grainlines, body measurements, fabric types and more!

How To Read Sewing Patterns
A sewing pattern consists of several elements, whether you buy a physical paper pattern, or a digital PDF pattern:
- Sewing pattern with different lines and symbols
- Size guide
- Finished garment measurements
- Fabric lay-plan
- Sewing instructions
We’ll dig into each of these five elements further below so that you can feel more confident reading a sewing pattern!
The most important thing though if you are a sewing beginner is to read the sewing pattern carefully – all the elements.
The designer will not state on the pattern the different seam allowance amounts, and these can vary depending on what section you’re sewing.
Some patterns are created with a 1 cm seam allowance and others are designed with a half inch seam allowance – the latter is about 1.25 cm.
Sewing Pattern Symbols And Lines
Let’s start with the part that causes most confusion among sewing beginners.
I’ll answer some questions below and then provide images and definitions for each pattern symbol as well as a printable worksheet.
What Do The Symbols Mean On A Sewing Pattern?
Each of the symbols on a sewing pattern has a different meaning. We’ll cover them more fully further down, but the symbols are a short hand key about the pattern piece in question.
What Is A Pattern Piece?
A pattern piece is a section of the whole sewing pattern. If you were planning to sew a shirt, you would have the following sections to sew:
- Font
- Back
- Back yoke
- Sleeve
- Cuff
- Placket
- Patch pocket
- Collar stand
- Collar
Each of those is usually a pattern piece. Unless it is a more complicated design in which case the front or back could be made up of multiple pattern pieces.
Each of these pattern pieces would have various symbols and lines as a visual guide of what needs to be done with each pattern piece.
What Are The Lines And Pattern Symbols On Pattern Pieces?
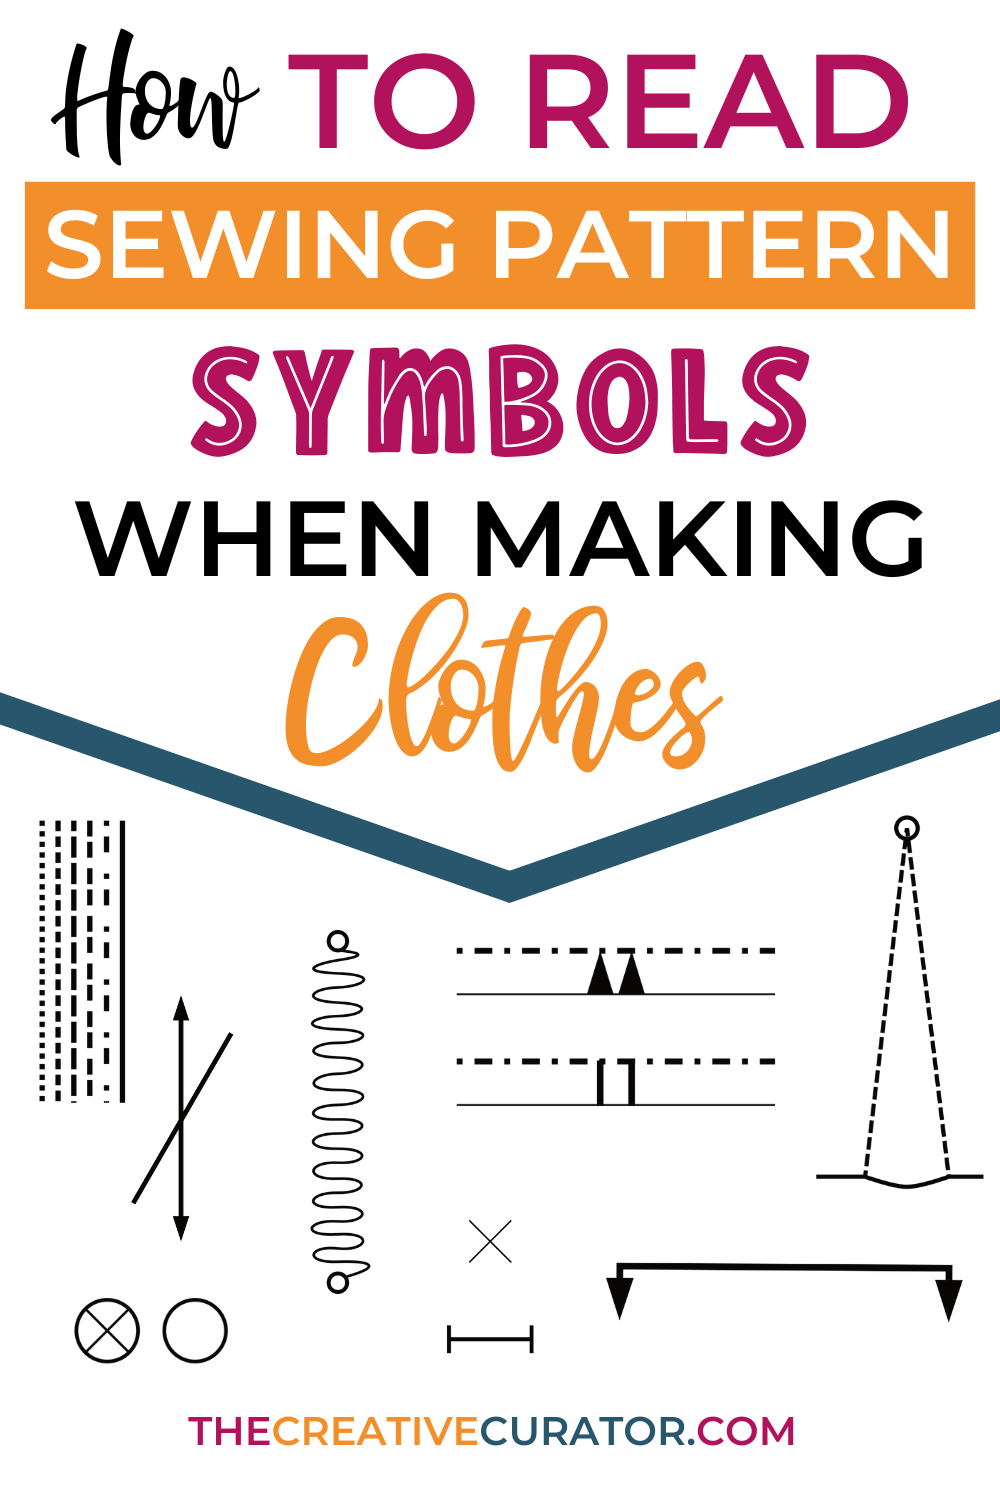
There are quite a few lines and symbols on pattern pieces and they will differ slightly depending on the sewing pattern brand.
While this isn’t an exhaustive list, it will help you learn how to read sewing patterns:
- Cutting lines
- Notches
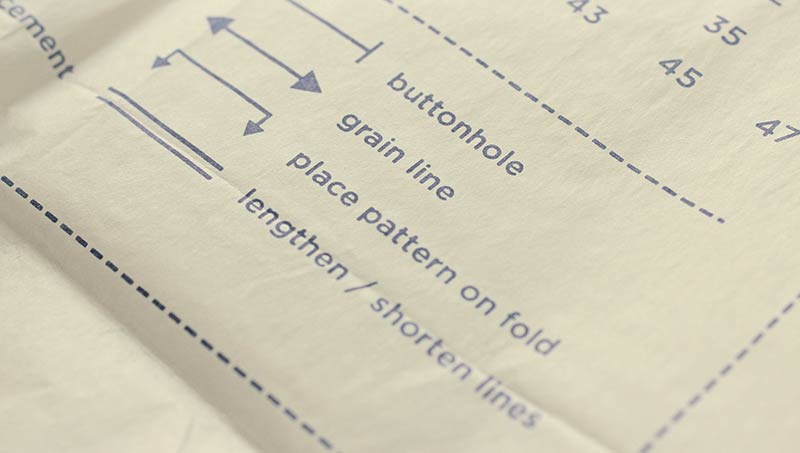
- Grainline
- Foldline
- Lengthen / shorten lines
- Darts
- Gathers
- Tucks
- Pleats
- Pockets
- Buttons and buttonholes
- Bust point
Let’s look at each in more detail now!
What Is A Cutting Line?
On every sewing pattern you’ll see cutting lines. There are usually quite a few, overlapping in places.
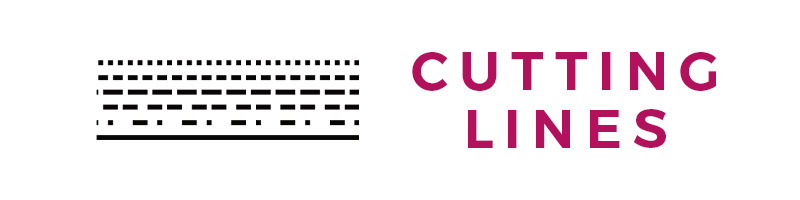
Digital patterns are sometimes ‘nested’ which allows you to select one or more sizes to print and cut.
This is handy as there are then fewer cutting lines on the paper and you are less likely to cut the wrong lines.
Cutting lines are differentiated by style:
- Dotted
- Dash then dot
- Varying dash lengths

Each cutting line style is assigned a size and that is the line you cut for all the pattern pieces.
If you need help with cutting fabric, I have this tutorial on how to cut fabric straight and this tutorial on sewing in a straight line!
What Are The Notches For On A Pattern?
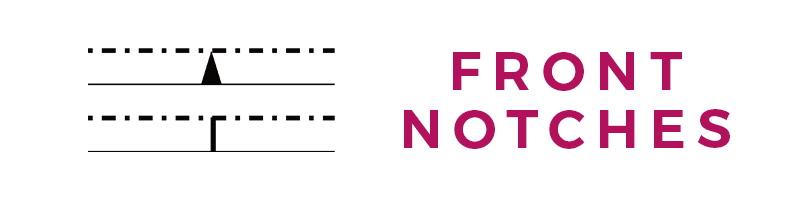
Notches on a pattern are matching points. You use notches to make sure that your pattern pieces are correctly matched up.
It could be the sleeve notch matching up with an armsyce notch or a centre front notch on the shirt front that will line up with the centre front on your collar stand pattern piece.

It is standard to have single notches for front and double notches for back pattern pieces.
As an example, a sleeve would have a single notch for the section to be sewn to the front bodice, and a double notch on the section to be sewn to the back bodice.
How Do You Cut Notches In Sewing?
Most commercial sewing patterns will have little triangles on them and these are the notches.
Some older pattern companies will have the notches pointing outwards, while most indie pattern designers have the notches pointing inwards.
To cut them, I use my paper scissors for that section, and make a little snip into the fabric and pattern, usually no more than 2-3 mm.
If the sewing pattern you are using has notches that extend beyond the circumference of the pattern piece, you could cut the triangle notches outwards too.
Do take a look at my guide on what notches are in sewing, and how to use them!
What Is Cut Two In Sewing?
When your sewing pattern tells you to cut two, it means to place the fabric together – either right or wrongs sides facing – and to place the pattern piece upon this.
By cutting two pieces in this way you are creating a symmetrical pair.
What Is A Fold Line On A Sewing Pattern?
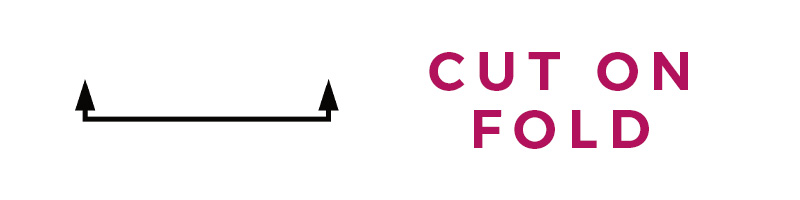
Sometimes pattern pieces have a fold line instead of a grain line. This is because the pattern piece is symmetrical and only needs to have one piece cut out.
The fold line marks the edge of a pattern piece that is to be placed on the fold.
That folded edge will not have seam allowance factored in as there will be a fold and no sewn seam.
The centre front of a dress or the centre back of a shirt can be cut on the fold, as well as collars, collar stands and skirt fronts and backs.

What Is The Grainline On A Sewing Pattern?
The grain line on a pattern piece is an arrow showing you how to line up the fabric and pattern piece.
Straight Grain

The grain line will have an arrow at one end. This line should be placed parallel to the straight grain of the fabric.
Cross Grain
The cross grain is at 90º angle to the selvedge. It is rarely indicated on pattern pieces, as the grain line arrow is place in such a way that the pattern piece is always parallel to the selvedge as needed.
Bias Cut

Fabric cut at a 45º angle to the selvedge is called the bias. There is more stretch and drape on this angle, so it is frequently used for tops and dresses that have no darting.
Other Grain Considerations
If you are using a fabric with a nap, it is super important to consider the direction your grain line arrows are pointing.
On some patterns, there are arrows at both ends of the grain line, like on the fold line. This typically means that the pattern can be placed in either direction as long as the grain line is consistent.
However, this doesn’t work for fabrics with a nap or pile such as velvet, corduroy and faux fur.
In this instance you would want to choose the uppermost direction arrow on each pattern piece, and block out the lower ones, to maintain consistency.
You can learn more about the different types of fabrics and their uses here.
Lengthen And Shorten Lines

Sewing patterns are designed with a certain height in mind. If you are taller or shorter than the intended height, you will need to use the lengthen and shorten lines on a sewing pattern to make changes.
It is best to use the lines marked in by the pattern designer rather than mark in your own lines. This is because changing a pattern can sometimes affect both the length and width of the final garment.
Darts
Darts are usually marked on patterns with dashed lines known as the the dart legs which connect at the dart point.

Darts are used to suppress fabric so are usually found on the front bodice to shape the fabric near the waist and bust, on the back bodice to shape the fabric over the shoulders and on the skirt front and back to shape the fabric from the waist to the hips.
Learn how to sew darts in a bodice here and if you’re feeling experimental, you can learn about dart manipulation here!
Gathering Lines
When fabric is to be gathered, it can be shown on a pattern as either a straight line or a wavy line between two points.
To gather the fabric, I use the longest stitch available to me on my sewing machine, and sew between the two points.
Back stitch when starting, but leave the other end open, so that the threads can be pulled through and gathered.
You’ll know what measurement to gather the fabric to from the sewing instructions, but this can often be understood from the notches on the connecting pattern piece.

Tucks
Tucks are formed by bringing two points together and sewing a line parallel to the fold line created. On a pattern this can look like the image below.

Pleating
Pleats look different to tucks on sewing patterns as they are directional and not sewn all the way down.
On a sewing pattern there will be an arrow showing the direction of the pleat and a dotted line to show where the folded edge of the pleat should line up.

Clipping
If fabric needs to be clipped to help it lay flat, the pattern piece may show the above symbol where the clipping is to occur.
Pockets
Pockets need to be placed correctly when sewing and this is usually shown by circle (drill holes) on pattern pieces.
These circles will usually correspond rather accurately with similar symbols on the pocket pattern.

Pockets are a great way to add unique elements when sewing your own clothes. You can learn more about pocket types here and the different uses of pockets here!
Buttons And Buttonholes
Buttons and their button holes are marked carefully on pattern pieces to ensure an accurate placement.
There’s nothing worse than having a button slightly off and affecting how the fabric sections line up when buttoned up!

Bust Point

Not always shown on front bodice pattern pieces, but the bust point it where the apex of the bust would sit.
This is usually the nipple on the body, but could be elsewhere on the bust if the fullest part isn’t the nipple.
Darts are designed to end before the bust point so that there is no sharp point at the bust point on clothing.
Reading A Sewing Pattern: The Size Guide

Your next consideration once you’ve seen and started to understand the sewing pattern symbols is to be aware of the size guide.
I want to point out – because it isn’t mentioned much in the fashion or sewing sectors – sizing is based upon a small sample, often just that of an ‘ideal customer’.
I know this, because when I had a fashion line, I created my house blocks based on a certain size – that of my fit model, who was my ‘ideal client’.

The sizes you see from different sewing pattern companies will differ, just like the size difference you see at clothing stores.
A size 16 at Burda or Simplicity is very different to a size 16 at Closet Case Files or Named Patterns.
Pattern sizings are based upon your body measurements. Depending on the type of garment the sewing pattern is for, you could have three measurements or more to consider.

Here are some general rules when looking at pattern sizing:
- For a loose fit bodice based sewing pattern you’ll want to consider the ’roundest’ part of your upper body – usually the bust – so that the garment is comfortable when worn and not dragging across the bust.
- For a tight fitting bodice based pattern, you’ll be focusing on the under bust, high bust and waist measurements. An FBA (full bust adjustment) can be made to increase the bust if needed.
- Lower body garments should have the widest part as the focus measurement – usually the hip / bum area – as fabric suppression can fix the narrower areas of the pattern.
It is rare to find that your body’s measurement perfectly matches those provided in measurement guides on sewing patterns.
Please DO NOT feel bad at not ‘conforming’. You are not an anomaly; you’re as unique as I am, and no sewing pattern can fit perfectly from the packet.
Finding your size on the chart provided with the sewing pattern will help you know how much fabric will be needed to create the garment, and whether you need to grade between sizes for a better fit.
I have this guide on understanding body proportions if you’d like to know how your body proportions can affect commercial sewing patterns.
Understanding The Finished Garment Measurements of a Sewing Pattern

The next consideration is the finished garment measurements.
If the garment is a close fitting garment, there will be very little difference between the waist measurement on the size chart and the waist measurement on the finished garment chart.
This is because only ‘wearing ease’ is needed, which is the ‘space’ between your body and the garment to allow it to be comfortable when worn.
If the garment is outwear, there will be a bigger difference to allow for layers to be worn underneath.
And if the sewing pattern is for a more ‘designed’ garment, there could be an excessive difference based upon the design ease added.
This article about pattern ease is a good read to clarify the difference between wearing ease and design ease!
It is at your discretion to go up or down a size based on the difference between your measurements and the finished garment measurements.
Reading A Sewing Pattern: The Fabric Lay Plan
When it comes to knowing how to read sewing patterns, understanding a lay plan is crucial.
You will often be provided with a lay-plan by the sewing pattern company – tucked away in a sewing booklet – which is designed to help you get the most from your fabric.
The plan will show various ways to lay out your fabric, depending on:
- Your fabric width
- The pattern size chosen
If you plan to use a fabric that has a print or woven pattern and want to pattern match, you’ll need to consider whether the lay plan is accurate for you. In this case, you may need to buy more fabric that the sewing pattern suggests.
Layplans do not always make the most use of the fabric. As someone who is very much against unnecessary fabric waste, I personally prefer to play around with the pattern pieces on the fabric to see if I can get a less wasteful layout.
If being more sustainable with your sewing is important to you, you may find this article about sustainable sewing interesting, and this one about zerowaste fashion.
Reading A Sewing Pattern: Sewing instructions

The sewing instructions themselves – provided as a step by step guide – is often the easiest part of knowing how to read sewing patterns.
Note that some pattern companies include the measurement guides and lay plan in the sewing instruction booklet or file while others print them on the physical pattern packets and envelopes.
Most sewing pattern companies will provide the actual sewing instructions:
- With text instructions
- Illustrations
- Photos
This makes reading sewing instructions easier, though the level of detail varies amongst companies. Closet Case Files patterns have great in depth sewing instructions whilst Style Arc sewing patterns are very basic.
For sewing beginners, I have this overview of how to sew clothes.
Understanding The Basics
The sewing instructions included will provide basic instructions first such as:
- Line drawing
- Pattern inventory
- Recommended fabric types. This includes whether the pattern is for a woven or knit fabric as well as the recommend fabric weight and fibre content.
- Haberdashery items such as interfacings and fastenings.
- A list of sewing tools needed.
- Any fabric preparation needed.
- Pattern printing directions if it is a digital sewing pattern.
- Marking of the pattern pieces.
- Actually sewing instructions.
Line Drawings

Your sewing pattern will contain one or more line drawings, which aim to provide a simplified idea of what the garment looks like when sewn.
There will usually be a drawing for each version of the sewing pattern, such as long or short sleeved versions or different length versions, which will help you decide which version is right for you.
Pattern Inventory
This is a list of the pattern pieces included in the sewing pattern.
If the sewing pattern has different ‘views’ then there may be a guide telling you which pattern pieces you will need from the full list along with a guide to which pages you need to print.
Fabric Types
The fabrics recommended will be exactly that – a recommendation.
As a creative pattern cutter, I often ignore fabric recommendations as I like to experiment and try new things, and I don’t feel that being told to use one fabric type is very creative, when there are so many different types of fabric to choose from!

That said, there are rules to follow:
- Knit patterns have ease added differently to woven patterns, so changing the fabric type from knit to woven can result in very unexpected outcomes.
- Close fit stretch patterns – leggings and swimwear being uppermost in my mind – have ‘negative ease’ which means the pattern is smaller than the body to allow for the ‘stretch’ of the recommended fabric. If you were to make this in a non-stretch woven fabric, it would be a fitting disaster!
- Woven patterns can be made from knit fabrics, but you need to be careful in your choice of knit type.
Choosing a fabric type comes down to design and function. Consider whether the attributes of knit fabric will work on a woven sewing pattern and vice versa.
I’m always using remnants of upholstery fabric for clothing patterns – yet I’ve had at least three email subscribers tell me that they’ve been told their quilting cotton should not be sued to make clothing. It’s all relative to the design outcome you have in mind!
Learn more about woven fabric types here, and working with knitted fabrics here.
Fabric Weight
Fabric weight is another critical consideration when sewing. Think about the season that the garment will be worn.
- Summer calls for more lightweight fabrics
- Winter calls for more heavier weight fabrics
Outerwear garments can safely be sewn up in heavier weight fabrics throughout the year, but you probably wouldn’t want to sew a light floaty dress pattern in a heavy silk jacquard or corduroy.
Knowing how to read sewing patterns includes understanding why the designer has recommended certain fabric weights and types. Once you understand why, great. Change it up to be more creative!
Fibre Content

We’ve covered fabric type and fabric weight. The third consideration of the fibre content. Your choices boil down to:
- Natural fibres
- Man-Made fibres
- Mixed fibres
Natural Fibres
Natural fibres occur naturally, and include:
- Cotton
- Silk
- Wool
- Linen (from flax)
Man-Made Fibres
These can either man made synthetic fibres or regenerated cellulose fibres. These include:
- Polyester
- Spandex
- Nylon
- Viscose
- Rayon
Mixed Fibres
Sometimes fibres are ‘blended’ to give a more versatile fabric. Polycotton is used in school uniforms in the UK as the cotton keeps the fabric breathable while the polyester limits the creases.
- Polycotton (polyester and cotton)
- Silk linen (silk and linen)
- Elastane (cotton and spandex)
For a very in-depth guide to fibre types, check out my article on man made vs natural vs synthetic fibres!
Haberdashery, Notions And Tools

The sewing instructions will include a list of additional items that you will need such as:
- Interfacings
- Linings
- Threads
- Stay tapes or ribbon
- Shoulder pads
- Buttons
- Zippers
- Pressing cloth
- Tailors ham
- And many more
I have articles on clothes fastenings as well as sewing tools and equipment for further reading.
Fabric Preparation Notes
The fabric preparation notes on sewing pattern instructions will often state that you need to pre-shrink your chosen fabrics by either washing or shrinking with steam.
This is a good rule to follow, as there is nothing worse than sewing up a perfectly fitting garment and then finding it smaller than it should be after the first wash.
You’ll also be guided on what sections need interfacing. (You can learn about what interfacing fabric is and how to use iron on interfacing too!)
Block fusing may be suggested – this is where the entire piece of fabric is fused – or there may be more specific instructions on what sections to fuse.
Printing Directions
This is only relevant for digital sewing patterns, but there will be a brief overview explaining:
- How to print the first pattern page to check the scale of your printer is 100%
- How to connect the various pages to form a full pattern plan for cutting out
If printing digital patterns flummoxes you, you can watch my video on printing PDF patterns at home and then assemble sewing patterns with this tutorial.
Marking Pattern Pieces

The final step before the sewing starts when learning how to read sewing patterns is to learn how to mark your pattern pieces.
You can use:
- Tailors chalk
- Carbon paper with tracing wheel
- Washable fabric pen
- Tailors tacks
I usually use the last – tailors tacks – as it is less likely to leave a mark on the fabric, and is a faster method for me to use.
If you’re keen, you can learn how to use a tracing wheel here and you can check out different fabric marking tools here!
The aim is to transfer in all the important information from the sewing pattern. Notches, drill holes, gathered areas.
These markings are all transferred over from the pattern to the fabric before you start sewing.
Sewing Instructions
You made it this far! Congratulations!
You have now learnt how to read sewing patterns and all that is left is to follow the step by step sewing instructions provided by the sewing pattern company.
If they are full and in-depth with illustrations or photographs, you’ll be hard pressed to go wrong.


This is great you should put into book form – very concise thank you so much
Thank you Rita – that is such a compliment! I’ll have to ponder that! 🙂
What an amazing website and easy to follow instructions. I have been dressmaking (making it up as I go along) for years and only recently decided to explore commercial patterns. I am making my way through the different sections and loving your easy way of explaining the mysteries of pattern deciphering! Thank you and I agree with the previous comment – you should write a book!
Very informative the information help me a lot even though i have ,been sewing from paper pattern for many years. Thanks and keep up the good works.
I’m so grateful for your knowledge sharing. I just started and this information is perfect for me. Than you!
What are the holes on typical commercial patterns for?
I am making my granddaughter Her First dress my pattern say Center back on sold but it does not tell me if I should put my material inside out can you please help me with this
Hi Irene! Usually, if told to cut on fold, it would be with the right side of the fabric facing outwards!
Thank you for the info. But, what is this about Dutch being tricky? 😉 Just start by reading children books and you will learn it quickly. Good luck and take care
Ha ha, you know I go to a bookstore uptown every now and again and look at the kids books, but I still haven’t bought one! That said, my Dutch is getting a little better. I can now say more than ‘ik spreek een beetje nederlands’!
Thank you, I learned this at school 70 years ago. I am now laying a peters out for child’s romper suit. I have laid as advised, but, this makes one pice having the grain line not matching the other grain lines of the other pieces of the pattern. I have checked that. It’s not back to front or wrong side up. Can you help me please. Thanks for your post,very clearly put. X
Hi Lesley! The thing with a Peter Pan collar is that it is drafted without a should seam, so the grain will always be ‘off’ if you compare it to either of the bodice pieces. The key is to pick which direction you want the print and work with that grainline. Be aware of any areas on the bias and stretching out – a bit of interfacing will help!
Hi! Eve When pattern piece is face down for cutting, do you face it up for marking circles and notches. Eg. Waistband
Hi Judy! If the pattern piece is symmetrical, then yes, this is exactly what I would do. If it is not, I would trace those markings onto the other side of the paper pattern so that I can then more easily mark them!