If you’re not yet ready to sew a full French seam, you may want to start with this simplified version – a mock French seam!
Just like the original version, a mock French seam has two stitch lines, but there is no trimming away of seam allowances, which can feel quite scary for sewing beginners.
A mock French seam also encloses the seam allowance so that there is less chance of it fraying away.
I’ve also provided a video lesson on sewing a mock French seam – scroll to the bottom for it!


Reasons To Sew A Mock French Seam
Now, many people say that you cannot sew a French seam on a curve. That is rubbish; it’s doable, but it is really fiddly. It requires patience, and for sewing beginners, it is not a recommended sewing technique!
Mock French seams, though, can be sewn more easily on curved seams, so this is one I recommend all sewing beginners practise so that they can get those beautiful clean finishes too!
If a mock French seam sounds like an easy French seam you can get behind, read on! If you have this down and want to learn other seam finishes, I have tutorials on:
- Sewing French seams in sheer fabric
- Curved French seam
- Simple Open seam sewing tutorial
- Welt seam in five steps
- Flat felled seam tutorial
What You Need To Sew A Mock French Seam
You do not need much, friend. Go gather:
- Sewing machine (or hand sewing needles if inclined!)
- Two pieces of fabric
- Thread
- Fabric scissors
- Dressmaker pins
- Tape measure
How To Sew A Mock French Seam
Here’s a quick overview of the steps needed to sew a mock French seam, and you’ll find a photo tutorial further down!
- Place fabric pieces right sides together.
- Pin in place to secure.
- Sew the length of the fabric pieces with your chosen seam allowance.
- Press the seam open.
- Fold the seam allowances inwards so that the raw edges meet at the original seam line.
- Press these fold lines in place.
- Bring the two folded edges together and pin to secure in place.
- Sew the two sections together with an edge-stitch, just inside the fold lines, enclosing all the raw edges inside.
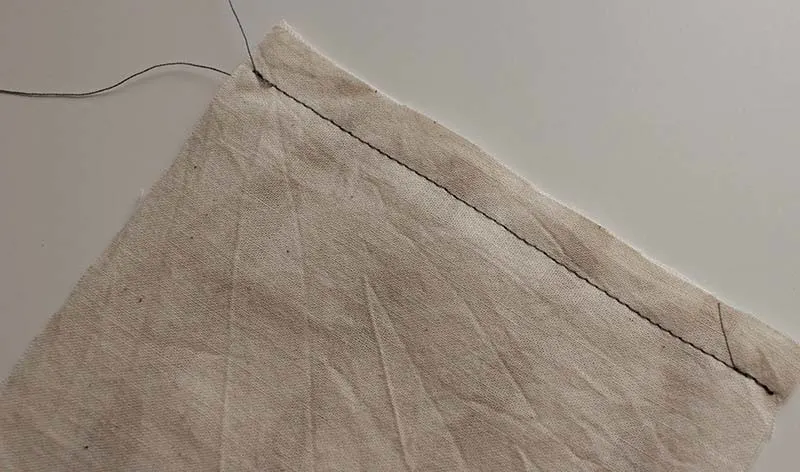
Here’s what it will look like once completed! (Note that the black stitching is UGLY but sewn this way so that you can see what is happening in the photos!)


Ok, ready to try that out yourself? Let’s crack on!
Step 1: Fabric Orientation
Make sure to place the fabric pieces right sides together, as you usually would when sewing an open seam. Below, my right sides are visible as the surface print is only on the right side of my fabric pieces.


Step 2: Securing In Place
Pin to secure fabric pieces together, ready for the first stitchline.


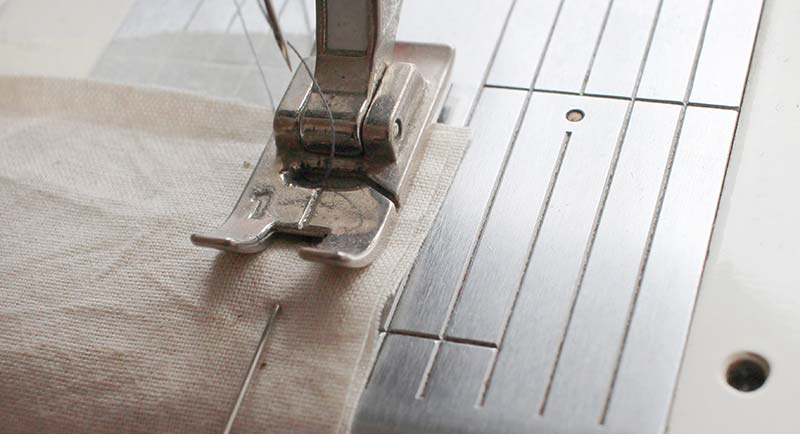
Step 3: The First Stitched Line
I’m sewing my first stitch line with a 10 mm seam allowance. This means my finished seam allowance width will be around 4 mm.


Step 4: Pressing Power
Press the stitches to set them, and then press the seam open.


Step 5: Folding Things Up
Now, carefully bring in the raw edges of the seam allowances so that they meet at the centre of the first stitched line. We are working on the wrong side of the fabric because this is a mock French seam.


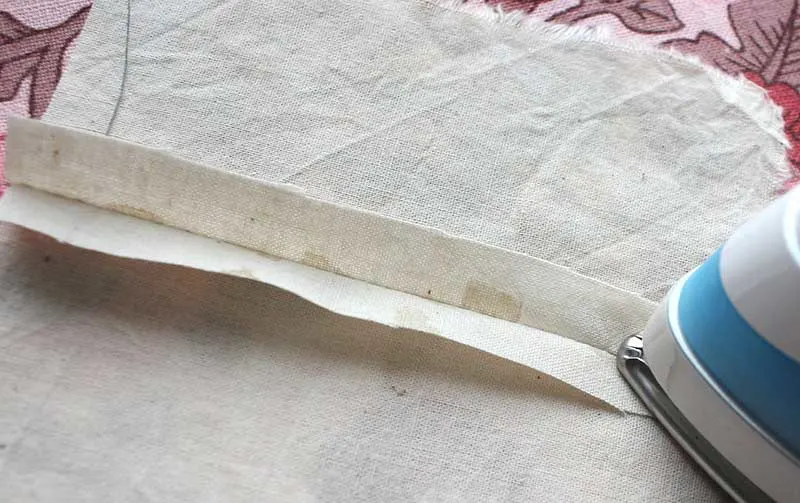
Step 6: More Pressing
Press the newly folded lines so that they have nice and crisp fold lines.


Step 7: Pinned Fold Lines
Bring the edges of the fold lines together. They should lie as flush as possible. Pin to secure so that there is no slipping when sewing.


Step 8: Edge Stitching Your Mock French Seam
Using an edge stitch, sew along the inside edge of the folded lines, nice and slowly, so that the two sides of the original seam allowance are sewn securely together. All the original raw edges should be fully enclosed.


That’s it. Nice and simple, this easy mock French seam will add a nice clean seam finish to your handmade clothes!


How To Sew A Mock French Seam
How did you find it? Do you feel ready to try it on curved seams too or will you be sticking to straight seams for now? Or perhaps you’re ready to try sewing the real French seam?