
5 Step Tutorial Showing How To Sew An Open Seam
I covered an overview of the open seam finish in my guide to the different seam types, but I wanted to expand on that with this quick and easy 5 step sewing tutorial, which is perfect for sewing beginners learning to sew!
I recommend reading through this whole tutorial first, to familiarize yourself with the steps, and then go back through the sewing tutorial with me, sewing as you go.
And if you prefer video, I have an open seam video tutorial at the bottom of this article.

Open Seam vs Plain Seam: What is the Difference?
Both open seam and plain seam are almost the same thing and are often used interchangeably. But, if we’re getting specific about open seams, here’s the difference:
Plain seam: a simple seam that has been stitched and then pushed to one side. It may also have both edges overlocked together.
Open seam: a simple seam that has been stitched and then pressed open, with both edges overlocked separately.
Here’s a photo of a plain seam. Typically, the seam allowance at the bottom is ‘pushed to one side’ for a plain seam…

And here’s a photo of an open seam, where the seam allowances has been ‘opened’…

Now, as many sewing pattern instructions call for seams to be pressed open, this is the term most frequently used.
A plain seam though – one that isn’t pressed open – would be used for sewing anything that doesn’t ask for the seam to be pressed open.
Open Seam Uses
An open seam is used all the time in sewing. The most obvious locations:
- Side seams on skirts
- Side seams on trousers / pants
- Side seam down underarm and side seam of shirt
- Tailoring
Plain Seam Uses
The plain seam, when not pressed open, is used when:
- Attaching facings to waistbands and necklines so that the seam can be ‘under stitched’
- Attaching collars to collar stands or necklines
- Attaching sleeves to armholes
- Attaching cuffs to sleeves
How Does An Open Seam Work?
The great thing about an open seam is that it spreads the seam allowance evenly to either side of the seam-line. This is very important when sewing heavier weight fabrics, as having two ‘pieces’ of seam allowance, as well as the self-fabric all in one area, can cause a lot of bulk.
Here’s a photo of an open seam in light cotton, which helps to minimise bulk. Notice how you cannot see the seam allowance through the fabric? That’s because it isn’t bulky! 🙂

You’ll notice that bulk is what happens if a ‘plain seam’ seam is used and the seam allowances are simply pushed to one side! An open seam limits that bulkiness.
If you are sewing several sections together that have already been sewn with open seams, then further open seams can drastically help further reduce bulk!
Open Seam Supplies List
If you’re planning on sewing open seams, you’ll need the following basics:
- Sewing machine / sewing needle
- Fabric scissors
- Fabric
- Pins
- Thread
- Seam gauge (not essential)
- Iron
- Press cloth
For my recommended list of basic sewing tools, you can review my sewing tools list I created especially for sewing beginners!
5 Steps To An Open Seam
Here’s a quick overview of the five steps needed to sew an open seam, but I’ll go more in-depth below with photos as well!
- Finish the raw edges of your two pieces of fabric.
- Place the right sides of the fabric pieces together.
- Sew a stitch line with chosen seam allowance amount down the length of the fabric pieces.
- Press the seam with a steam iron to ‘set the stitches’.
- Press the seam ‘open’ – one seam allowance to one side, and one seam allowance to the other!
Pretty easy right? Doesn’t sound nearly as scary as sewing beginners think!
If you’re completely new and have never even sewn a line of stitches, go check out this post first on how to sew straight and curved lines with a sewing machine.
Step 1: Finishing Raw Edges For An Open Seam
Your first step is to decide how you want the raw edges of your fabric to be finished. This is the part we read above called ‘Seam Finishing’.

In the example above, I have used a simple zigzag stitch on my sewing machine to limit how much the fabric edges will fray in the future.
In the photo below, you can see that the zigzag stitch has somewhat prevented the fraying of the woven fabric at the points of the zigzags.

The standard zigzag stitch on sewing machines is not the best method for finishing fabric edges, but for sewing beginners who do not have access to an overlocker or serger, or the experience of sewing enclosed seams, the zigzag stitch edge finish is a great starting point!
Step 2: Place Right Sides Of Fabric Together
Now, when it comes to fabric, there’s a right side and a wrong side. Here’s the wrong side of my fabric below, and then further below that, the right side of my fabric.

The wrong side of my fabric in the photo above only just shows the ink from the right side.

And the photo above of the right side of my fabric looks pretty much the same – except for the hand-painted detail!
Determining the front and back of fabric can be very tricky with sight alone. If you’re a sewing beginner, choosing a simple cotton with a print on it will help because you’ll be more able to see the difference.
As you get more experience sewing, you’ll ‘see’ the difference more readily on plain fabrics.
For now, place the two pieces of fabric’s right sides together and pin into place.

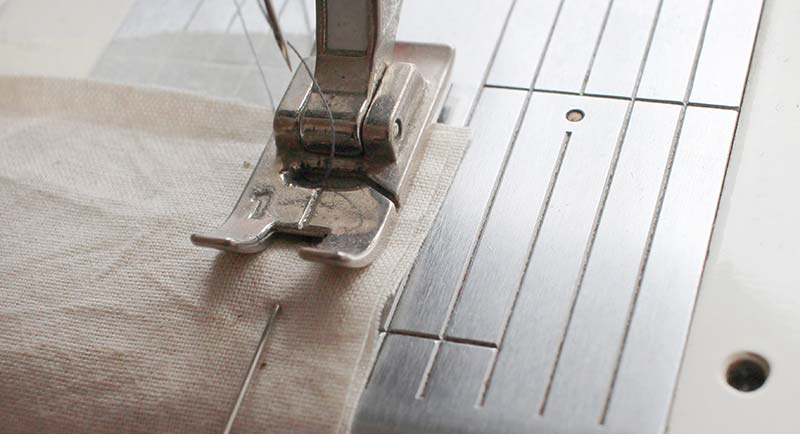
Step 3: Sew Your Stitchline With Chosen Seam Allowance
Now that you have your two pieces of fabric together, place them carefully under the sewing foot on your sewing machine. (If you need some help with sewing machine parts, head to this post to learn about the different parts of a sewing machine!)
You can use a seam gauge to keep the seam allowance equal and sew slowly down the length of fabric. I usually sew with minimal pins and rely on the sewing plate guidelines.
Don’t be worried about whether your sewing is wonky. You can practice sewing in a straight line with this tutorial too!
Step 4: Setting The Stitches
You now want to grab your steam iron and ‘set’ the stitches in place. This is done with a little bit of steam, and depending on your fabric choice, you may need a pressing cloth to prevent damage.
I keep this small travel version nearby for speedy use!

Step 5: Pressing The Seams Open
The final step for sewing an open seam is to press those seam allowances on your new seam ‘open’. To do this, I like to ‘finger press’ the seam open to make sure the seam allowances are where they should be before I bring in the hot iron.

Then I use the tip of the iron to help press the seam allowances open.

Pressing your seams is a really important part of sewing, as it ensures that your sewing looks professional by avoiding ‘bouncy’ seams!
You can see from the two images below that the open seam I sewed was crisp and neat. A great open seam in fact!
Open Seam Video Tutorial
How did you find that? Does the process of sewing and pressing your open seam make sense? Have a go, and let me know how you get on in the comments below!
If you’re ready to try other seam types, the next one I would recommend trying is the welt seam tutorial! But you should also take a look at my beginner friendly online sewing course.
Learn to Sew Online Course
If you’re completely new to sewing, then why not join my online course for sewing beginners Learn to Sew? It is perfect for sewing beginners, and over the length of the course you’ll learn how to use a sewing machine, build confidence sewing a selection of fabrics and become well practiced in sewing seams, hems, and various fastenings too. The course also includes sewing patterns to help you build your skills!


In your post above, you didn’t finish the edges of your seam. In the beginning of the lesson you explained this. But in the finished picture you didn’t do it. Do how would you finished the edges after already sewing the open seam? Would you attempt to sew the edges after the fact somehow? or rip the seam out and start over.
Oooh Coreena! That was sharp spotting! When editing the photos I realised that I didn’t finish the raw edge first before sewing the seam, so added in the photo I had taken! Alas – there was I hoping no-one would notice! 😉 So, the decision would be based on how much seam allowance you have. If you has between 5-7.5mm I would unpick and sew again! If it was greater than 7.5, you can get away with a small width zigzag stitch to finish the edge. However, if you planned to finish the raw edges using an overlocker / serger, I would *always* say to unpick and start again. It’s just too tetchy with that pesky overlocker / serger blade!
What do you do if the seam won’t stay open flat and keeps lifting back up?
Hi Eve Tokens! I am not brave enough to sew clothes yet! For some reason it just scares me! Your tutorial is great and very informative! I will definitely bookmark this for future use!
I am giving away a fat quarter bundle on my blog today! I would love for you to come over and enter! Happy New Year!