How To Sew A Flat Felled Seam {One of the Strongest Seam Types}
I find the flat felled seam to be one of the best to sew if you need a strong enclosed seam. They’re also a great way to add top-stitching detail to a hand sewn garment too.
I’ve also added a video showing the flat felled seam sewing process at the bottom of this tutorial for those who like extra visuals!
Tools For Sewing Flat Felled Seams
To sew a felled seam, you’ll need to gather the following supplies:
- Sewing machine
- Regular presser foot or flat felled foot
- Thread
- Bobbin
- Two pieces of fabric
- Fabric scissors
- Dressmaking pins
- Tape measure
- An iron
How Do You Make A Flat Felled Seam?
There are two ways to sew a flat felled seam and the way each is constructed defines its technical name.
Flat Felled Vs Run And Fell
Want to know quickly what the differences are? The flat felled is always used for outerwear and denim, and the run and fell seam is used on shirts.
If you’ve ever looked very closely at denim wear (that has real and not mock felled seams) and a well made tailored shirt you’ll have notice that both have enclosed seams.
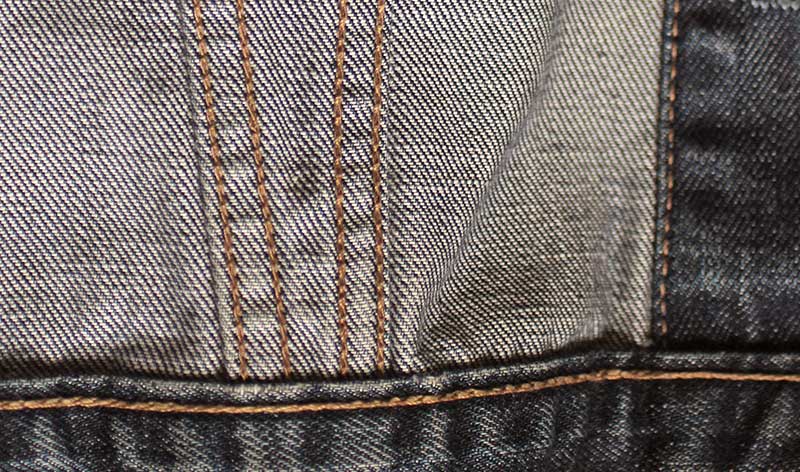
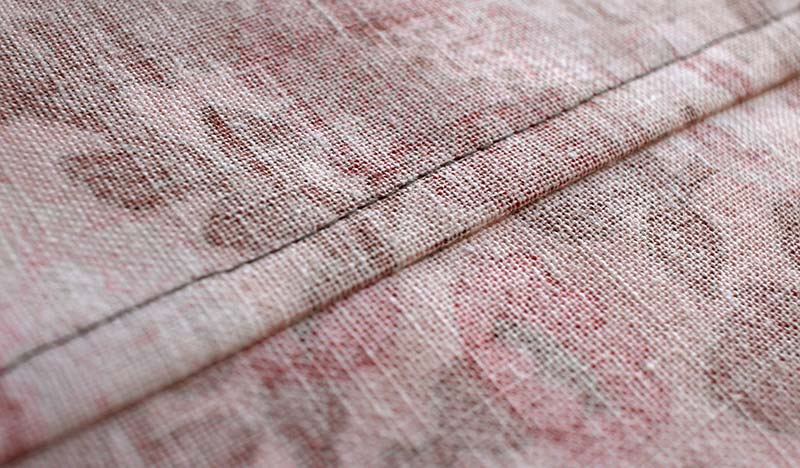
Here’s a photo of a true flat felled seam on my favourite and knackered old Levis jacket.
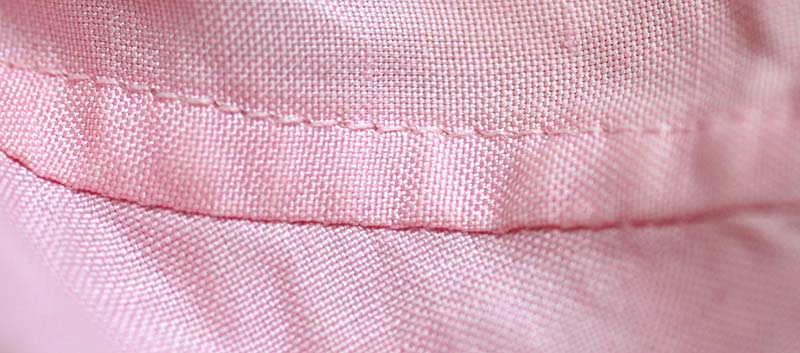
And here’s a photo of the seam on a tailored silk shirt.
Can you see the obvious difference?
The denim seam – aka flat felled seam – has two lines of stitching. This is the version which is sewn with wrong sides together.
The silk shirt version – aka run and fell seam – has only one visible line of stitching, and is sewn as normal with right sides together.
Let’s jump into the flat felled seam tutorial first!
Sewing A Flat Felled Seam
I want to start by saying that in the fashion industry, there is no trimming away of fabric when sewing a flat felled seam. Patterns are always created with the actual seam allowance amounts needed on each side of the seam, and the raw edge is enclosed.
One pattern piece will have a wider seam allowance, and the joining pattern piece will have a narrower seam allowance.
These amounts are marked with notches, and they help the sample machinist to line up the fabric pieces in the correct places.
For ease, and to simplify the process for home sewers, I’m showing you the easier method of using a the same seam allowance on both sides which will result in a trimmed seam allowance.
Sewing A Flat Felled Seam in 7 Quick Steps
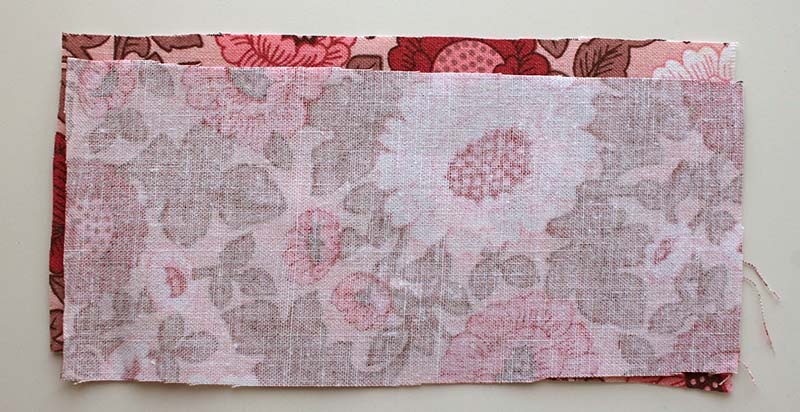
- Take two pieces of cloth, and place them wrong sides together, pinning to secure.
- Place the fabric pieces under the sewing machine foot, and sew with your chosen amount of seam allowance.
- Press the seam with an iron and press cloth if needed.
- Open the seam, and press both seam allowance sections in the same direction.
- Take your fabric scissors and trim the seam allowance that is underneath, to just under half.
- Fold the top seam allowance amount under the bottom seam allowance amount, ‘enclosing’ it to created a folded edge. Make sure the width is consistent. You can press in place and then secure in place with your pins if needed.
- Place the fabric back under the sewing machine foot, and now edge stitch along the folded edge removing the pins as you go.
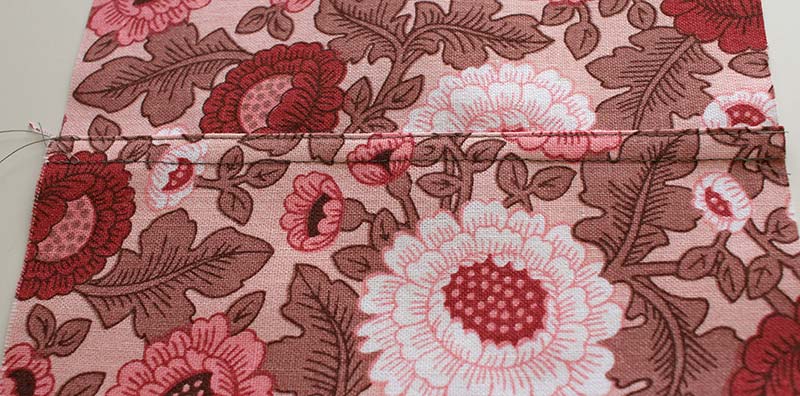
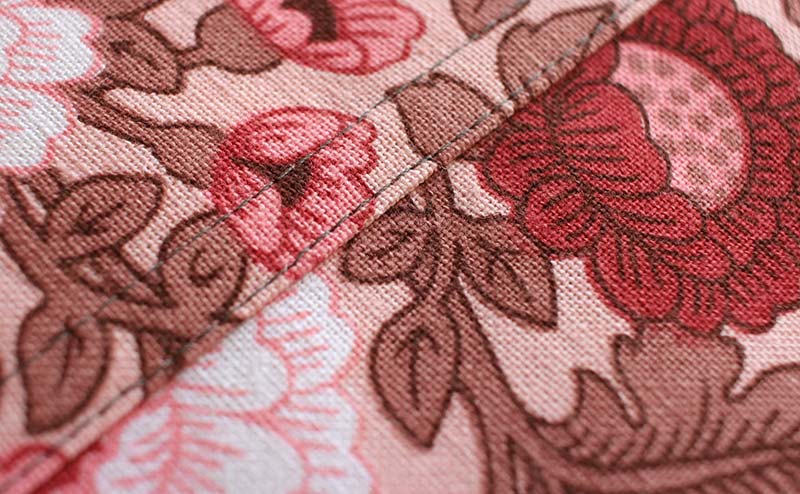
You’ll notice that the seam has two visible lines of stitching on the right side, and only one on the reverse/wrong side. This is a flat felled seam!
Here’s that again in more detail with pictures, so that you can follow along with the sewing tutorial!
Step One: Pin Fabric Wrong Sides Together
Start by pinning the wrong sides of the fabric together. I’m using remnants of vibrant cotton from my lovely sustainable tote bag!

Step Two: Sew The First Seam Line
It’s important to note that the amount you choose for your seam allowance is around double the width that your finished flat felled seam will be.
This is because we will be trimming away some of the seam allowance when completing this seam finishing technique!

You can see from the photo above that my seam allowance is 15 mm, from the needle to the edge of the fabric. Notice it is lined up with a line on my sewing machine? This is to help me sew straight!
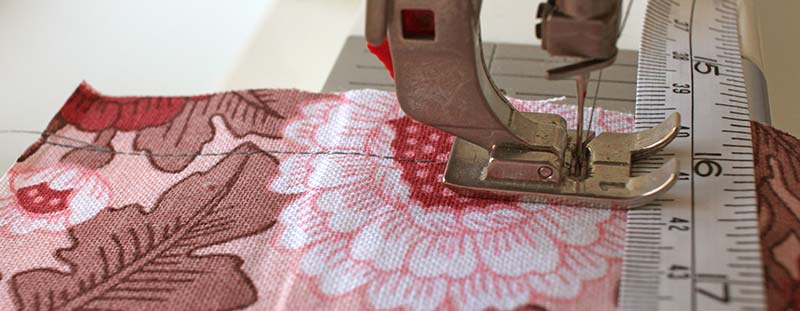
Straight stitch with you usual seam allowance amount, nice and steady.
Step Three: Setting The Stitches
Part of building a good strong seam is to ‘set’ your straight seam stitches in place, and this is done with an iron and a pressing cloth.
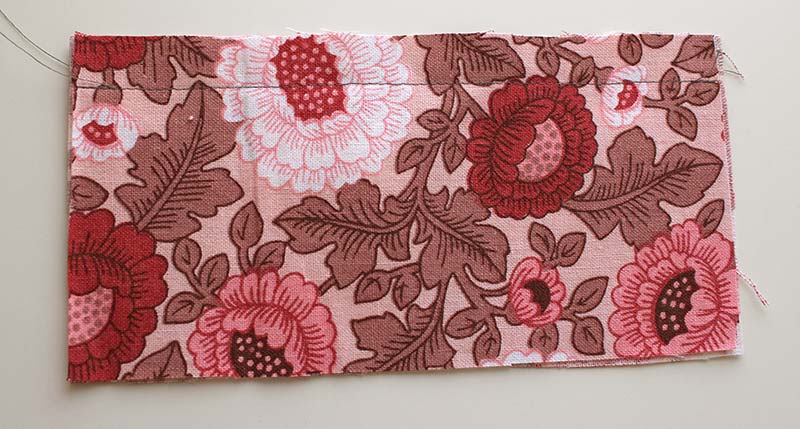
Step Four: Pressing Seam Allowances
As always, it is essential to press your seams if you want a beautiful clean finish. For a flat felled seam, we need to press the untrimmed seam allowance, which is protruding on the right side of the fabric piece.
I start by pressing mine so they’re pointing upright! It makes it a little easier for me to trim afterwards!
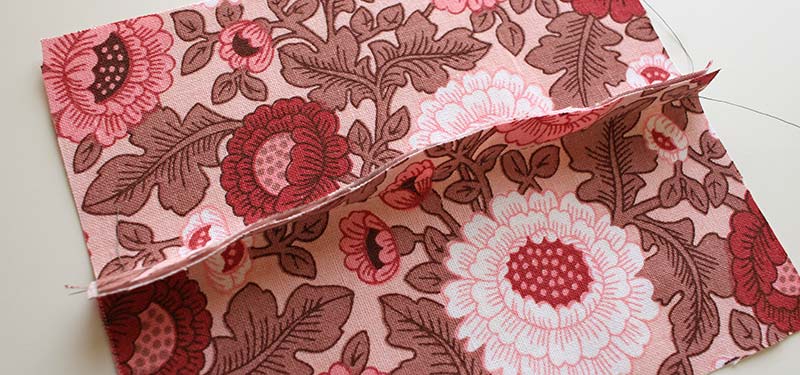
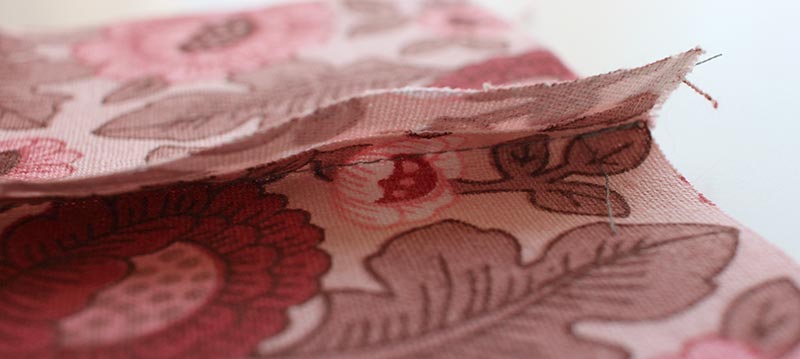
Step Five: Trimming The Uncut Seam Allowance
Now we need to trim away some of the excess fabric on our bottom seam allowance. This is the one that will be sitting on top of the main fabric.
You will want to trim the fabric to just under half the current amount. My seam allowance was 15 mm, I have cut the lower piece to be 7 mm wide, taking off 8 mm.
If my seam allowance had been 25 mm, I would have trimmed off 13 mm, leaving 12 mm behind.
Think about your seam allowance. How much do you need to trim away?
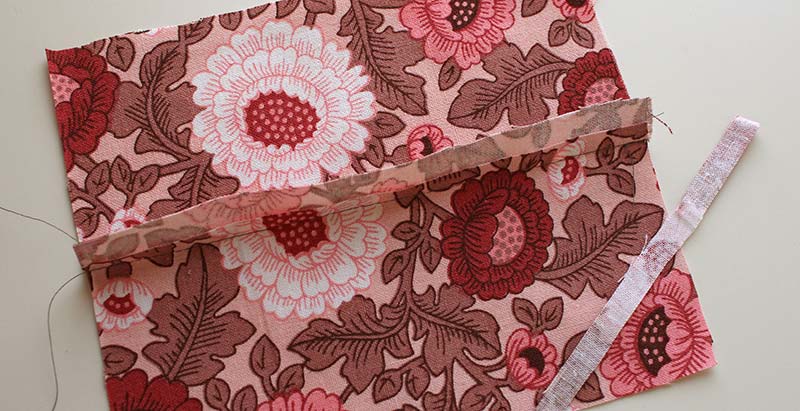
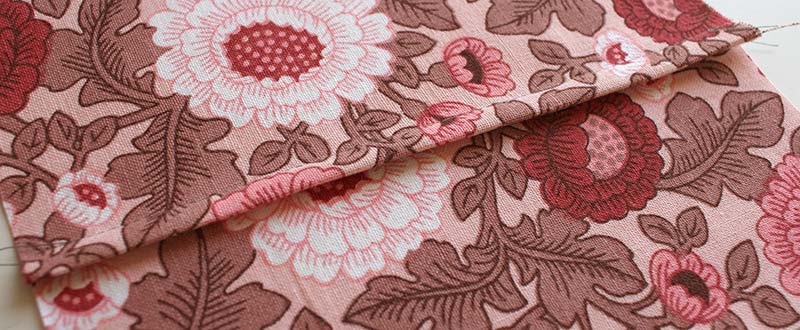
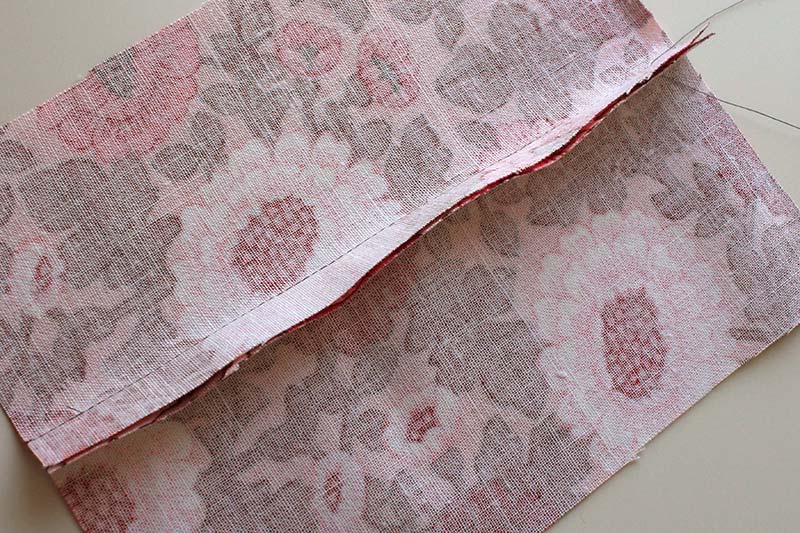
Step Six: The Folded Seam Allowance
Now that you have trimmed away the excess fabric, we can fold the top seam allowance over the smaller seam allowance.
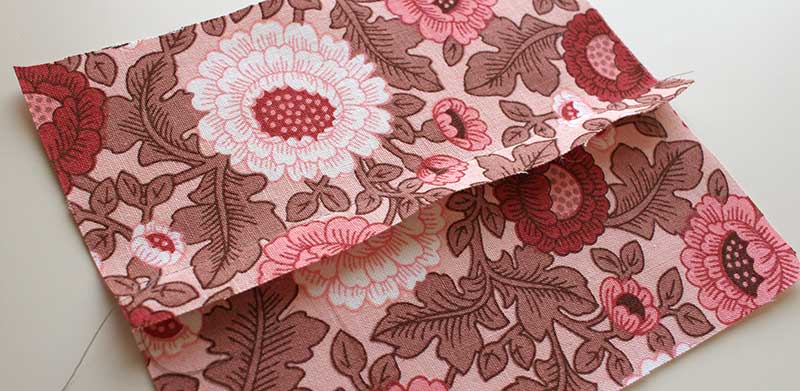
You can press the fold in place and pin, or go straight for the pins as you fold.
Work your way down the length of the seam, folding and pinning as you go to create a flat seam.

If you plan to not use pins, you should use an iron to press the fold.
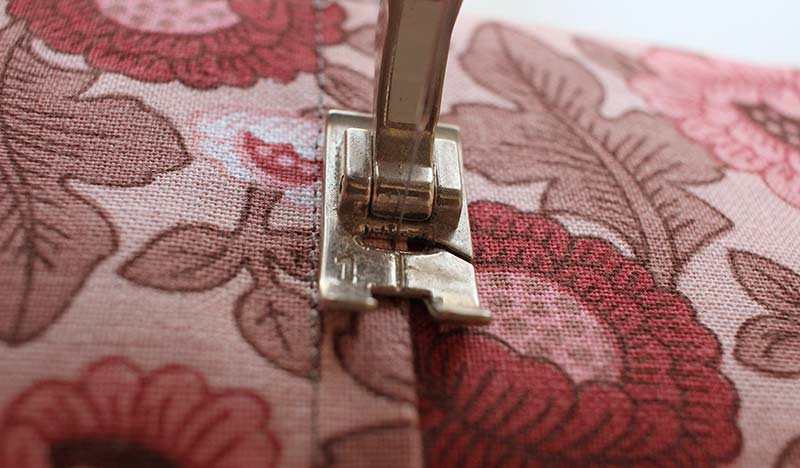
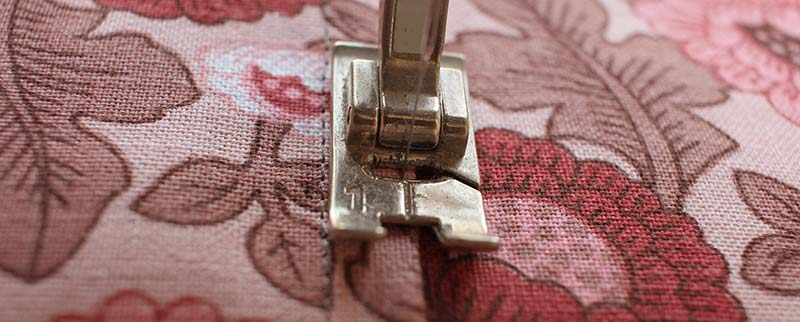
Step Seven: Edge Stitch The Fell
Now you’re ready to sew the second stitch-line! Place the fabric under the presser foot. You’ll perhaps want to align the edge of the fold with the inside edge of your sewing machine foot, and maybe change your needle position too.
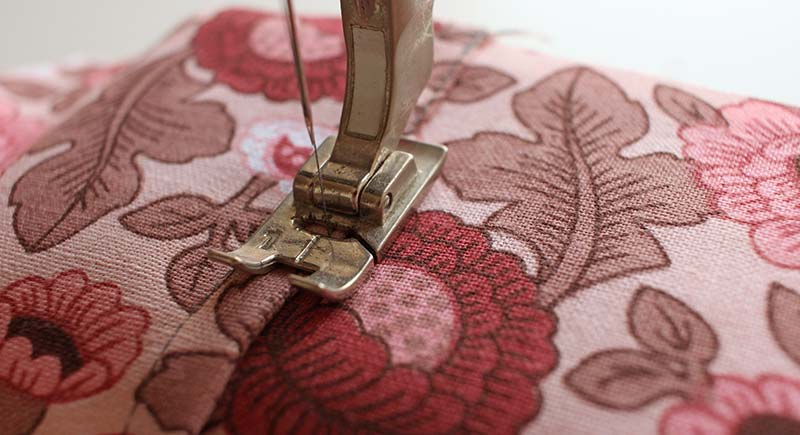
The plan is to sew a line of topstitching nice and straight along the edge of the folded line – an edge stitch. Be sure to remove the pins as you draw near, and sew slow and steady for a neat seam finish.
That’s it. Make sure to press the seam so that it is finished neatly.
Remember, practise makes perfect, so if you’re not happy, grab another piece of fabric and create a new felled seam with your existing spare edge!
How To Sew A Run And Fell Seam
So, as I mentioned further up, a run and fell seam is the version of a flat felled seam that is sewn with the right sides of the fabric together. It is used when sewing tailored shirts.
1. Place your fabric right sides together and secure with pins.
2. Start stitching with your chosen allowance amount. I’m using 15 mm.

3. Press the seam allowances to one side. If you are using a run and fell seam to attach a shirt sleeve to a shirt front and back, first sew the shoulder seam and then make sure that the shirt bodice section is the smaller seam allowance, so that the sleeve allowance is the overlapping seam.
4. Trim the allowance closest to the garment to less than half. If sewing a shirt sleeve to the shirt bodice, you’ll want the shirt bodice allowance to be the allowance that is trimmed down, and you could even use pinking shears to limit the amount of bulk in this seam.
This allows the shirt sleeve allowance to wrap around the shirt bodice, and hides the ‘bulk’ of the seam inside the shirt rather than on the outside of the shirt.

5. Fold the larger allowance amount under the smaller amount, so that it wraps and hides the smaller seam allowance.

6. Secure in place with pins – it is best to do this from the right side, but be careful not to make the fabric! You may need to ‘ease’ the fabric if you are folding a curved seam from a sleeve cap around a not so curved armsyce section.
7. Sew from the right side of the fabric, so that the stitch line is using the spool thread and not the bobbin thread. This stitch line will be visible on the right side of the garment, so we need to sew it as neatly as possible.


8. Finally, give it a good press. As run and fell seams are used on shirts, I would recommend using a tailors ham to press any curved seams so that there is minimal distortion and puckering.


Felling Foot for Sewing Machines
Additional items you may want to use include a felling foot / flat felled foot which is really handy if you’ll be making lots of shirts! I haven’t used one of these myself, because I like having more control by sewing my felled seams manually, but I hear from others that they’re good.
There you have it. How do your felled seams look? Are you happy with them? Do you feel ready to take on a sewing project involving felled seams? Let me know in the comments below how it works out for you!
Video Tutorial: How To Sew A Flat Felled Seam
If you enjoyed learning about the process of sewing a flat felled seam, do check out the other articles I have on different seam finishes, which includes the basic open seam, a French seam, a mock French seam, a welt seam, and a lapped seam!


Thank you so much for this! I’ve looked all over the internet and on sewing sites with little to no luck in learning how to sew seams for my linen and shirting projects.
This was easy to understand and the pictures make it very clear each step of the way.
Thank you so much for the time and effort you have put into producing this!
Ah, thank you so much for your lovely comment Arlene! I really appreciate you taking the time to let me know that you found the tutorial helpful – if there’s anything else you’ve been hunting down and haven’t yet found, please do let me know!
Hi Eve!
I am from Namibia and I recently developed an interest in sewing and coming across your page was heaven sent.
Though I have never sewn in my life, I am hopeful that my interest and strong will to learn will push me to a level where I can generate income from the work I will be doing.
I just wanted to make use of this opportunity to thank you for taking time to produce this tutorial, everything you have covered is exactly what I need as a beginner I will be going through your lessons everyday because I am learning so much and the fact that you are using pictures in your lessons makes it so easy to follow especially when you use words like (Facing,Bodice,gussets, etc) that I am not familiar.
thank you so much for your efforts really what you put together is helping me a lot
Hi Lilly! Thank you so much for taking the time to leave such a lovely comment! I am really happy to hear that you have found the tutorials helpful – I create them to encourage those new to sewing to have a go. So thank you again!
That was a great tutorial! Thank you 🙂
Ah, you’re very welcome Jude, glad you found it helpful!
I found your classes to be very helpful. I can”t wait to start sewing using your techniques
This article, as with all your other posts are so educational and clearly explained and help to build people’s knowledge of sewing. Thank you
Ah, thanks so much Paul! Always nice to see such a positive comment. Have a lovely day!
Thanks Eve, This is a really well produced tutorial and exactly what I (think) needed to make reversible trousers