Are you ready to learn more about your sewing machine? Do you want to know the parts of a sewing machine so that you can feel more confident using yours?
When I first got my hands on a sewing machine, I had no idea what I was looking at. To be fair, I was still quite young as my Ma and my Gran had both taught me to use their machines when I was barely 10.
And to that end, I was never taught what each of the sewing machine parts were – or their functions!
You don’t have to suffer the same fate, though. This picture guide of sewing machine parts and their functions is perfect for sewing beginners, and those sewists who know how the different parts work, but not necessarily what they’re called!
If you don’t have a sewing machine yet, do check out my guide to buying a sewing machine – it’ll help you choose the right machine for your needs!
If your machine has something you’re unfamiliar with, let me know, and we’ll figure it out together!
Finally, I also created a video explaining how a sewing machine works and the tools you’ll need when using one – you can watch that over on my sewing YouTube channel.


Parts Of A Sewing Machine
I’ve broken down what sewing machine part is and provided close-up photos so that you can better understand what the function of each part plays.
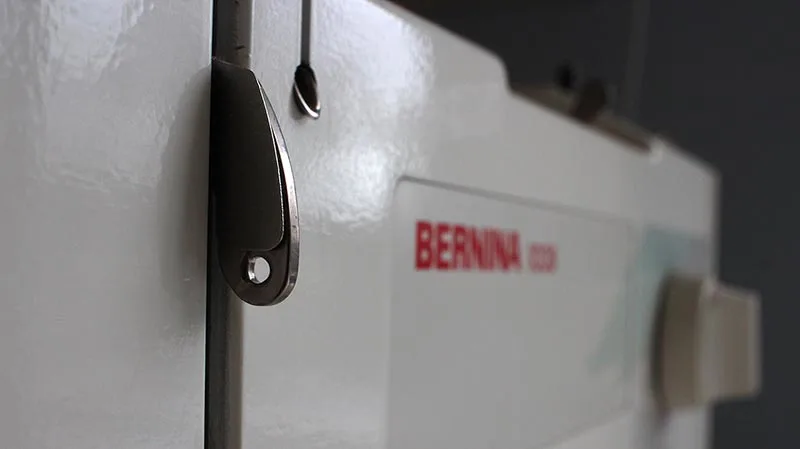
The machine I’m using here is a Bernina 1008, a mechanical type of sewing machine though it is powered by electricity, unlike my old hand cranked Singer 66!


Yours may look the same or similar, so you should be able to work out the parts on your machine from the photos here!
Pssst… I’ve just released an amazing online course for sewing beginners – Master Your Machine! You’ll learn all about using your sewing machine, the stitches, needles presser feet and more! Do check it out!
Power Knob


The power knob (or button on some machines!) is used to turn the sewing machine on and off.
My lovely old Bernina has a dial on the right hand side, below the hand wheel and above where the power cable is inserted. I have the option to have power with or without the light.
Other machines have a simple switch to turn the power on and off.
Spool Holder
The spool holder is where you place your spool of thread; from here you begin threading your sewing machine.
The spool holder works to keep the thread in position. Some spool holders are upright while others are horizontal.
There is often a cap to secure the spool of thread in position.
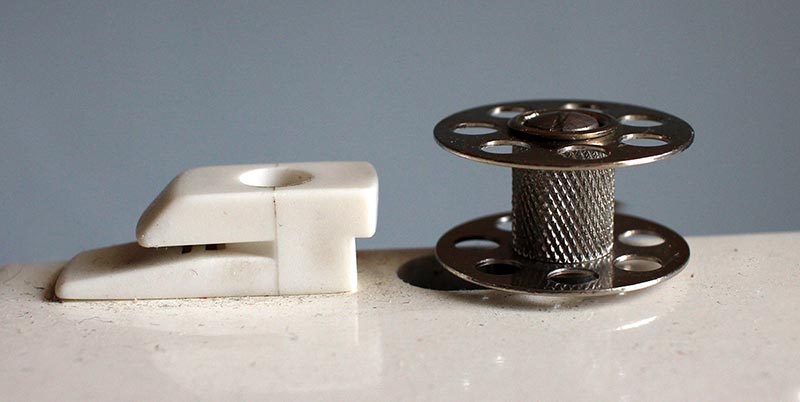
Bobbin Winder


In order to sew on a machine, you need to have a spool of thread and a bobbin filled with thread. This is because stitches on a sewing machine are created by interlocking two threads: one from underneath (the bobbin) and one from above (from the spool).
When you need to load your bobbin with thread, you place the bobbin on the bobbin winder and click it into position. Often you’ll need to adjust the hand wheel too so that it ‘deactivates’ the needle.
Above is what the bobbin winder looks like without a bobbin loaded onto it.
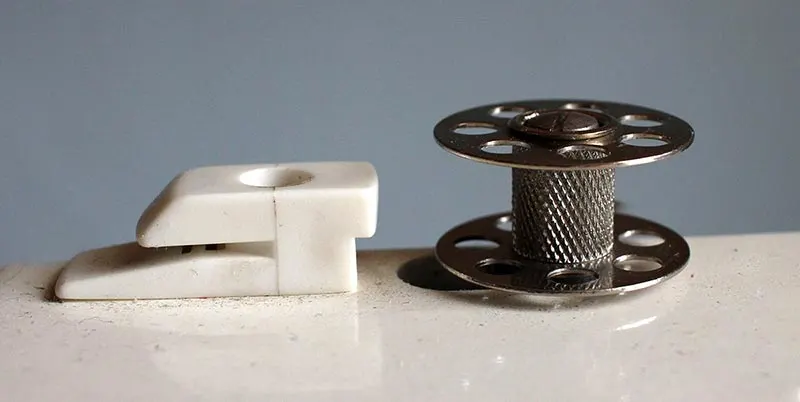
And this is what the bobbin winder looks like with an empty bobbin placed onto the bobbin holder.
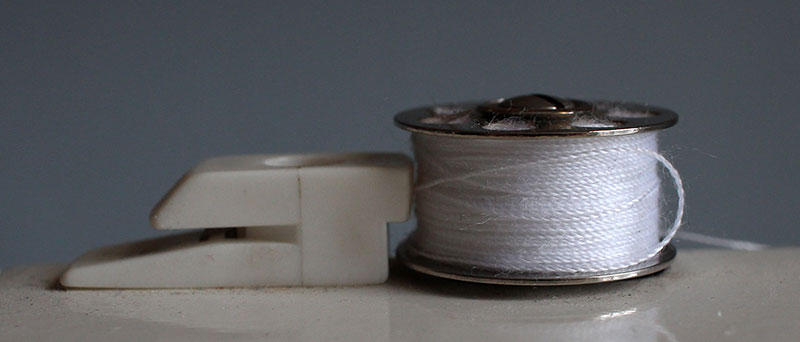
Bobbin Stopper


The bobbin stopper works by ‘stopping’ the bobbin once it is full. It will prevent the bobbin from spinning and loading more thread.
In the photo above you can see an almost-full bobbin in position.
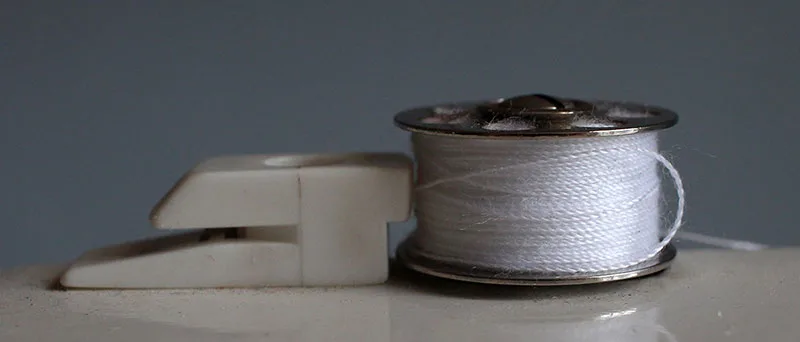
And in this photo below, it is ‘locked’ into position against the bobbin stopper. If I were to continue loading more thread onto the bobbin, it would start to slow, and then stop turning.
Bobbin Winder Thread Guide


In order to maintain good tension while filling the bobbin with thread, we need to use the bobbin thread guide.
This is a little ‘button-like’ guide – at the top left of the photo – and it enables you to wind the thread to retain some tension while winding the bobbin. You do need to wind the thread following the arrow direction to ensure there is some tension.
Hand Wheel


This is connected (ultimately) to the needle. Whether using the foot treadle or turning by hand, it is the hand wheel that moves when the needle does.
Use the hand wheel when starting your sewing project by turning the wheel to lower the needle into the fabric.
Thread Tension Discs


Sewing machine tension is really important, and tension can be increased or decreased via the dial visible in the photos below, but also within the bobbin casing!
If the stitches you are sewing with your sewing machine are too loose or too tight, your tension can be faulty.
Within this section, you will invariably find two metal discs, which work to ‘sandwich’ the thread. You can just see them to the right of the dial.
The dial with numbers is to help you increase or decrease the tension of your thread. Red is ‘normal’ but this can change depending on the type of fabric you are sewing with.
Thread Take-Up Lever


Once your thread has been worked through the tension discs you’ll need to make sure it is taken up by the take-up lever. The take-up lever works by moving the thread from the spool through the machine and through the fabric you are sewing, to create stitches.
You’ll find the take-up lever almost directly above your sewing machine presser foot, as it will ‘pull’ the thread to tighten the newly created stitch as the needle comes back up!
Here’s the take-up lever from the side. Note the hole? This is what you thread your thread through so that it is held in position when sewing.

Thread Guide


There are several thread guides to navigate when threading up your sewing machine.
The first is at the top of the machine, quite close to the spool holder. In the photo above, we’re viewing it from behind so that you can better see the shaping of the metal guide, which helps to lock the thread in position.
Next, there is the thread guide after the thread has gone through the tension discs.


Next up is this almost imperceptible thin piece of metal which helps to keep the thread in position before entering the needle area.


This is the final thread guide, just below the needle clamp, which guides the thread towards the sewing needle.


Sewing Needle


Coming in a variety of types and sizes, you’ll need a needle to make stitches with your sewing machine.
You can learn all about the different types of sewing needles and when to use them inside my new beginner sewing course ‘Master Your Machine‘!
Domestic sewing machine needles have a flat edge – make sure this is inserted correctly into the needle clamp before tightening the screw!
If you find that your broken needle happen a lot with you, do check out this guide on why your sewing machine keeps breaking!
Needle Clamp and Screw


The clamp and the screw help to hold the sewing needle in place. You will need some sort of screwdriver to loosen or tighten the screw adequately.
Presser Foot & Presser Bar


There are different types of presser foot available for different sewing techniques, but the basic function is to hold the fabric against the feed dog so that the needle can form stitches as the fabric is fed through.
This is done with the help of the presser bar – learn more about what a presser bar is and how it works!
It’s also really important that you use the right presser foot for the job – learn about the different types of sewing machine presser feet here!
Needle Plate / Throat Plate


Often marked with lines for use as a seam allowance guide, the needle plate (also known as a throat plate!) is the metal plate surrounding the feed dogs. It is held in place with screws to prevent it from moving, and has various lines acting as a sewing guide.
Feed Dog


This is the moving section made up of two jagged metal pieces that move in a conveyor belt motion, working to pull the fabric from the front of the sewing machine to the back.
Thread Cutter
Not on every machine, this is usually found on the left-hand side of a sewing machine, towards the back, and is used to cut the thread once a section of sewing is completed.
I often find that the thread cutter leaves the thread without a clean finish, so prefer to use my sewing snips instead.
Stitch Width Dial


This dial controls how wide the zigzag stitch will be, as this stitch requires the needle to move from side to side.
Stitch Length Dial


This dial is the one you turn to change the length of your stitch. Sometimes you may need a shorter stitch, and I would turn my stitch length dial to between 1 and 2.5. Or, if I need a longer stitch for basting, I would turn the dial to 5.
Reverse Stitch Lever
For me on my old Bernina, this is the lever function of the stitch length dial in the above photo! When I need to reverse and make a couple of back stitches, I push the stitch length dial up to enable it. Yours may look different or be its own dedicated lever or button.
Stitch Selector


Every sewing machine differs when it comes to stitch selector areas. Mine is made up of two parts. The lower selector, below all other dials, allows me to choose the type of stitch, and a more specific stitch selector up top, which allows me to differentiate between all the stitch styles.
Depending on the kind of machine you have, yours may be manual-selection-based like mine, or a more electronic way to select on computerised sewing machines.
And this section is where I select the style of stitch. All the options!


Don’t be confused by all the different stitch options on your sewing machine! I cover the basic sewing machine stitches in my beginner friendly sewing course ‘Master Your Machine’!
Button Hole Dial


My Bernina makes buttonholes manually, using a dial. The dial gets turned from 1 through 6 at certain points. Your sewing machine may have something similar, or even an automatic buttonhole maker if your machine is less basic than mine!
Ruler / Measuring Guide


Again, this isn’t always on every sewing machine I have used, but it is on my trusty Bernina. There is a very small measuring guide / ruler which is super handy for taking quick measurements when my tape measure is not close.
Bobbin Cover


This hides the bobbin housing, keeping lint and dust out of the mechanical area. There’s usually a little catch of some sort to open the housing and reach the bobbin within.
Some bobbins are top-loading; mine is front-loading.
Bobbin Housing

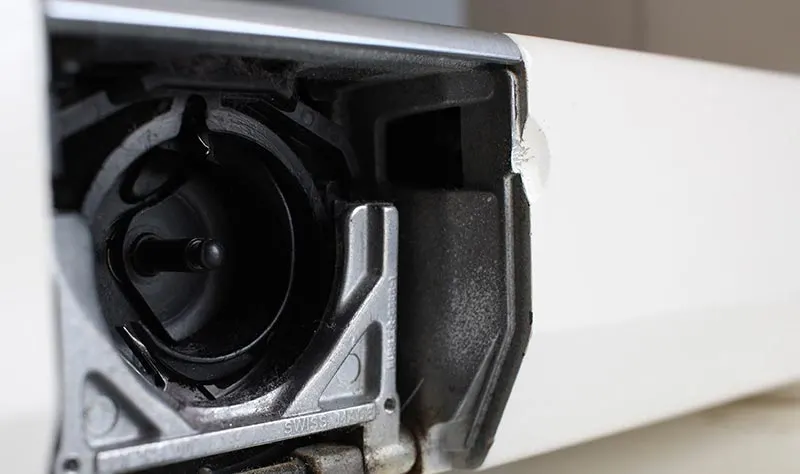
This is where I place my bobbin, which allows the stitches to be created. At the moment, it is empty, so you can see what it looks like before the bobbin is inserted with its case.
You can now see the bobbin (in its case) has been inserted into the bobbin house area.


Here’s a closer look for you!


There you have it. A guide to the different parts of a sewing machine, with photos to help you recognise those parts on your sewing machine of choice!
As noted at the start, if you do want to see how my Bernina 1008 actually works, I have a video on my YouTube channel here that covers sewing machines and more.
Michelle
Thursday 22nd of August 2019
I think i have my needle in wrong. The flat part of the needle does it go to the back to the left or right side or to the front?? Need help in vegas.
Eve Tokens
Friday 23rd of August 2019
Hi Michelle! On a domestic sewing machine, the flat part of the needle goes towards the back leaving the eye of the needle facing you. :) If it's an industrial machine, then the eye of the needle is usually sideways on!
Anne Hawtin
Sunday 11th of August 2019
Thank you, great to think about what each part is for. I feel I take my machine for granted it would lovely if you could do a blog ‘how to look after your machine’, covering basic cleaning and maintenance. Anne
Eve Tokens
Friday 23rd of August 2019
Oh, what a fab post idea! Thanks Anne! I've added it to the list! :)