
How To Sew Leather On A Home Sewing Machine
Today I’m going to teach you how to sew leather on a home sewing machine. This is a great skill to learn if you think you’ll want to sew any leather garments as most will be constructed with a leather that is thinner than leather used for bags and purses, so can easily be sewn on a home sewing machine!
I have quite a stash of leather from back when I had my London studio – yes, I bought it all out to The Netherlands with me! – and am on a mission to use up all the offcuts by sewing them together patchwork style. It’s going to be a slow process, but I’m in for the long haul!
You probably have a few questions about sewing leather at home, so I’ll cover those first, then the tools you’ll need – sewing leather on a machine is different to sewing woven and knitted fabrics! – and then I’ll take you step by step through the process of sewing your leather on a regular sewing machine.
Some of the links in this article are affiliate links. This means that I may receive a fee at no extra cost to you if you purchase a recommended product.

Do I Need An Industrial Sewing Machine To Sew Leather?
No! Especially not if you’re a home sewer just wanting to sew leather occasionally! Any sewing machine that you already is have is the best sewing machine to sew with, but there are three important things to consider:
- You need to use a leather needle with your sewing machine
- You need a machine that offers a variable straight stitch length
- You should consider either a teflon foot, a roller foot or a walking foot all of which will make sewing leather easier
So Can You Sew Leather With A Regular Sewing Machine?
Absolutely! And you can even sew leather on a regular machine without a special foot – in the tutorial below, I’m using a standard sewing machine foot and a leather needle! But, it is advisable to invest in a special non-stick or teflon foot is you end up sewing quite a bit of leather!
Let’s looks at the different presser foot options in a little more detail.
Presser Foot Options
There are three different presser foot options you should consider when sewing thin leather at home – each of these will help make the leather less ‘sticky’.!
Teflon Foot
I prefer to use a teflon foot when sewing leather, as it helps prevent leather stickiness. This happens when the presser foot sticks to the leather.
Roller Foot
The roller foot is a sewing machine foot with mini rolling pins built in – they help the foot to not stick on the leather when you’re sewing.
Walking Foot

This is the sewing machine foot found more often on the leather sewing machines used by leather workers. I love a walking foot. The foot is split in two with each half moving in an alternating, ‘walking’ motion so that the leather has no chance to stick.
I used this type of machine presser foot for some very tricky pieces in my graduate collection and loved how much easier it was to sew them.
I have a more in-depth article on different types of sewing machine presser feet here!
Currently (and for this tutorial) I am using a regular sewing machine presser foot, to highlight that you can sew leather without specialist equipment.
RELATED CONTENT: Different sewing machine presser feet
Leather Sewing Tools
Let’s talk tools next!
Because leather is a non-woven, non-knitted material, it needs to be treated differently to when you’re sewing with different fabric types. Which means there are some changes to the typical list of sewing tools:
- Sewing clips
- Leather glue / leather cement
- Leather needle
- Pieces of leather
- Rotary cutter
- Cutting mat
- Regular sewing machine
- Sewing awl
- Polyester thread
While you may not need all of these items immediately, as you get more experienced with sewing leather, you’ll want to start adding some to your sewing kit. Let’s dig into why you’ll need each of these!
Binder Clips

Leather doesn’t have the natural holes for pins to go through, like knit and woven fabrics do, so if you try to pin two pieces of leather together not only will they damage the skin by leaving holes when removed, but the pins will also constrict the material creating a wave effect.
Instead, it is better to use binder clips to hold the pieces of leather together before sewing. I use these metal ones that I’ve had for about 12 years now, but there are many different types of clips to choose from that will work in the same way.
Leather Needle

A leather sewing needle is different from regular needles – it has a special tip that will cut through the leather without damaging it when forming stitches.
RELATED CONTENT: Sewing machine needle types
Leather Glue / Leather Cement

As leather is less malleable than woven and knitted fabrics, when you have sewn a seam you will likely find that the seam allowance will not lay flat – it kind of ‘bounces’.
To help with this, it is common to glue the seam allowance down. There are many types of leather glue and leather cement available that you can use, but remember that once the lather is glued in place, it is stuck – there’s no room for error!
You can also use fusible webbing to seal the leather seam allowance in place, but you risk scorching the leather with an iron.
Pieces Of Leather
You’ll want some leather pieces cut from your pattern pieces with any seam allowance amount allowed for. You could also use faux leather – which should be sewn the same way as real leather! Avoid thick leather were possible, because that can be much harder to sew on your machine when starting out!
In the tutorial below, I am using Napa, which is a soft lamb leather.
Rotary Cutter
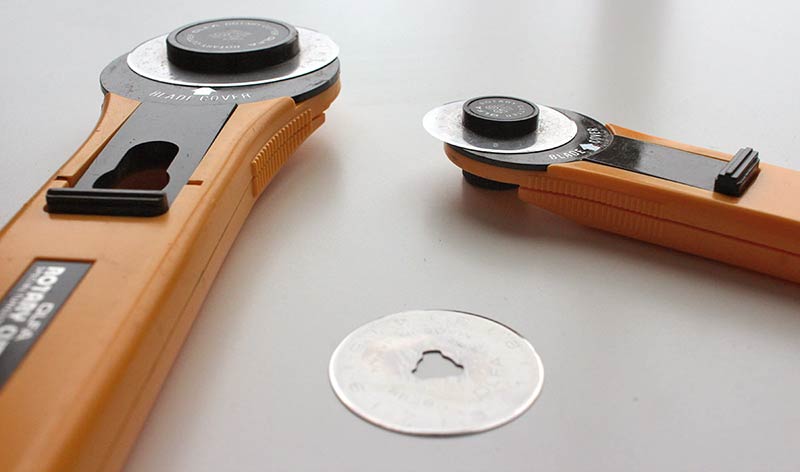
Rotary cutters are perfect for cutting leather. The blades are easily changeable meaning if it blunts quickly, you can simply replace. Much easier than getting scissor blades sharpened!
I have two sizes of rotary cutters:
- A larger 45mm version which I use for cutting straight edges.
- A smaller 25mm version I use for cutting curved edges. It allows far more control.
You can also use a cutting / craft knife with a metal ruler too if rotary cutters are not your thing.
Cutting Mat

When sewing leather based projects, you’ll want to invest in a self healing cutting mat to cut your leather on. For now, if you’re only sewing some test samples, you can use scissors, though I recommend having a pair dedicated to leather cutting and not using your fabric scissors.
I have two cutting mats that I use, depending on the job:
- An A4 sized mat for smaller needs, like cutting the patchwork squares for this tutorial.
- An A2 sized mat for cutting out larger pattern pieces for clothing.
Learn how self healing mats work here – along with the best 3 that I recommend!
Regular Sewing Machine

Despite what you think, you really can sew leather on a home sewing machine! You may find that more basic machines will struggle a little – I have a great round up of the 7 best leather sewing machines here if you’re looking for a home sewing machine that can handle leather easily! – but if you are well prepared, and sew slow and steady, you can do it!
My knackered old Bernina (photo above) is a basic mechanical sewing machine. It’s manually operated (no electronic / computerised options at all!), I have no teflon, walking or roller foot, but I still sew leather just fine on it.
Sewing Awl

A sewing awl is a great tool when working with leather. We use it to pierce holes when hand sewing leather, but also when marking key points like button placement and dart points.
Thread

Ideally you will avoid cotton thread when machine sewing leather. This is because the natural tannins in leather will gradually destroy this natural thread. Instead, use polyester thread or nylon thread for better results.
A regular weight thread is fine or you can use a topstitching thread. If you opt for a regular weight thread, you can also double it up to get that topstitch look to your stitches. Be aware that with topstitching thread, you may need to go for a bigger leather needle size to accommodate the extra ‘width’ of the thread.
A final note with thread is to use a longer stitch length than you would normally use for woven or knit fabrics.
Seams For Sewing Leather
You also need to think about the construction process. Machine sewing leather is different to hand sewing leather. Instead of sewing with a saddle stitch which uses two needles, two lines of thread and the one hole, our sewing machine will be sewing with a lock stitch – one needle, an upper thread, bobbin thread and one hole.
This gives us a few more options for seams with leather! The three that I would recommend using are:
1. Open Seam
A regular open seam is sewn and then pressed open. You can use binder clips to sew this seam! This is the method I’ll be showing in the sewing tutorial further down.
2. Lapped Seam
With a lapped seam, a second leather piece is laid over the first side of the leather to ‘overlap’ and then stitched down. This is trickier and binder clips aren’t an option, so leather glue or cement is often used instead.
I have this tutorial on sewing lapped seams using suede.
3. Welt Seam
A welt seam is a plain seam with a normal stitch, but the seam allowance amounts are pushed to one side and stitched down. Binder clips can be used to help hold the leather in position for just the first seam.
Note that the lapped seam is preferable to the welt seam, especially if working with thicker leather as the lapped seam equals two layers of leather and the welt seam will have three, making it 50% more bulky which can lead to broken needles, skipped stitches and damaged leather in the sewing process.
Use this welt seam tutorial if you’ve never sewn a welt seam before.
How To Sew Leather On A Sewing Machine
Right, we’re now ready to get started sewing leather on your home sewing machine!
Any kind of needle you use will leave a permanent hole in your leather material, so you need to first of all test a line of stitching to make sure that the tension is correct, the stitch length is good and that both can handle the different layers of leather you plan to sew.
So, take a piece of leather that you plan to sew with, and double it up so that it is two layers as you would normally sew, then sew a line of stitches and review. If all ok, progress!
Step 1: Clipping The Leather Sections Together

I’ve already mentioned that you cannot use pins with leather. So grab your binder clips, line up your leather pieces and clip them together.
Step 2: Placing The Leather Under The Presser Foot

I like to have one clip on the straight edge that I am not sewing, to stop the leather pieces from slipping apart. Then. I place the leather under the presser foot.
Make sure that both the upper and bobbin thread are visible and in reach, line up the edge of the fabric with your ideal seam allowance amount (I’m using 1cm) and then lower the presser foot to hold in place.
Note that I have the needle aligned as close to the back edge of the leather as possible, as I won’t be back stitching.
Step 3: Hold Both Threads To Start Sewing The Leather

Grab the threads – I’m using two colours so that you can more easily see what I’m doing – and hold them securely. Start sewing slowly, forwards only, while holding the threads. This will help prevent the leather from being eaten up by the feed dogs which is always a risk when starting so close to the edge.

You can see on the photos above and below that I have not backstitched at all. Notice also that on the lower photo of the pink leather piece, you can just make out two lines of scuffed leather, one either side of the stitch line.
This is ‘damage’ caused from the feed dogs, which are have zigzagged teeth. This is why many people will opt for teflon feed dogs when sewing lots of leather. If the right side of the leather will not touch the feed dogs, then you’re fine.

Step 4: Glueing The Seam Allowance Down

I actually forgot to photograph this process, so do pop further down to step 5 as I have included it there when. I sewed further pieces together!
You’ll want to use your chosen glue, and a hard surface – I’m using the flat end of an old fork, but you could use anything that is impermeable so that the glue can be spread.

Step 5: Sewing Further Seams

Once you have one seam, you may find that you need to join other leather pieces with seams together. Start by sewing the seam together as below.
NB. If you are patch working leather together, line up the join, and sew from just over that first seam to the edge and then repeat to the second edge. This helps to lessen the stretching of the leather which will result in your join not meeting beautifully – as seen in this example!

As before, sew your pieces together and turn so that right side is down.

Use your finger to finger press along the seam line, so that the seam allowance starts to flatten down. You could also use a small hammer, but be harmful not to hammer to hard as you risk damaging this softer leather.

Grab the glue and the hard surface / applicator and add a thin layer along one of the seam allowances.

Using your fingers, smooth the seam allowance from the seam line out, so that there are no wrinkles and crinkles. This works well on straight edges, but if you have sewn a curved seam in leather, you’ll want to clip or notch it before glueing.

Repeat for the second seam allowance. Try to avoid pools of glue as seen in the above photo – instead it should be evenly and thinly spread.

Press the second seam allowance down. Notice how my pools of glue have seeped outside of the seam allowance area. This is why a thinner amount is necessary!

Finally, the photo above highlights why it is important to sew from the centre out to each edge. The green leather is a tad thinner than the other three colours and stretched slightly, so now I have a join that doesn’t join. Below are the photos of the correct way to sew this seam!
Sewing Joining Leather Seams Correctly
I didn’t want to leave it with that ‘wrong’ join, so I continued sewing, so that I could show you the correct way to sew joined leather pieces together.
Start by placing the new section next to the first section so that it aligns at the seam.

Place a clip at this centre point so that the join is lined up.

Start sewing from just before the centre point so that you end up sewing over the original same twice in total. You can see that my orange thread starts on the black leather piece and then I sewed out to the edge of the taupe leather piece.

Now remove the leather from the machine, turn it over, place back under the presser foot as shown below, and start sewing from the centre to the opposite edge.

This is what the ‘wrong sides’ of the leather looks like when sewn this way. (I used orange thread on the upper and white thread on the bobbin so that the difference is clear.)


And finally, the ‘right side’ of the leather is much neater for this seam than the first!

Final Thoughts On Sewing Leather On A Home Sewing Machine
As you can see it is completely possible to sew leather at home on your domestic sewing machine. No industrial machine needed.
You do have to be consistent and careful when sewing for best results though. I’m going to continue patching all my leather scraps together and will be making a DIY patchwork leather jacket from them. I’ll be sure to add a photo here when complete!
In the meantime, some projects that you can use your leather scraps on are my little wallet pattern (Free), a DIY easy tote bag would also look awesome in leather or you could create your own patchwork leather quilt using these fat quarter dimensions to get you started!
Let me know in the comments below whether you’ll be trying any sewing of leather with your home sewing machine!


What is the number of the needle I need to sew leather. Thank you!
Hi Flo! It really depends on how thick the leather is that you want to sew. For a thinner goat skin or lamb napa I would use an 80, for a cow or pig skin, I’ve used 90-110 before. Its the same as sewing woven and knit fabrics, make sure the needle is suited the the thickness of the leather, but also can handle the thread you’ll be using!