
Perfect Lapped Seam Sewing Tutorial
Sewing a lapped seam is a no brainer when dealing with bulky or non-grain fabrics. The problem is, a perfect lapped seam is hard to achieve.
This sewing tutorial will help you achieve a beautiful and perfect lapped seam finish on leather, suede, fleece to any other non-grain or non-fray fabric.
If you prefer watching, scroll to the bottom for the video lesson on sewing lapped seams!

What Is A Lapped Seam?
A lapped seam is the seam created when one piece of fabric is laid upon another piece of fabric with an overlap. The fabrics are both right sides up, and by overlapping the fabric, you end up with two layers of fabric instead of up to four when using other types of seams.
We all know that the flat-felled or French seams are great for a perfect seam finishes that hide the seam allowances away, but the lapped seam is the best when going for a clean flat finish with non-fray fabrics.

Lapped Seam Uses
Knowing when to use a lapped seam over any other type of seam kind of comes down to experience if you’re not following a sewing pattern guide.
You can use a lapped seam:
- To reduce bulk
- As a design feature
What You’ll Need
If you plan to sew a lapped seam on leather, suede to other ‘sticky’ materials, then you’ll want to use:
- Leather needle
- Leather foot (can be a roller foot, a teflon / plastic foot or a walking foot)
- Suitable thread
Using the above items will make for a cleaner finish on your lapped leather seams.
How To Sew A Lapped Seam
Sewing a lapped seam in theory is easy, but as they say, the devil is in the detail. (Is that what they say?)
Here are the basic steps for sewing a lapped seam, then we’ll jump into the photo tutorial part!
- Place your first piece of fabric on a flat surface, with a cutting guide or tape measure nearby.
- I line up the raw edge of my one fabric piece with the straight line on my cutting matt.
- Take the second piece of fabric and lay this upon the first, overlapping by your chosen seam allowance.
- Secure the lapped seam with your first row of stitches.
- Edge stitch your second row of stitching along the un-sewn raw edge.
Typically, the lapped seam has been sewn with fabrics that are not most suitable for heat from an iron, so I always endeavour to finger press seams.
Sewing A Lapped Seam
Alrighty, lets sew this seam! First thing to note is seam allowance. There are two ways to factor seam allowance:
- Full amount on one side, and no seam allowance on the opposite.
- half the seam allowance on each side, so when overlapped, it becomes the whole amount.
Materials
First, start by gathering your fabric / materials. I’m using a remnant of suede from my remnants stash for this tutorial.

I’ve cut it into two, so that the pieces can be lapped. Here’s the two sections. Rotary cutters are best for non-grain materials in my experience!

Lining Up The Lap
Next, place the one piece on your chosen flat surface right side up – I’m using my cutting matt as mentioned before. Notice how the straight edge of my material lines up with one of the bolder lines on my cutting matt?

Overlapping The Lap
Next, we’re going to place the second piece on top of the first, again right side up, so that it overlaps by our desired seam allowance.

Notice how it is perfectly aligned with the thinned straight line of the cutting matt?
Sewing The First Stitch-line
As I’m using a suede remnant in this tutorial, I can’t use pins to hold the sections in place as the pins would leave a mark.
If you were sewing lapped seams on a leather, suede or other non-grain material, you could lay a little leather glue or cement to join the two sections first before sewing. It will help the lapped seam to be in position!

When sewing the first stitch line of your lapped seam, make sure to edge stitch carefully to maintain a neat and perfect finish. This type of seam is visible on both sides remember!

When you turn to look at the back you’ll notice that my piece has visible marking from the feed dog. This means I cannot turn the piece over and must stitch the second line from the right side too!

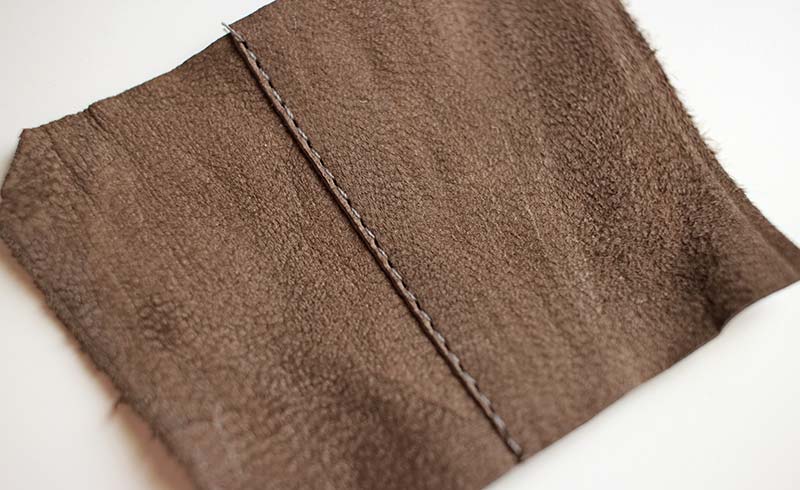
That perfect line of stitching! Woop woop!
Sewing The Second Line
Now, we sew the final line. As we cannot sew from the wrong side without scraping at the right side with the feed dog we need to be careful and make sure we know *what* we are using as our sewing guideline.

This is the reverse of the seam. I’m going to use the ‘bump’ created on the right side by the overlap and use my left hand to feel it’s position as I sew from the right side, making sure to not go over that ridge, so that my second seam is in fact catching the two pieces of material.
Another way way would be to buy a teflon feed dog, designed specifically for working with such fabrics, though I found when using mine on my Brother that it still dragged on the material. Better to just sew from the right side.

Isn’t that just a perfect lapped seam? You can also use the edge of your sewing machine foot as a guide, and pop your needle to the right instead of centre, so achieve a perfect and non-wonky stitch-line.

You can see better in this photo just what the marking looks like when the feed dogs drag over the suede.

Lapped Seam Video Lesson
Below is a super short video lesson on how to sew the lapped seam.
There you have it. Will you try a lapped seam on any of your planned sewing projects? Let me know how you find sewing it in the comments below!


Beautifully done, you clever lady. Can you please tell me if it matters whether the lap on both side seams go in the same direction, or should they be different?
Also, I’d love to see how it works on linen and having to fold under the edge. I suppose I could serge the raw edge first. What do you think?
Thank you very much Creative Curator, your instructions were perfect for me, and your explanations are helpful so I can remember and may not even have to review this before I do it. I had purchased a sewing magazine that had this awsome jacket, made from a blanket or material that did not fray. I just loved it, and it was explained well until the author said to do a lapped seam, and I did not know how to do that, I’m a beginner with only a few patterned items under my belt, some having a bit to be desired, but I actually am seeing improvement with more understanding. I Really appreciate your excellent tutorial and explanations for the lapped seam. It is very kind of you to offer this online,THANK YOU THANK YOU THANK YOU, do you have any books on the market for sewing, because I would be VERY interested??!!? You explain very well.
how do you handle the front facing and collar insertion using lapped seams?
Thanks
Hi Pat. This would depend on which collar you plan to insert! Let me know and I’ll offer more guidance! Eve