
A Pockets Series For Those Who Sew Their Own Clothes!
This post is the first in a series all about pockets. Whether you love pockets for their ability to hide your hands and protect them from the cold winter months, or you just like to add to your hand sewn clothes with a dramatic or funky pattern, this series of posts all about pockets will inspire and excite you!

Pockets As Design Features
When it comes to adding design features to our garments, the easiest and most functional option is to sew on a pair of pockets!
How many garment types in your wardrobe that you wear regularly, have pockets?
- Jeans
- Trousers
- Skirts
- Dresses
- Tee’s (though I guess the itty bitty patch things don’t really count?)
- Shirts
- Sweaters
- Jackets
And if you take a close look, you’ll notice that the pocket type is one of the following three:
- Patch
- In-seam
- Inset pockets
Within the three types of pockets are a range of styles, which include:
- Slashed
- Accordion
- Welt
- Jet
So really, pockets can be hidden in seams or inside garments or used as a design detail on the outside. It’s entirely up to you!
We’ll have a quick overview here of the pockets mentioned above, but there are also more specific posts that you can read now, which will further your knowledge of pockets in clothing!
For now though, we’ll continue with this pockets overview!
Patch Pockets
As simple as the name suggests, patch pockets are pockets constructed by placing patches of fabric on top of the main fabric. This could be on the outside, with or without a flap, or inside using lining fabric.

They appear on EVERYTHING.. Things that you wear on your top half, things you wear on your bottom half. They can be pockets on your boobs, pockets on your bum, pockets on your hips and even a big pocket on your tum.
You can line them. Add a flap to cover them. You can shape them or decorate them. There are so many things you can do to a patch pocket.

Most importantly of all.. Practice them! A patch pocket is visible to the world and nothing will make your garment look more homemade than a pocket done wrong.

Pocket placement is of course key, being that it is highly visible on your garment. The placement should be very carefully marked out on your garment sections before even attempting to sew the pocket on.
And be sure to use tailors tacks, not chalk or pen. Why? Because you will of course be sewing the patches on to the right side of the fabric.
If you have a pair of pockets, you should do them at the same time to ensure they will be symmetrical! And of course, all this is happening before the flat sections of your garment are sew together into their 3D form.
Always make a pocket template out of card. You can then use this to cut out your pockets in your chosen fabric. Or you can use it as a pressing guide, so that your pockets match perfectly. You can use it to mark your pocket placement on the garment too!
I’ve included three templates for you to download and get crackin’… Click the link to grab yours!
I have this tutorial for you if you have no idea how to sew a patch pocket!
Unlined patch pockets
This is the easiest form of patch pocket, in its most basic shape – the square / rectangle.

This pocket won’t have a lining but will have a grown on facing. (We covered facings last week, check out the post to review that information).
To construct the pocket, we press down the facing amount for a nice sharp fold line. I use a little fusing tape on my fold line to help keep it crisp.
We also press the seam allowance under for clean edges on the remaining three sides.
Then, place the pockets on top of the tailor tacks, making sure the pocket is straight.
You should be working on the opposite side of the garment too if the design requires it, it’ll be easier to see if a pocket is skew this way!
I would suggest hand tacking the pockets into position once you have them in their perfect spot, and then sewing them with you machine, securing the facing too within you start and end stitches.

Lined Patch Pockets
Slightly trickier than the unlined patch pocket, this version makes your hands feel nice when they’re bundled in your pockets!

If your pocket is just the patch and no facing, your lining piece will be the same size as your posket patch itself.
If your pocket does have a folded back facing, you need to take this amount off of the lining pattern. When the two pieces are sewn together along the seam line, they should be equal size with the pocket patch!
Pattern Matched Pockets
When adding patch pockets to garments, you should also consider the fabric choice.

Is it a stripes kinda weave, like a tartan? Maybe it’s a print and there are snazzy flowers all over? When cutting out your pockets, bear in mind that the patches will be covering up sections of these patterns.
It would then be an idea to use the cardboard template and use it as a guide on booth the garment piece and the extra fabric, so that we know the patterns will match up.
Here’s another example of what I mean..

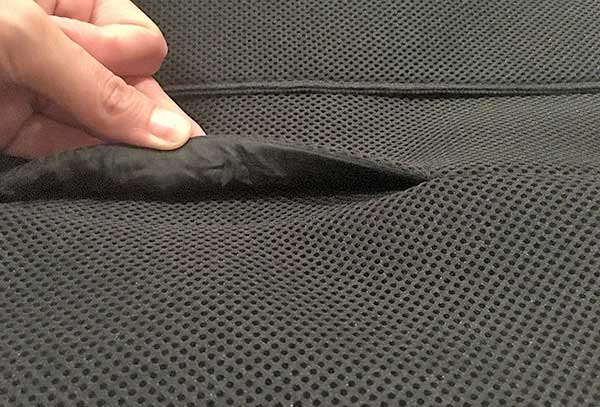
In Seam Pocket
We’ve all use one of these before. In our trousers, our jackets and our skirts.
Side seam packets can be grown on as part of the main fabric piece or added separately. I prefer separately as it means less fabric wastage.

These in seam pockets kinda blend into the seam, so you don’t necessarily realise they’re there.


There are five types of side seam pockets:
- The basic side seam pocket is made of two pieces of fabric which when sewn together form a basic pocket bag.
- The Faced Side Seam Pocket is the same as the basic side seam pocket, but has a facing which would usually match the garment fabric. It is also cut separately, just like the basic.
- Side seam pocket with extensions is much like the basic side seam pocket, but the garment has an extension with attaches to the pocket bag pieces, so that the pocket appears to have a facing as well.
- Grown On Pocket is ‘grown’ on to the garment, much like the front edge facing from last week’s Facings post. This is my least favourite pocket as there is a lot of waste when cutting like this.
- Side seam pocket with a waist extension is the same as a basic pocket except the pocket is drafted taller, so that it gets caught into the waistband of the garment when sewn. It is often found on garments such as skirts and trousers that utilise a waistband rather than a facing.
HEADSUP: Remember that pockets are rarely visible to the world, apart from the facing sections. You could really have fun and use an obscure or unusual fabric that only you know about, or keep it very safe and use a plain coloured fabric, or matching garment fabric. The choice is yours.
Also remember that the edge of your pocket bag will be liable to fraying, so consideration should be given to how it will be constructed and finished. I sometimes bind my pocket edges to keep them nice and smart, but has also been known to create them with a french seam so that there is also no visible fraying.
Slashed pocket
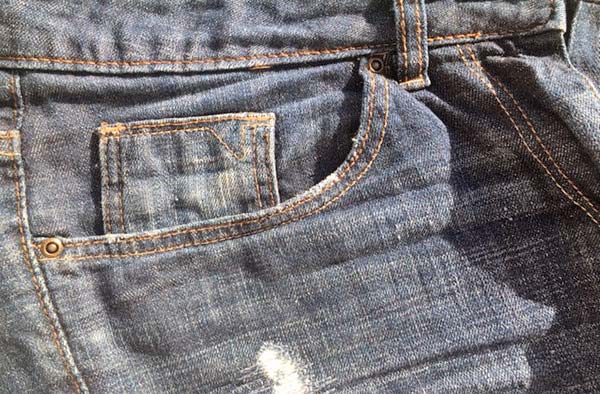
The slash pocket is also known as a slant pocket or a jeans pocket if curved. Take a look at your jeans and you’ll notice that this pocket it trickier to construct. The trouser leg have a section missing, which is where the pocket facing is seen.
The facing is attached to a pocket bag, which is again attached to the trouser leg and retain stitched. The pocket bag is then caught in the side seam, the facing caught in the waistband, and hey presto, a slashed pocket is complete.
Don’t forget to read my previous post on facings, which will give you an idea on how to construct facings for your pockets!

HEADSUP: When sewing a slashed pocket, you will need to reinforce the pocket edge to reduce stretching. The first pocket I attempted of this sort was made from a silver foil leather as part of my graduate collection. The slashed part stretched and that one pocket still looks gapey and rubbish to this day.
It’s easy to reinforce a pocket. you just use a strip of fusing tape (i got for the 1 cm wide kind!) and apply it along what will be the stitch line. When you come to sew your pocket facing on, no stretching! Woop!
Inset Pockets

Inset pockets are known as welt pockets (a single rectangle welt) or jet pockets, which have one or two ‘lips’ and look like an enlarged bound button hole.
The jet pocket can also have a flap, They are worked on the garment, right side up, while the sections are flat. They is a lot of hand basting involved, but this type of pocket really is worth all the extra effort.


Once the hand work is complete, you need to create your pocket back from the two pocket bag sections.
Inset pockets are great for adding a closure method. Jet pockets in particular can have a botton loop attached, with a button, or even have a zipper inserted and concealed by the lips.

Okay. Thats three different types of pocket for you to think about incorporating into your designs. Have you sewn any of these? How did they come out? What is the pocket you most dread? Let me know in the comments below!


I’m thinking about designing/sewing a trumpet skirt, knee length, but I want pockets. I need pockets in my clothing and when I sew there have to be pockets.
But is there actually a way to get pockets into a high-waisted trumpet skirt? I don’t really like patch pockets as a challenge.
Thanks in advance.
Hi Lotta! The problem I see is that a trumpet skirt would fit very close to the form, from the high waist through the hips and thighs before flaring out, which doesn’t leave much room for poeckts.
Theoretically, if the skirt was cut from woven, and with a little more wearing ease added, you could probably sew some nice inseam pockets in – the problem however is if you then put something in the pockets… anything in the pocket will leave a visible pocket bulge. 😮
I’ll put my thinking cap on and see if I can think of a different solution! 🙂
Yeah well, an easy way would be well easy.
As the skirt is knee length and thus the flair will, probably, start at the low hip. And after way to much time on Pinterest, I’m thinking about something similar to this:
https://s-media-cache-ak0.pinimg.com/564x/b5/e0/30/b5e030475940abcc27b816fe83b039bc.jpg
Well not quite like this, I’ll try and make the pockets lay flat and will bind everything with bias binding.
Ooooh, I like it! I think you’ve definitely found a great workaround! Please do share a pic when you’re finished, would love to see it! 🙂
How to go about pockets that have their circular seam already sewn?
Hi Ginger. Could you provide a photo of what you mean? I can’t picture exactly what you’re saying! 🙂