A patch pocket is a pocket that is placed onto a piece of fabric and sewn into place.
They are one of the easiest types of pockets to sew and add to a garment, whether something you are sewing from scratch or an up-cycling project. Partly because you can make a patch pocket any shape or size that you want, but also because you can literally just sew it onto a garment during a moment of inspiration.
For anyone wanting to know how to sew a simple pocket, whether you’re a sewing beginner or a bit more practised at sewing, mastering the patch pocket is easy. And this easy pocket tutorial will teach you how to sew a patch pocket in just a few steps!
First, let’s take a look at some questions about pockets!


What Is A Patch Pocket Used For?
A patch pocket is used to:
- Create a space on garments to hold items such as a phone, cash, or debit card
- Make a design statement
Are Patch Pockets In Style?
Patch pockets are never not in style. From the pockets on the back of our jeans to the oversized pockets on winter jackets, patch pockets are always a ‘staple’ of fashion!
Do Patch Pockets Have Flaps?
Sometimes. Most patch pockets do not have flaps, like the ones on the backs of pants. But it is easy to create a flap for your patch pocket!
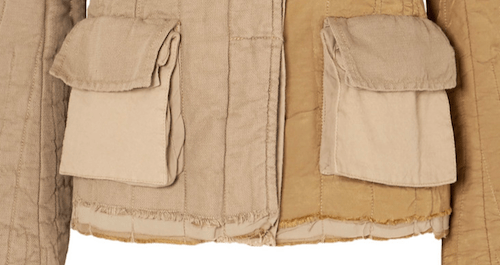
You may want to add a button and buttonhole to secure the flap or leave the flap loose over your patch pockets like the photo below.

Types Of Patch Pockets
There are several different types of patch pockets:
- Simple pants back patch pocket
- Denim coin pocket
- Accordion pocket
- Kangaroo pocket
- Zippered patch pocket
- Lined patch pocket
- Patch pocket with a flap


These different patch pockets are essentially the same – they are all added onto a garment as a patch, and either top-stitched in place or ‘bagged out’.
The first is the super easy and simple way to sew a patch pocket and is the sewing technique I’m showing you in this tutorial, but there’ll be a later sewing tutorial showing you how to sew a bagged-out lined patch pocket too.
How To Sew Patch Pockets: Overview
There are just 9 steps to sewing a patch pocket. Here’s an overview:
- Decide on the size of your new pocket
- Draft a basic patch pocket pattern (or use this patch pocket pattern template!)
- Cut the pocket out in chosen fabric
- Add interfacing to the pocket opening
- Press pocket seam allowances
- Measure for accurate placement of patch pockets
- Pin pockets in place
- Sew pockets with top stitching thread
- Press
How To Sew A Patch Pocket: Step By Step Tutorial
Okay, now we get down to actually sewing one! I’m using photos from two different pants projects:
- The colorful patch pocket is on the front of my favourite summer trousers
- The denim patchwork patch pocket is on the back of my favourite DIY refashioned jeans
Step 1: Patch Pocket Size
The first thing to consider is how big – or small! – you want your patch pocket to be. If your patch pocket will be functional, this is a step that you shouldn’t skip; otherwise, it comes down to your design ideas.
A good rule of thumb is to use your hand as a guide. You’ll want the opening section of your pocket to be wide enough to allow your hand to enter, plus a little extra room for ease.


I usually draw my hand outline on a piece of paper and work from there.
Step 2: Patch Pocket Pattern
You can use a shaped patch pocket pattern, or a basic pocket pattern to get started, but I do have large hands, so you may need to adjust them for your hand!
You could draft a simple patch pocket yourself using my pocket drafting tutorial.
Step 3: Cutting The Fabric
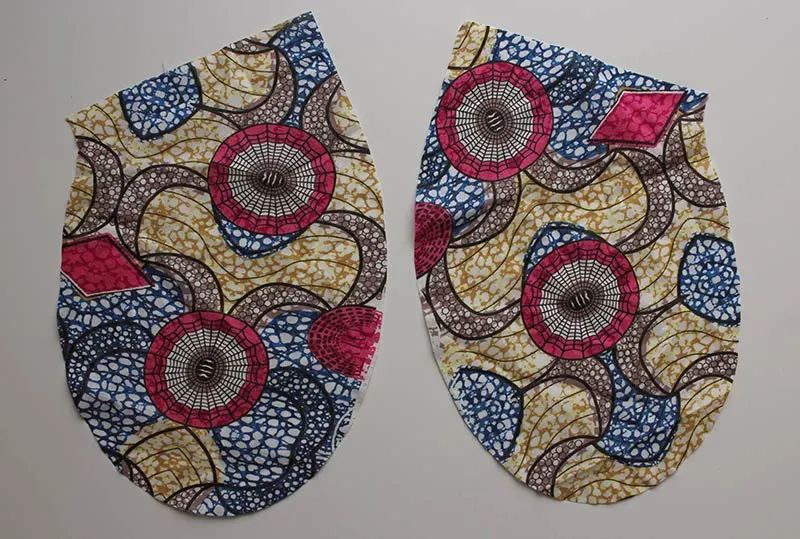
Place the pattern on the fabric and carefully cut out a pair. You’ll want to consider the print placement if you are not using solid colour fabric.
This is the shape of my curved patch pockets.

This is the shape of my regular shaped patch pocket. To fit with the DIY jeans that I was applying this to, I patch-worked the denim together first.


Step 4: Stabilising The Pocket Opening
Areas of clothing that see a lot of stress can stretch out, and a pocket opening is a great example. I always add either interfacing tape or a woven strip – the selvedge of your fabric also works well! – as a stabiliser at the pocket opening. It stops the fabric from stretching and distorting.


If using strips of interfacing, place carefully at the pocket opening. Trim the interfacing down to size.


Press carefully to let the glue side of your fusible interfacing. If you’re using the sew in kind, you should baste it in place now.


You can see that the fusible interfacing at the pocket opening has become more transparent not that the glue has been melted, bonding it to the fabric.
For my back patch pocket, I interfaced the patch-worked denim to stabilise the entire pocket. You’ll see this further down.
Step 5: Pressing Seam Allowances
Now that you’ve added your stabiliser, you’ll want to press the seam allowances. This is another essential step so that you can make sure both pockets are perfect and symmetrical when sewn to your garment.
Start by pressing the seam allowance for you pocket opening first.


You can use a seam guide, pattern master, or tape measure, but do make sure that you are accurately turning over your seam allowance!


The interfacing section will have a nice crisp fold once pressed over.


Before moving on to the seam allowance around the pocket, stitch the pocket opening fold in place first. I did this with a machine for speed, but the rest of this patch pocket will be sewn by hand.


This is the back patch pocket with its opening section pressed and sewn. You can see that the pocket is made up of two halves, both of which were interfaced for stability and then patched together before the opening was sewn.


For curved seam allowances, I like to sew a basting stitch just inside the seam allowance and gather the fabric slightly along this stitched line before pressing. It helps to keep a nice smooth curved edge.


For my back pocket, I kept the raw edges visible as it fit better with the style of my DIY refashioned jeans.
Step 6: Patch Pocket Placement


Deciding where your pocket will be sewn should always happen when the garment is still flat. But you may be like me and decide *after* you’ve sewn trousers that a pocket would be handy.


My banana pants are one of my favourite comfy pants pattern, but I didn’t add pockets as I felt it would take away from the drape at the hips and outer thighs.
I still believe this to be true, but I do miss having a pocket to put my phone in when out and about. So I decided to create patch pockets for this pair, and I ended up hand sewing them on.
To decide where to place your pockets, first hold the garment section up to your body. You could even pin it into place on the clothes you’re wearing. I’ve pinned it into place in the photo below, being careful to avoid the pleat area.


Look in the mirror and decide where they look best – if for design-only reasons! – but if you plan on using your pockets, be sure to put your arms into a relaxed ‘hands-in-pockets’ position.
Step 7: Pinning Pockets
Once you have decided on where the pockets should go, quickly pin them into place, take off the garment section and lay flat on your worktable.
You’ll now want to use your tape measure to check that the patch pockets are symmetrically placed, making adjustments as needed.


For my DIY jeans, I laid the denim of the back pant leg flat and then pinned the pocket into position.


Step 8: Topstitched Pockets
Now that your pockets are in position, you can either machine or hand sew them into place. If the stitching is going to be visible, you’ll want to consider your needle type, your stitch length, whether you’ll straight stitch or zig zag stitch and the type of thread you’re using.
If you stitching is going to be visible, make sure that you do not sew topstitching thread with a small stitch length as it will look odd. I usually aim for a 3.5 on my machine which has a stitch length dial running from 0-5.
I’m sewing my patch pockets on my colourful trouser by hand, using an invisible stitch.


The only way to know that these patch pockets are there is the difference in fabric colour. The trouser legs have faded from many wears, while the print on the patch pockets is more vibrant!


If your patch pockets are on trousers, pants, or jeans – usually a fabric weight heavier than my cotton lawn above – you may want to sew two lines of topstitching.
In my denim verison, I’m using orange thread with a zigzag stitch to secure the patch pocket in place.


I love the addition of the orange – I plan to use it for any visible mending and repairs that are needed in future.


If your patch pockets are made from a lighter-weight fabric, you may want sew:
- One line of edge stitching to secure the pocket in place or
- A hand-stitched invisible seam to make the pocket more subtle


You may want to stitch a triangle shape at both the start and end of your stitch line, to add extra stability to the pocket where it is attached to your garment – this is where it takes more stress, so the added stitches can limit accidental ripping.
Step 9: Perfectly Pressed Pockets
Now that you have one of your patch pocket sewn on, the final step is to press it. You’ll press to set the stitches but also to reinforce that original pressed fold line for the seam allowance. Then repeat for the second patch pocket!


I love the patch pockets on my cotton lawn banana pants. They’ve been the perfect summer trousers for three years now, and with the added pockets, they got even better!
And my DIY refashioned jeans get worn all the time since I made them in February. In fact, I just added elastic to the hems to narrow the pant leg slightly!


It’s the perfect size patch pocket for my oversized phone, which is exactly what I wanted it for!


IF you loved this, do check out my guide to the different types of pockets for more pocket inspiration!
Ruthann
Thursday 22nd of September 2022
This is exactly what I needed. I so pretty well but always use patterns. I think that your tutorial is so good it may make me brave enough to be more free and not use patterns all the time. Here's hoping! Thanks for making this available.
Eve Tokens
Friday 23rd of September 2022
Hi Ruthann, I'm so chuffed to hear this. Be brave, and let me know how you get on! :)