Men’s Drawstring Shorts Pattern: Making The Trigg Shorts!
I recently bought the Trigg Shorts pattern – a men’s drawstring shorts pattern with an elasticated waist, front and back pockets and available in two lengths – to make for my other half who suffered through the past summer with just one pair of shorts (which were actually swimmers!) because he loathes shopping.
I had promised to make some early in the year, but then being back in the UK for five months put a spanner in that plan, so it was only this past weekend that I was able to sew up the drawstring shorts pattern that I had purchased, printed and cut out back in late August!
Some of the links in this article are affiliate links. This means that I may receive a fee at no extra cost to you if you purchase a recommended product.
Men’s Drawstring Shorts Pattern
The men’s sewing pattern I opted for was the Trigg shorts pattern (from Etsy) because it has both an elasticated waistband and a drawstring. It also has four pockets – two patch pockets on the behind and two front pockets with lovely detailing.
My other half loves a pocket to throw his phone and wallet in, so this along with the drawstring waistband was a no-brainer.
The Trigg Sewing Pattern Details

The Trigg is a PDF pattern – super easy to put together once printed off! – and I needed just 120 cm of fabric. I wanted to use some funky printed fabrics, but being it was actually the first thing I’ve ever sewn for my other half, I decided to go with a fabric that wasn’t quite so important in my stash, in case it all went tits up!
I opted for a khaki coloured cotton / tencel blend which I had intended to make a zero waste top for myself from, but I had a sneaky suspicion it would work well for these drawstring shorts!
The sewing pattern also calls for elastic that is 5 cm / 2″ wide – <– I had none in my stash so had to order that one in – a small piece of interfacing and two metal eyelets for the drawstring to be threaded through. You can also use buttonholes, but I went with the eyelets myself. (You can use this tutorial on putting eyelets in fabric if you’ve never done so before!)
If you choose to add a drawstring to this men’s short drawstring pattern, then you’ll want to buy something suitable or make your own drawstring.
Trigg Shorts Pattern pieces
In total there are 6 pattern pieces that make up the drawstring shorts:
- Front leg
- Back leg
- Pocket bag (front pocket)
- Pocket lining (front pocket)
- Back pocket
- Front waistband
All of the above are cut in your main fabric choice, The interfacing needed is just a small section for the centre front of your waistband to reinforce the fabric where your drawstring is inserted!
Drawstring Shorts Construction Process
The constructions process for these drawstring shorts was really easy, but, I took photos of the process and will add them below for you to follow along more easily. I don’t know about you, but I find that step by step tutorials with photos help me visualise much better than simple illustrations.
Step 1: Pocket Lining To Front Shorts Piece
First step in making these men’s drawstring shorts is to attached the pocket lining to the front of the shorts leg. This pocket has lovely detailing so do take your time to get that perfect finish.

You’ll want to snip into the corner created to release the fabric so that you can turn the pocket lining through, and then top stitch in place. I used a slightly contrasting thread (okay’d by the other half, though at that point he had no idea what he was agreeing to… 🤣)!

I did not have my travel iron to hand when sewing these – so please do excuse the creases!

Step 2: Attach The Pocket Lining
Next up, we attach the pocket lining to make the pocket an actual pocket! 😉 Place the pocket linings in place – I’m a do them at the same time, batching kinda girl! – sew the pocket together down the edge closest to centre front and along the bottom.

Don’t forget to finish the fabric edge – *actually* dragged out my overlocker (👀)!

Step 3: Sewing The Front Crotch Seam
Next up, pin together and then sew the front crotch seam. I also overlocked the fabric edge to finish it off.

Step 4: Creating The Back Patch Pockets
Now we get to crack on with the back pockets. I say pockets – in all the photos I’ve seen. there’s only one on the back of the Trigg shorts – but I whacked on two because I prefer the symmetry of two back patch pockets! 🤣
Start by overlocking the top edge of the back pocket piece/s!

Then turn the top of your patch pocket over at the notch, right side to right side. Sew the short edge to secure.

Turn through so that the top of the patch pocket is lovely and neat…

Press, and topstitch in place! You should also press the edges of your pockets under, as per the allocated seam allowance. (Clearly I did NOT do any pressing... 😬 PS. Please don’t judge me! 🤣)

Step 5: Sewing The Back Pockets In Place
Place your back patch pockets in position on each of the back sections (or just the one if you’re only sewing one)! Pin them to secure.

Topstitch in place – I used just the one line of topstitching, but you could double up if inclined!

I also reinforced the upper corners of the patch pockets with some triangle stitching, to strengthen it for those times when the other half pops both his phone and his hands in that poor pocket!

RELATED CONTENT:
Step 6: The Centre Back Seam
Now we get to put the back pieces together, though you could have done this before the back patch pockets. I don’t think it matters too much which way you do steps 5 and 6!
Place the back pieces together, right sides together, and sew with the allocated 1 cm seam allowance unless you’ve modified the pattern for a different seam allowance amount, then topstitch the seam.
Below you can see my two lovely back patch pockets amongst all the creases in the fabric. Right? 🤔🤣 (If nothing else, this shows that you can get away with minimal pressing when desperate! 😬)

Step 7: Closing The Shorts At The Side Seam
This is where we take the Trigg shorts from flat to round!
Place the front and backs right sides together. Pin in place the side seams, and then sew. Push the seam allowance towards the back and topstitch in place to maintain the same topstitching style you’ve been using throughout.
I actually sewed this section in the almost dark so don’t have any photos good enough to show…
Step 8: Creating The Waistband
This is a solid waistband for your drawstring shorts. You’ll need to cut the right amount of 5 cm / 1 inch wide elastic. The pattern instructions suggest the non-braided variety, but I went with what I could get hold of! It worked well despite being braided!
Now, I’m going to be completely honest with you. This is the trickiest part when it comes to sewing your drawstring shorts. There is a lot of elasticity in the elastic (doh!) and you need to be consistent with pins to make sure you’re sewing accurately and adding the right amount of ‘gathers’ in the elastic area.
You start by adding your eyelets (or buttonholes as per the instructions!). This is the point that you add the small bit of interfacing needed.
RELATED CONTENT:
Then, you need to be very thorough following the instructions for sewing the channels. The pattern provides very specific measurements, and following this will help you get the best outcome on your DIY men’s drawstring shorts!

Step 9: Attaching The Waistband
Attaching the waistband is a two step process. First, sew the waistband to the shorts, as you did the waistband – stretching the elastic out as you go between the different sections. I then went over it all with the overlocker, to reinforce.


Step 10: Hemming Your DIY Men’s Drawstring Shorts!
Hemming the shorts is super easy too! Literally overlock the hems to finish the fabric edge.
Then, turn under by 3 cm, and topstitch place. I use 2.5 cm allowance to make sure the hem was properly caught.
RELATED CONTENT:

Men’s Drawstring Shorts Pattern: The Trigg Shorts Verdict!
My other half loves these drawstring shorts. I haven’t actually added the drawstring part yet because he prefers them without, but I’m working on him! If I convince him, I’ll whack in the ready prepared drawstring I have and will add an updated photo for you!
The Front View
As you can see, the eyelets are in but I haven’t yet threaded through a drawstring.

The Side View
I love the shaping of the main pockets – and they’re great with some top stitching detail too!

The Back View
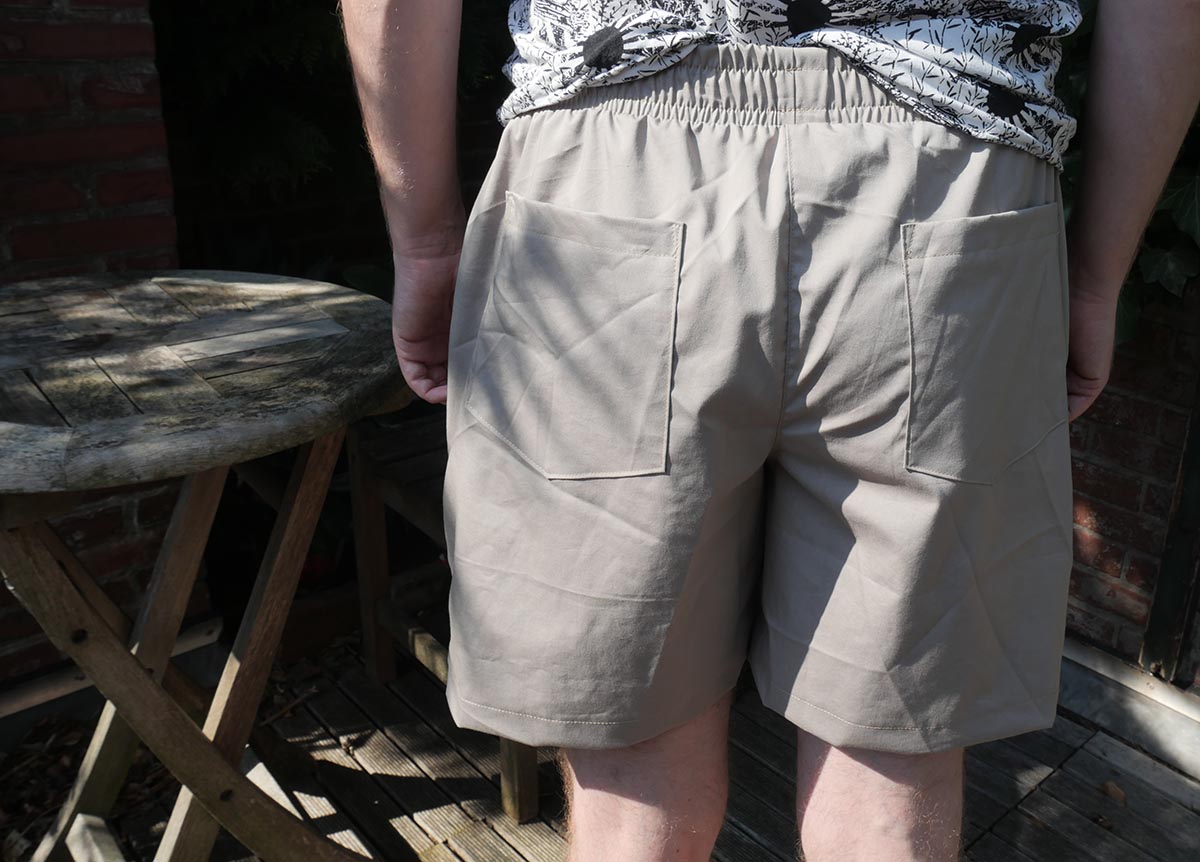
The original pattern called for one pocket, but my other half likes patch pockets on both legs of his shorts, so here they are. I could have used a little more gather at the centre back of the waistband, but realistically it’ll be covered by his shorts so isn’t a biggie.

The Full View
Finally, here’s my other half, looking well chuffed, wearing his lush new drawstring shorts! It took some convincing to get this photo allowed! I’m going to have to buy lots of fun printed cotton now and crack on with sewing a few more pairs of the Trigg Shorts sewing pattern for him ready for next summer!

If you’re a man or someone looking to make more mens clothing, then do check out this guide on the best male dress forms and my welt pocket and jet pocket tutorials too, which are all going down well with my male readers!


