
How To Make Bias Binding: In Two Ways!
Last week I posted my DIY wrap skirt tutorial, which uses bias binding to make the ties. This week, I thought it would be great to show you how to make bias binding for yourself, so you have more control over the fabric options to use for binding.
Bias binding is made by cutting strips of fabrics on the bias – which is a 45º angle from the selvedge. This is the grain of fabric with the most stretch, which helps the bias binding you’re making work nicely on curves such as necklines and armholes. You can then sew these strips together to make continuous bias binding.
If you have no clue how to sew binding, I also created a bias binding tutorial!
Today though, I’ll show you two methods of making your own bias binding!
Some of the links in this article are affiliate links. This means that I may receive a fee at no extra cost to you if you purchase a recommended product.
How Do You Calculate Bias Binding Amounts?
Knowing how much bias binding you need to make is your starting point for any project needing personally created bias binding.
I usually start by measuring the length I want to bind and add on 2.5 cm / an inch for the overlap allowance.
If you plan on creating your bias binding strips from a square of fabric rather than offcuts like I tend to do, here is a rule of thumb. Measure the length of the area to be bound, multiply it by the preferred width of your bias binding, find the square root of that number, and add around 5 cm on top.
Sound complicated? Here’s an example!
Let’s say that my skirt hem that I am binding is 140 cm and I wanted binding made from 5 cm wide strips. I would take this calculation:
- 140 x 5 = 700
- Square root of 700 = 26.46 cm
- 26.46 + 5 = 31.36 cm
When I cut a square that is 31.36 cm long and wide, I will can create over 140 cm worth of continuous bias binding – it’ll actually be closer to 190 cm!
Now, to make sure that the strips created are all the same length and not a mix of smaller fiddly pieces, you will want to cut this square on the bias!
How Wide Should Bias Binding Be?
Your bias binding can be as wide as you like. I would avoid very narrow bias binding unless you are using it on fine, delicate fabrics. Trying to sew narrow bias binding made from fabric that isn’t lightweight is a hassle – I’ll show you photos further below!
As a rule of thumb, you will want to take your ideal finished width for the bound edge and multiply it by 4 to get the width that you need for making your own bias binding.
So, if I want my skirt hem to have binding that is 1.25 cm wide, I would cut 5 cm wide strips of bias fabric.
- 1.25 x 4 = 5 cm
If I were creating a statement with my sewn garment – and had added an allowance to the pattern area before cutting out – I might decide I want binding that is 4 cm in width. My bias strips before folding would then need to be 16 cm wide.
- 4 x 4 = 16 cm
How Do You Make Bias Binding – Without A Tool!
Let’s now work through making bias binding without a tool.

Step 1: How To Cut Bias Binding
The best way to cut bias binding is to use a cutting mat, a rotary cutter, and a set square or pattern master.
These are the tools that I use:
- Cutting mat
- Rotary cutter
- Set square or pattern master
In this tutorial, I’m working with fabric scraps but you would start by cutting the correct square dimensions from the bias of your chosen fabric.
Place the bias fabric on your cutting mat, making sure that the straight edge aligns with one of the straight lines on the cutting mat.
Take your set square – mine has lines marked at centimetre intervals – and place the straight edge parallel to the fabric edge at the width you need.
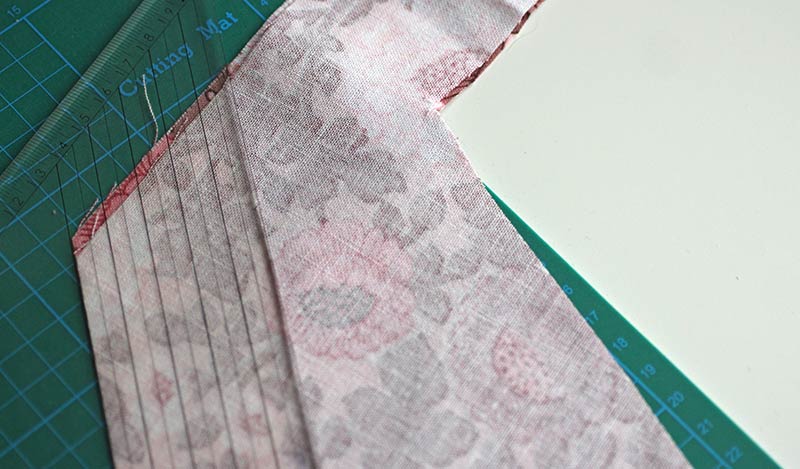
Mine is at 5 cm for my 5 cm strips.

Cut all the fabric strips you need until the fabric square is no longer.
Step 2: How To Join Bias Binding
You now need to join these strips together to make continuous bias binding. When connecting the strips, you’ll want some seam allowance. The amount you use will affect the length of each bias strip. I always go for 1 cm seam allowance and then trim the excess afterwards.

Place one of your bias strips in front of you from left to right.

Take a second strip and place this one from top to bottom. They should lay upon each other – right sides together – at the top right.

If you were to sew the strips together like this, you can often end up with a bit of a ‘step’ on the edge. It isn’t a problem as the binding strip edge won’t be visible when sewn, but I still like mine to be neat and so I offset my strips by 1 cm. If you do this on your cutting mat, you can use the 1 cm lines to guide you.

Pin the strips together on the diagonal – a 45º angle – and then repeat the process with the remaining bias strips that you cut.

At your sewing machine, you’ll want to insert the needle just below the corner you have created so that you can backstitch to secure your seam, then sew in a straight line to the opposite corner. Repeat for all the pinned seams.

Press the seam lines to set the stitches and then press the seams open. There’s quite a bit of ‘overhang’ on mine as I used a 1 cm seam allowance, so I now need to trim this away.


I start by trimming the excess to line up with the long edge of the bias binding, and then I trim the width to about 5 mm. Repeat this for all the new seams that you have sewn.


Step 3: How To Fold Fabric For Bias Binding
Remember that when I started, I cut my strips 5 cm wide? This was so that I could have a 1.25 cm finished binding width. So, to make this happen, I need to fold my continuous bias binding strip into four.
I start by folding the bias strip in half and pressing carefully. Be sure not to stretch the fabric strips as you are pressing, as this will make them narrower.

Once I have my centre fold line, I need to fold the edges of my strips in towards the centre to create two more folds.

If you were not using the bias binding with visible top stitching, you can create only two fold lines:
- One at the centre line
- Once at the quarter line
I’ll show further down this tutorial how this works when sewing your bias binding in place.

Use an iron to press the folds in place and then carefully roll up the length of your folded continuous binding.

How To Make Bias Binding With A Bias Tape Maker
Now we move on to method two, which is how you make bias binding with a bias tape maker. I have to be honest – I have a bias tape maker, but I have rarely used it as I prefer the control I have over making my own folds. It’s just how I am!

But, not everyone is weird like me, so here’s a tutorial on how to make bias binding with a bias tape maker. When you buy a bias tape maker, there are different width options available, so make sure you buy the one you’re most likely to use.
What You’ll Need
- Bias tape maker (In this tutorial I am using the Prym 12 mm tape maker)
- Bias fabric strips cut to the correct width
- Pin
- Iron
- Ironing board (or a pile of fabric like me!)
I’m assuming that you have already cut and stitched your bias strips together!
Step 1: Starting The Bias Tape

Start by placing the continuous length of bias tape on the worktop in front of you. I like to have a corner cut at the starting point but this isn’t necessary. Feed the start of your bias tape into the large opening of your bias tape maker.


Step 2: Securing The Bias Tape
You now want to make this process a little easier, and to do this, use a pin to secure the tip of the bias strip in place. Ensure that you push the pin into the fabric / ironing board at an angle so that the bias strip cannot slip.

Step 3: Making The Bias Binding

Grab your iron; it’s time to create the folds in your bias tape! Very slowly and gently guide the bias tape maker along the fabric whilst applying heat. You’ll need to manoeuvre the tape maker carefully to ensure the folds are equal, and you’ll notice that they don’t quite meet in the centre. This is normal.

There will only be two fold lines with this method, as there is no centre fold line created.

Step 4: Roll The Bias Binding Tape Up

To keep my bias binding neat, I roll it up and pop a pin in place to secure it, much like how you would find bias binding in a haberdashery.

Sewing Your New Bias Binding
I have created a bias binding tutorial, but here are some photos of how these two types of bias binding looked when sewn.
Remember that the hand-folded bias binding was 5 cm wide and when sewn on gives a 1.25 cm bound edge. The binding made with the bias tape maker was initially 2.5 cm wide, and when sewn became 0.62 cm wide.
As the fabric I used to make the bias binding was not lightweight, it looks a mess when sewn on – with both topstitched and stitch-in-ditch methods.
Here are some photos to show you what I mean!
Bias Binding Made From Medium Weight Cotton
This is the narrow topstitched bias binding in medium-weight cotton. Notice the wobbly stitch line and the visible first line of stitching!

The narrow bias binding looked much neater when stitched in the ditch – this bias binding is again in medium-weight cotton!

The wider bias binding in medium-weight cotton works better when topstitched than the narrow width bias binding.

But best of all is surely the wider width bias binding that is stitched in the ditch. You can only just see the stitches because of how close I took the photo, and because I hadn’t yet pressed the binding edge to cover them.

What are your thoughts? Will you have a go at making your own bias binding now?


