How To Draft The Female Bodice Pattern
If you have ever wanted to learn how to draft the female bodice pattern – this in depth step-by-step tutorial is for you!
I’m going to take you through the process of creating your own basic female bodice sloper, one step at a time, so that you can start creating sewing patterns from it that fit you.
Some of the links in this article are affiliate links. This means that I may receive a fee at no extra cost to you if you purchase a recommended product.
Pattern Drafting Tools

You are going to need some basic pattern drafting tools in order to draft a bodice block. I have a full pattern making tools list here, but my most frequently used tools are a pattern making ruler (this one is great for those who work in inches), some pencils with an H lead for good line quality, paper scissors (mine have lasted years), a measuring tape for accurate body measurements and this tracing wheel for truing darts and other areas.
You’ll also want paper, but you can use any type for the initial drafting of a bodice sloper. Finally, I like to copy mine onto this oak tag so that I can then draw round it quickly when inspiration strikes and I want to make a pattern for a new design idea.
Measurements
To successfully draft a female bodice pattern, you’ll need some key measurements. If you are drafting the bodice pattern for yourself, you may want to ask for some help when measuring to make sure that the measurements are accurate – otherwise your bodice pattern may not fit correctly when toiled up!
Measurement Chart Guide
The measurement chart below shows the sizings along the top row and the locations in the second column. The first column is the one I used as shorthand when drafting.
The sizing row correlates to US sizings and the measurements to help you draft your bodice sloper are in both centimetres and inches.

Your Measurements
Now you’ll want to create a personal chart, one that you can use to note down your body measurements and cross reference them with the nearest size from the chart above.
You can right click on the chat below and print this black measurement chart below to use!

Measuring Your Body
The first thing to do is make a note of your measurements on the Bodice Measurement sheet. The ones you need to take are:
- Bust
- Waist
- Back Width
- Chest Width
- CB Length
- Shoulder
- Top Arm
The bust measurement is the most important as we will use it to cross check against the standard. The remaining measurements are taken from the Measurement Chart!
In the second column, make a note of the size nearest your bust measurement. For my bust, I used the measurements for size 18. There were discrepancies but they are minor – except my CB length – and will get taken care of when drafting.
Drafting the Back of your Female Bodice Pattern
It’s important that you take your time drafting the bodice pattern. Make sure you do the calculations correctly. Double check your numbers before drafting a line, so that the bodice block drafted is accurate.
When drafting the female bodice block, we only draft half the body, and we work from the centre back towards the centre front.
Step 1: Center Back Line
Start by drawing a nice long line at the bottom of your paper, close to you. This will be your centre back line. Then draw a line at a 90º to that line, on the left hand side.

Take note of your starting point amount in the correct size column, and measure this along the CB from the corner. Mine starting amount is 4cm. Label it as O.
Step 2: Plotting the Waistline

Now mark another line from O to Waist using your CB length amount. My centre back amount is 46cm, which is almost off the chart. Be sure to check your height at the bottom – CBLP is for petite, CBLR is for regular, CBLT is for tall – so that you can check the proportion.
Step 3: Plotting the Bustline
Find the bustline (BL) on the chart and mark this amount down from O. Mine is 23cm for my sizing.

Step 4: Plotting the Hip Line
Mark in Hip line (Hi) 22cm below your waistline (Wa) measurement.

Step 5: Drafting the Main Lines
now you need to square up from each of these markers, maintaining a 90º angle for accuracy.
Step 6: Back Line
Take your back line measurement (BL / mine is 23cm) and halve it. This gives me 11.5cm. Mark a new line this amount from O and label it Back Line.
Step 7: Shoulder Line
Finally, mark in 3cm below point O for your shoulder line and label it Sh. This is always 3cm, no matter the size.
Make sure all these markers have been squared, with only the shoulder and back lines not being extended the whole width of your paper.
Your bodice block draft should look similar to this.

Step 8: Drafting the Back Neck, Shoulder Line and Armhole
Now we need to draft in the back neckline, your shoulder line and the armhole.
- From point O measure the amount for your back neck from the chart. Mine is 7.75 cm.
- Square 2 cm up from this line, mark this point as your neck point (NP).
- Take your back width (BW) amount and halve it. Mine is 38 cm and halved it becomes 19 cm. Mark this amount in on the backline, and then draw a line through this point, parallel to the Centre Back, and touching both the back line and waist line.
- Using that same back width measurement, you will now add your under arm (UA) amount. Mine is 6.5cm to it, so my total is: 19 + 6.5 = 25.5 cm. Mark your amount on the bust line and label it UA. / underarm
- For your shoulder amount, take your half back measurement again, add 2cm and mark this total on your shoulder line and label is SP (shoulder point). Mine was 19 cm + 2 cm = 21 cm.
- Place the one end of your ruler at your neck point (NP) so that the 0 cm point is sitting on NP. Pivot the ruler until your shoulder measurement (mine is 13.5cm) touches the shoulder line. This is your new shoulder point (SP) and once drawn in place, this line becomes your back shoulder line.
- Next, create your back neckline by connecting the neck point (NP) on your block to the O point at centre back (CB) with a gentle curve.
- Draw in a slightly bolder line on your back line where it meets the vertical line, 1.5cm either side of the back line, so that you have a straight section to form part of your armhole.
- Connect your shoulder point (SP) to the top of this bolded line with a slight curve, and continue it through to the UA point. This is your back armhole line.
Your female bodice block should now look something like mine in the photo below!

Step 9: Drafting the Back Side Seam
Now it’s time to lengthen out the lines on our bodice block. Again, follow these steps carefully for the best results!
- Take your hip measurement and divide it in half. Mine is 114 cm so: 114 ÷ 4 = 28.5 cm. Mark this into the hip line (Hi)
- Draw a line connecting your under arm point (UA) to your hip point (Hi). This is your straight side seam.
- Make a mark 2 cm in on your waist line (Wa) and connect this point with a curved line up to your under arm point (UA) and then down to your hip point (Hi). This is your shaped side seam.
The side seam of your bodice block should look similar to this photo now!

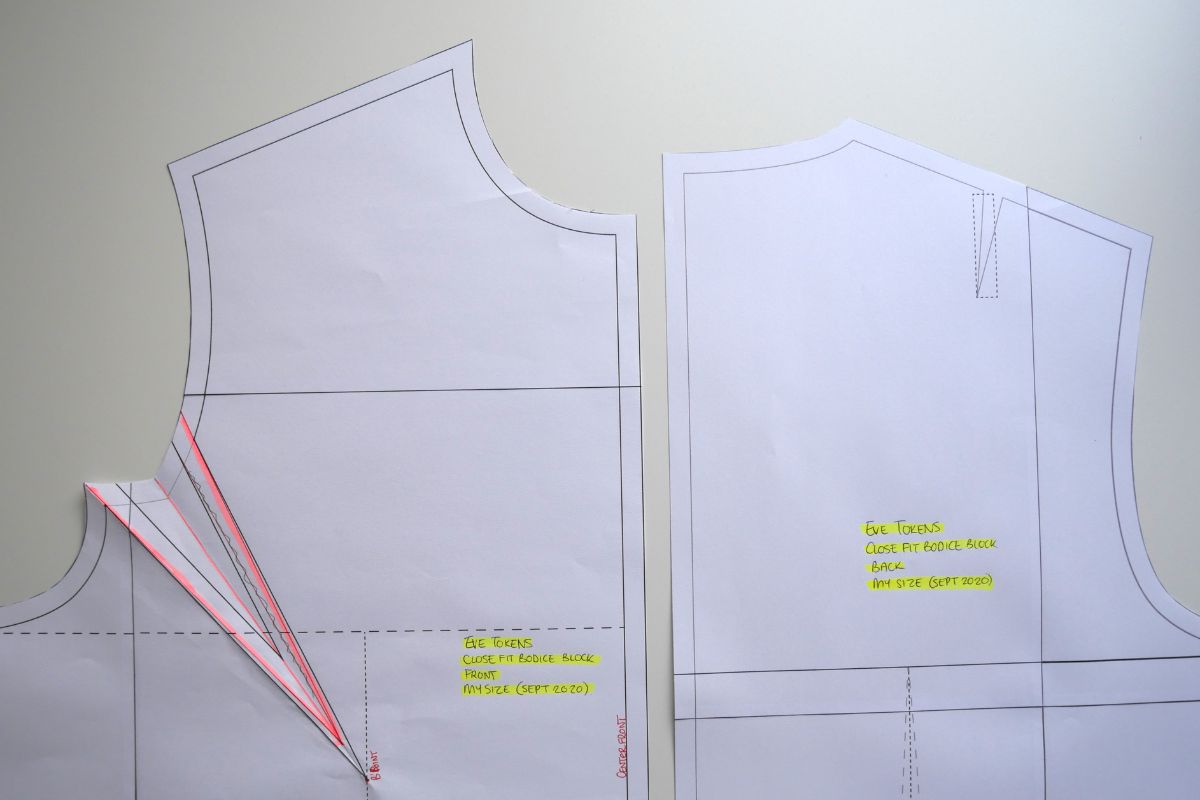
You have now successfully completed the basis for the back female bodice block section. Phew! This is what it ought to look like…

Drafting the Front of the Female Bodice Pattern
Okay! Now we move onto the front of your female bodice pattern.
Once drafted – and connected to your back bodice – you’ll have drafted an easy fit female bodice block for yourself! Exciting!
Step 10: Drafting the Center Front and Front Shoulder Lines
- Start by extending the top line, bust line, waist line and hip line on the back bodice section as far up the paper as you can possibly go.
- Next, measure the hip width on your back bodice draft and add this much again – plus 10 cm – to the front hip. Make a mark.
- Now, square up from this point all the way up to the top line. This is your centre front.
- Point O on your centre front sits on the top line, unlike your O point on the centre back line.
- Now, if your size fell between 6-12 on the chart, mark your shoulder line 4.5 cm down from the O point on centre front. If your size fell in 14-20 range in the chart, make the shoulder line 4 cm from the O point. For sizes 22-28 on the chart, you will want to make the shoulder line 3.5 cm from O point. Square across towards the centre back and then label this line as your shoulder line. My size 18 requires my shoulder line to be 4 cm down.
- Next, measure down from the O point the required amount: 7.5 cm for sizes 6-12, 8 cm for sizes 14-20 and 8.5 cm for sizes 22-28. Square across; this will become your centre front neck.
Your front female bodice block should now look like mine in the photo below – minus the curved neckline!

Step 11: Drafting the Front Neckline and Armhole
- Take your pattern master and square a line 4 cm up from your bust line and label it as your chest line.
- Find the measurement of your back neck again and then mark this amount on the top line from centre front towards your centre back. Label it as your neck point (NP). Mine is 7.75 cm. If you are a size 6, and yours measures 6.25 cm, round it up to 6.5 cm
- Next, square a vertical line parallel to centre front, from the neck point down to neck line. Using this line, create a 45º angle and 3 cm up from this for sizes 6-14, 3.5 cm for sizes 16 and bigger. This is the curve of the front neckline.
- Measure 16.5 cm along the shoulder line from centre front, and make a mark on the line.
- Place the 0 cm point of your ruler at the neck point (NP) as we did for the back bodice draft. We will now pivot the ruler so that a line runs from your neck point (NP) through to the mark we made in step 4. This line should be around 25 cm long.
- Next find your chest width measurement (CH) on the size measurement chart. Divide your measurement by 4. Mine is 41 ÷ 4 = 10.25 cm. Mark this on the bust line out from the centre front line and then square a line from 2 cm below this and up to the shoulder, parallel to the centre front.
- Measure 2 cm to the left from your newly created joining line on the shoulder line, and use this to line up your ruler with the point 2 cm below the bust line. Draw a straight line the length. This is the first dart leg. Label the top of the dart leg as A.
- Mark in the width of the dart you need for your size – mine is 9 cm – and then draw this line down to the point 2 cm below the bust, just like we did with the first dart leg in step 7. Label this dart leg B.
- Time to measure the distance of your shoulder from the neck point to the start of your dart leg A. Mine is 5.2 cm. Take your amount away from your shoulder measurement to find the amount of shoulder that remains. Eg. My shoulder should measure 13.5 cm. My NP to A is 5.2 cm. This leaves me 8.3 cm remaining. 13.5 – 5.2 = 8.3 cm
- Mark in the remaining shoulder required from your second dart leg (B) along the shoulder line. Label it SP, your shoulder point!
- Take your chest width measurement and divide by 2. Mine is 41 ÷ 2 = 20.5 cm. Mark this on the chest line as your chest point (CP), and then square down to the your bust line. Make sure that you exclude the dart section!!!
- Next step is to draw a straight line with your ruler from your shoulder point (SP) to your chest point (CP), connecting it to the squared line. We will use this for the front armhole shaping.
- The next calculation is the trickiest. So go slow and steady!
- Write down your bust measurement and divide it in half. Add on the amount of your under arm amount (UA). Finally, measure along your bust line from your centre back to your underarm and subtract this amount. The number you are left with, is your front bust line amount, running from your centre front (CF) to your underarm (UA).
- Here’s how it works for me: My bust measurement is 104 cm. So I’ll do 104 cm ÷ 2 = 52 cm. Then: 52 cm + 6.5 cm (UA) = 58.5 cm. Finally: 58.5 cm – 26 cm (CB —>UA) = 32.5 cm.
- Therefore, my front bust line amount from centre front (CF) to my underarm (UA) will be 32.5 cm. Phew! Make a mark on the bust line (BL) from the centre front (CF) for your remaining bust width.
- Finally – for this section of drafting the female bodice block – we get to shape the armhole. Make a line, curving it gently inwards from the shoulder point to 1 cm in from your straight shoulder point (SP) to check point (CP) line, down towards the chest point (CP) and then out towards the underarm (UA) point. Use a 90º angle again to guide you, as we did for the back armhole!
Your female front bodice block should now look like mine in the photo.

Step 12: Drafting the Front Side Seam
We’re almost on the home straight of drafting the female bodice block! You’re doing brilliantly!
- Find your hip measurement and divide it into four. Add 3 cm to it, and then mark this amount on your hip line (Hi) from your centre front (CF) line.
- Draw a line connecting your front underarm (UA) to your front hip line (Hi).
- Make a mark 1.5 cm in at the Waist Line.
- Next, create a lower waistline, which is more realistic of how our waistlines are shaped, by using the following directions:
- Make a mark below the waistline (Wa) at your side seam. For sizes 6-18 the mark should be 0.5 cm, and 1 cm for sizes 20-28. Do the same at centre front waistline (Wa) marking 1 cm down for sizes 6-12, 2 cm down for sizes 14-20 and 2.5 cm down for sizes 22-28.
- Now, create a beautiful curved line from 0 at your centre back waistline, to the mark you made on your side seam waistline and then on to the new CF waist point.
Phew. We’re so close to getting your female bodice block drafted! Excited? Your bodice front should look similar to mine in the photos below!


Step 13: Truing the Front Dart and Front Shoulder
We’re on the last part – truing the front dart and correctly the front shoulder line!
Draw a line 4 cm below the bust line – and this is only for the front bodice! – from centre front (CF) to your side seam. Label this line as your true bust.

We now need to find our final front shoulder line.
- Make a fold along the dart leg A, the drat leg nearest to your centre front (CF).
- Close the dart by moving this folded edge over to dart leg B. You’ll see that the original shoulder line no longer connects. That’s ok!

Using a ruler, join a new line from your neck point (NP) to your shoulder point (SP). I use a tracing wheel (or prick holes with an awl) to mark in this new line. This will transfer the line to the folded under paper, so we can see the dart shape.


Step 14: Checking the Armhole Size
Your last job for the basic draft of your female bodice block is to check the armhole size – you don’t want an armhole that is too tight! I recommend using your tape measure up on its edge to get an accurate measurement, and measure the front armhole, and then the back.
- My front armhole is: 26.5 cm
- My back armhole is: 23.5 cm
- My total armhole is: 50 cm
I like to connect my tape measure so that it forms a loop of this size, and I slide my arm into it, until the loop is sitting at my shoulder point. Does it feel comfy too tight or too loose?
Step 15: Create a Muslin / Toile to Test Fit the Bodice Pattern
Alrighty. You have now drafted a female bodice pattern from scratch using this step by step tutorial. This is an easy fit bodice block, so there is a good amount of wearing ease included.
You’ll want to add seam allowance to your bodice block pattern and then cut it in a fabric suitable for creating a toile or muslin and test the fit.
You’ll then be able to make changes, pin in any darts for shaping and develop your female bodice block into different bodice styles. Exciting! Don’t forget to consider fashion design principles when you’re developing your bodice block into actual sewing patterns!
Drafting a Sleeve Block
You may now want a sleeve block to go with your female bodice pattern – this is the sleeve block tutorial for drafting a sleeve using your measurements!
And if you need some help staying on track of your sewing and pattern making projects, why not grab one of my sewing planners – perfect for people who make their own clothes and want to plan out the process!


I really have found this interesting. To me now to work out the female bodice, it has become easy.
I wish there was a diagram of where these measurements are taken, for example “back line “ where is that ? It’s not on the table , when googled it appears to be many different things but it is essential to Thai formula
This was very easy to follow. You however did not tell us what to do if the armhole is too small. Can you explain more about the true bust line.
I dont understand how to get the correct cb length. In your eg. You use size 18, so i would thi k cb length for tall is 43,5 but you use 46. How do I determine the cb length for size 20, cb regular?
There’s great information on this page but there’s so many ads that it is confusing. Is there any way I can print this out without the ads. Also is it possible to get the instructions in the Imperial system wit inches, feet, etc.
Thank you.
@Carol Joy Ferron, I understand that when you find a instructional in a system you don’t use it, can be confusing. When I kept finding recipes online from the US it was annoying to learn to change all the measurements of the tablespoons, cups, and oven temperature. Now however, I can do it in my head, proving to be a useful skill.
According to a study in 2019, only the USA, Myanmar, and Liberia mainly used imperial measurements. The UK uses both imperial and metric. The rest of the world uses mainly metric! So if you learn the basics of the metric system you will likely find it helpful for other things in your life. I wish you the best learning it 🙂
I would like to purchase the book on how to draft the female bodice block.
While I appreciate that you put this information out there and are trying to help people create a bodice block, this tutorial just has too many errors, inconsistencies and confusing wording to be helpful to me.
Hi Tilly. I’m sorry that you have struggled with this tutorial. I have had a tremendous amount of positive feedback on this tutorial and how it has helped people draft a female bodice block from scratch, so I would really love to know more specifically what part of it you struggled with? That was I can try to simplify it further.
Exactly I love creative creator and her efforts to help ppl but a bit overwhelming with not easy wording make it impossible to followup i mean for me unfortunately
Thank you, Eve. You’re the best.
I need tamil translation
Perhaps use Google Translate? I don’t speak or write Tamil!