How To Draft A Pants Pattern: Detailed Method
Pants are one of the trickiest patterns to fit – very rarely will you get the perfect fit from a paid pattern at the first attempt – and it’s for this reason that I like to start with a basic block that I drafted myself and then modify it to get the pant style I’m after.
Today, I’m going to show you the method that I use to draft a basic pants pattern for myself. It’s not a method found in any one book or pattern making tutorial, but something I have cobbled together over the many years that I have spent pattern making.
It differs from most methods in that I plot from the center of the leg out, rather than working from one side across the leg.
To follow this pattern drafting method, you’ll need a selection of measurements and tools which I’ll detail in the next sections, and some patience. This process involves numbers and many people working with numbers which is where errors come in, but if you go nice and slowly following my tutorial, you’ll end up with a pants sloper that you can then fit and adjust as needed.
If you’re someone that prefers video over text and photos, then I have added the accompanying pant pattern drafting video tutorial at the bottom!
What You’ll Need
You don’t need much but what you should gather together before starting with the measuring are:
- String
- Measuring tape
- Hard sitting surface (wooden stool, chair etc)
- Notebook (or my free spreadsheet)
- Pencil
- Calculator (or a head for calculating numbers)
- Ruler or pattern master
- French curve
- Paper suitable for pattern making
When you’ve gathered all of the above, you’re ready to move onto taking the measurements.
The Measurements Needed To Draft Your Pant Pattern

These are the measurements that you will need to draft your pants pattern. I know it looks like a lengthy list, but these will help us to create an accurate two dimensional version of your body.
- Waist circumference
- Front waist
- Back waist
- Hip circumference
- Front hip
- Back hip
- Waist to hip measurement
- Crotch depth
- Front crotch length
- Back crotch length
- Waist to ankle
- Thigh circumference
- Hip to knee
- Knee circumference
- Hip to Ankle
- Ankle circumference
If you’ve never taken some of these measurements or are uncertain of where exactly you should be measuring, check out my measuring guide first.
My Measurements For My Pants Pattern
As it is easier to learn from an example, I’ll be drafting my own pants pattern (again) using my current measurements. You can follow along with your measurements or practice using mine at half scale if you prefer but there’s also this Google Sheet that you can use to note your own and work through the process at your half scale if you’d like to practice along with me.
I’m always getting ‘access requested’ emails, so a quick update: In order to use the spreadsheet, when you click through, you’ll be taken to a Google Doc. You can then ‘make a copy’ by going to ‘file’ and then ‘make a copy’. Hope this helps!
To use the spreadsheet simply decide if you want to use metric or imperial, and then swap out my measurements for your own in column D for both the centimeters or inches tabs. The scaled amounts are then auto-populated in the green column.
I have added basic ease amounts but if you prefer closer or looser fitting pants, you should modify the ease amount accordingly.
Here are my current measurements in centimeters:
- Waist circumference 114 cm
- Front waist 59 cm
- Back waist 55 cm
- Hip circumference 122 cm
- Front hip 58 cm
- Back hip 64 cm
- Waist to hip measurement 18 cm
- Crotch depth 29 cm
- Front crotch length 28 cm
- Back crotch length 43 cm
- Top leg circumference 76 cm
- Front 34 cm
- Back 42 cm
- Waist to ankle 103 cm
- Hip to knee 39 cm
- Knee circumference 45 cm
- Hip to Ankle 85 cm
- Ankle circumference 34 cm
My Basic Pant Pattern Drafting Process
I like to break my drafting into front and back legs, and vertical then horizontal lines. We will be adding in some ease, so pay close attention to the additional numbers that I mention throughout. This ease can always be taken out later for various designs that you may want to create, but I like to add in a basic amount at the drafting stage.
Front Vertical Lines
These are the points along the central Front Line which will act as the grainline for your front leg piece.
FV1: Draw a line that is a little longer than your waist to ankle measurement (103 : SG). Label it as line A. Square across in both directions. Label the intersection as 1. Label the horizontal line as Waist, as shown in the photo below.

FV2: Take your waist to hip measurement and mark this in on line A measuring from intersection 1 down (18 cm). Label this intersection as 2 and then square across and label this line as Hip.

FV3: Staying with line A, measure down from 1 your crotch depth amount (29cm) plus ease (29.5cm). Label the intersection as 3 and then square across in both directions and label this line as Crotch Depth.

FV4: From intersection point 2 – found on your Hip line – measure down your hip to knee amount (39 cm). Square across in both directions, labeling the intersection as 4 and the line as Knee.

FV5: From the same intersection point 2, measure down the amount you need for hip to ankle (85 cm). Square across, labeling the intersection as 5 and the line as Hem.

FV6: Measure from points 1 to 5 – this should be equal to your waist to ankle measurement (103 cm).
Front Horizontal Lines
Now we need to plot in the horizontal lines for the front leg of your self drafted pants block.
FH1: Take the front waist measurement (59) and add on 1” / 2.5cm for ease. Divide the total amount (61.5 cm) in half (30.75 cm) as the pant block is for one front leg, not two. Divide this amount equally either side of point 1 on the waistline. Label the left mark as 6 and the right mark as 7.

FH2: Now take your front hip measurement (58 cm) and add 1.5” / 3.75cm for ease (61.75 cm). Divide this amount in half for the one leg amount (61.75 / 2 = 30.88 cm) and mark this on your Hip line, with half the amount (15.44 cm) falling either side of line A. Mark the left as 8 and the right side as 9.

FH3: Take your knee circumference (45 cm) and add on the ease required. I’ve added in 2.5 cm / 1″ across the entire circumference of my knee, but you may prefer more or less.
Now divide that amount (47.5 cm) in two so that you have an equal amount for the front (23.75 cm) and back (23.75 cm) of your leg. Place half of this amount (11.9 cm) each side of Line A where it meets your knee line (point 4). Label the left side as 10 and the right side as 11.

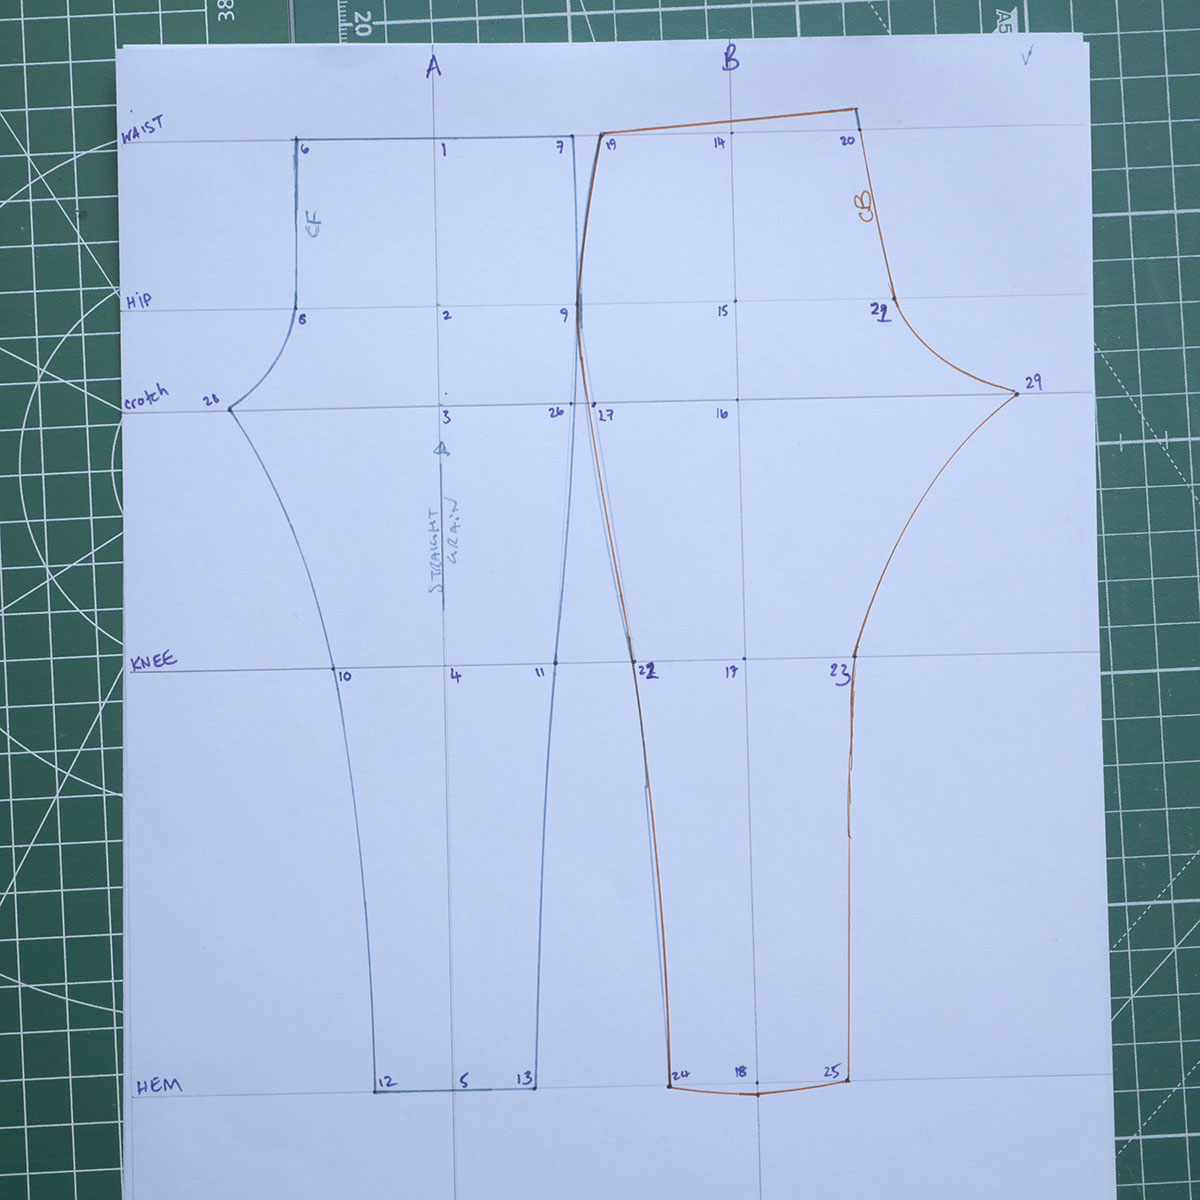
FH4: Find your ankle circumference and divide this number in half. 34 / 2 = 17 cm. Place half of this amount (8.5 cm) either side of line A on your Hem line and label the left point as 12 and the right point as 13. Your self drafted pants pattern should look a little like the image below.

We’ll now move onto drafting the back leg – but don’t worry, we will be connecting all the dots at the end!
Back Leg Points
We’ll be using the horizontal lines marked in during the front drafting process to plot in our back points.
BL1: We’ll start with the back hip as this is generally the widest measurement that we have. Mine is 64 cm and to this I have chosen to add 2” / 5cm of ease, giving me 69 cm across my back hip.
I now divide the total amount in half (69 / 2 = 34.5 cm) to get my per bag leg amount and will plot this total amount out from point 9 on my hipline, and label it as 21 (not 29 as I have mistakenly done).
(Also, don’t worry about the number jump, this is to help keep things organized for the next step.)

BL2: Halfway between 9 and 29 (17.25 cm) I will make a mark and label it as 15. Square up to the waist and label the intersection as 14. Label this vertical line as B and then square down to the hem, labeling each intersection as follows:
- Crotch and line B: 16
- Knee and line B: 17
- Hem and line B: 18

BL3: Find your back waist measurement and add on 1” / 2.5cm for ease. My amount is 55 + 2.5” = 57.5cm. Divide this in half (28.75cm) for just one leg, and then plot half of this amount either side of the waist line from point 14 (for me this is 14.38cm on each side). Label the left as 19 and the right as 20.

BL4: Take the amount you used for your knee in step FH3 (mine was 23.75 cm) and plot this on your knee line, with half (11.88) falling either side of Line B. Label the left as 22 and the right as 23. (Ignore the numbering on the image below – I lost track of my numbers when drafting.)

BL5: Next, find your ankle amount from FH4 and add 2.5 cm / 1″. My amount is 19.5cm (17 + 2.5 = 19.5cm). I’ll place half of this (9.75 cm) either side of Line B on the hem line, and will mark the left point as 24 and the right as 25.

We’re now ready to mark in the crotch line for the front and back pant legs!
The Crotch Line
This line can be trickier, so I’ve kept the steps separate.
CL1: Using a pencil, mark in a faint line connecting point 9 on the front hipline to point 11 on the front knee line. Where this line intersects the Crotch line, place a mark and label as 26.

CL2: Repeat the process, this time connecting point 9 to point 22 on the back knee line, and mark the intersection as 27.

CL3: Take your front top leg amount (34) and add on 1” / 2.5 cm of ease (36.5cm). Plot this on your crotch line, out from point 26, and label it as 28.

CL4: Take your back top leg (42) and add on up to 1.5” / 3.75 cm of ease (45.75cm). Plot this on your crotch line, out from point 27, and label it as 29.

Joining Up The Dots
Now that you have everything plotted in, we can connect all the dots. I prefer to freehand the process but many like to use a straight and curved ruler for neater lines – the choice is yours.
The Front Rise
Connect 6 to 8 with a straight line (this can be marked as Center Front) and then join to 28 with a smooth curve. This line should be close to your front crotch length (mine is 28 cm).

The Front Inseam
To create the front inseam, connect point 28 to 10 and then on to point 12. This line should be gently curved from 28 to 10 but can be straightened somewhat from 10 to 12.

The Front Hem
Connect point 12 to point 13 with a straight line.

The Front Side Seam
Draw a nice curved line from 7 to 26 passing through point 9 on the hipline (this is your hip curve) then continue the line down to 11 and finally to point 13 on the hemline. It is not essential that it touches point 26 on the crotch line, but the line should run to the right of it, so as to not shorten the top leg amount!

The Front Waistline
The front waistline can be drawn in, connecting point 6 (center front waist) to point 7. I keep this as a straight line for now, as it will be modified during the first fitting process.

The Front Grainline
Use the existing Line A as your grainline as it runs down the center of the pant leg.

The Back Side Seam
We’re now going to draw in a nicely curved line from 19 on the back waist, down to point 9 at the hip. This is the back hip line. We can then continue down to point 22 on the knee line. There is no need to connect with point 27 on the crotch depth line, but the line should sit to the left of point 27 on the crotch depth line to maintain the back top leg measurement.

The Back Hem
I like to create a slightly lower hem on the back leg and to do this I mark a point 1 cm below point 18 and then draw a nice curved line from 24 to 25 intersecting this new point, as seen in the photo above!
The Back Rise
This is generally a more pronounced curve than the front rise, in part because of the extra ease we added here. This can be removed if there is too much ease for your liking.
This will be your Center Back and should be quite straight, but it can then curve out to point 29 on the crotch line. The measurement of this line should be close to your back crotch length – mine comes to 43 cm.

The Back Inseam
To create the back inseam on your self drafted pants pattern, connect point 29 on the crotch line with points 23 and 25.

The Back Waistline
The back waistline has a curve to it that is missing from the front waistline, and this is because we extended the CB line up to add length to the back rise.
Draw in a slightly curved line from point 19 on the back side seam, to point 20 at the center back waist.

The Back Grainline
I use line B as my grainline for the back leg, so you can mark this now.
Truing The Pant Pattern
You now need to true the pattern. This is the process of checking your noted measurements against the sloper that you have created. You can either use your measuring tape on end, or if you’ve created yours digitally, use the measure tool for each line. Below is the process of how I true my pant sloper.
The Vertical Measurements
I like to start with the vertical measurements first, as I find a methodical approach means that I won’t miss anything.
Front Inseam vs Back Inseam: There will generally be a difference between these two seams which is ease, to ensure the seam doesn’t pop with movement. My front inseam measures 76.5 cm while the back inseam is 77.5 cm. This is a difference of 1 cm, which I’m happy with.
Front Side Seam vs Back Side Seam: Like the inseam, I like to have a little extra fabric on the back side seam, between the hip and knee, as a little extra ease, so that the seam doesn’t feel like it is bursting open when I move or when my thighs are a little on the heavier side.
My front side seam measures in at 103.5 cm and my back side seam is a 104.5 cm which is a nice 1cm of added ease.
Front Rise: This isn’t so much as a truing process, but more checking that the length of the front rise is close to my front rise.
- Mine: 30 cm
- Sloper: 32 cm
Back Rise: Again, this is just a check that the length of the back rise is close to my back rise.
- Mine: 39 cm
- Sloper: 36.5 cm
I’m not concerned about the difference in either the front or back rise, as I fully intend to add on more allowance at the waist for when it comes to fitting.
The Horizontal Measurements
Starting from the top down again means that I won’t miss anything out.
Front Waist: My front waist measures in at 59 cm and the pattern is 30.5 cm, which doubled up to reflect the full front waist is 61 cm. This means I have 2 cm of ease added in. If I wanted to add in dart shaping, I could have added in more ease at the waist, but this is something I prefer to do during the design stage when using this block as a base.
Back Waist: My back waist was measured as 55 cm and the pattern comes in at 28.5 cm, which when doubled up to reflect the full back waist is 57 cm. That’s 2 cm of added ease, which I may end up taking out in the form of a back dart or additional shaping at the side seam or center back. The fitting will guide me.
Total Waist: My total measured waist circumference is 114 cm while my sloper waist circumference is 118 cm, that’s a 4cm difference for ease.
Front Hip: The front hip on the sloper comes in at 32.5 which is 65 cm for the full front hip. That’s 2” / 5cm of ease, which is a little more than I’d like, but I also prefer to take out ease than add it in, so all is good.
Back Hip: My back hip on the sloper measures in at 34 cm, which doubles up to 68cm. This is 4cm (over 1.5”) of added ease.
Total Hip: With a total hip measurement of 133 cm on the sloper, that is 11 cm (4-ish inches) more in ease. I think I’ll definitely be removing some of this, though that will depend on the styles I plan to use this pant sloper to create.
Front Top Leg: This one is probably an anomaly for you if you’ve ever made a sloper before. I’ve never seen this measurement included in any instructions, but I find it really helps me to draft better fitting pant blocks. My top front leg is 34 cm, which is 2.5cm below 36.5 cm, the amount measured on my sloper (points 26 – 28 on the crotch line). We added in 1” / 2.5 cm ease, so this is perfect.
Back Top Leg: My back top leg measures in at 42 cm, and measuring from point 27 to 29 on the sloper, I can see that it is just 1 cm longer at 43 cm.
Top Leg Circumference: Wrapping the measuring tape around the top of my leg gave me 76 cm as my top leg circumference. This is 5.5cm smaller than the sloper amount of 81.5 cm. A sensible amount of ease for a basic pants sloper.
Knee Circumference: This was measured on me as 45 cm and when I add both the front and back knee amounts together, I get 50 cm, which is 2” / 5cm of added ease. Perfect.
Ankle Circumference: Last but not least, the ankle circumference. On me, I measured 34 cm – and this number is from the corner of my heel to the bend of my foot, so that I know I can get my pants in a non-stretch woven fabric over this girth – while my sloper measures a total of 37.5 cm. Again, a perfect amount of minimal ease.
The Next Step: Fitting Your Pattern
The next step in this process is to test your pants pattern. I’m not going to explain that process in this tutorial as it is already quite detailed and lengthy, but I will be publishing a tutorial next week that uses the Top Down, Center Out method to fit a pants sloper. That gives you a week to get your sloper drafted ready for the next step!
If you have any questions, please do drop them in the comments section below!


Can I ask, with the waist circ, how did you determine to the two diff measurements? did you take them separately??
Hi Jess! Yes, I take the whole waist measurement, with the 0 on the measuring tape at one of my ‘side seams’, so that I can note the individual front and back amounts too.
Just a note for the body measurement calculator: 3.75 cm of ease for the waist measurement translates to 1.5 inches of ease (chart currently shows 2 inches)
Argh, there’s always one error. Thanks for the heads Ruth, will go fix that now!
Hi there, you’ve mentioned a measuring guide for those who aren’t sure of how exactly to measure the body! May I know where exactly to access it??
Awesome! Thank you Thank you Thank you. Very good instructions that must have taken a fair effort to put together and I very much appreciate it / you.
Thanks Ken, I really appreciate the positive feedback! Best, Eve