So, I know a that a lot of my regular readers here at The Creative Curator are proper into their sewing. They know what they’re doing and how they’re doing it.
Their main concerns are fit issues and creative pattern making. And I am all over that!
But, I also need to think about my newbies… those readers in the house that just don’t quite know what to do with a sewing machine. Those guys n gals need a ‘How To Use A Sewing Machine For Beginners’ kind of post…
So here it is…


Your Sewing Skills
Lets get honest…
How many of you are just about old enough to have been taught sewing waaaaaay back in school when you were younger?
And how many of you have recently been drawn to sewing because of TV shows like The Great British Sewing Bee or Project Runway?
And, how many of you are drawn to learning to sew because you just cannot get clothes that fit great, or you’re fed up wearing the same thing as everyone else?
My Sewing Skills
I had the fortunate situation of a Ma and a Gran to teach me sewing skills when I was way younger – like over 30 years younger – ouch! 😉 But we also covered it in textiles at school too – though only at GCSE level. Yep, I’m not quite old enough to have studied O’Levels! 😉
Initially, a lot of what I did learn way back then, was from my Ma and my Gran… They totally rock for setting me off on my sewing education! I then went on and studied hard at school, at different colleges and at Fashion School too… As well as a shed load of self study and self discovery too of course! 🙂
For those of you not in the same position, I want to be YOUR sewing fairy godmother! Woop woop!
Because, words I hear FAR TOO OFTEN are…
I wish I knew how to sew…!
Is Sewing Really That Hard?
I know that for many, sewing looks hard. And scary. And overwhelming too. Yet, once you get down to it, and mastering the sewing basics isn’t that tricky!
So, for the absolute newbies in the house, those keen to know how to use a sewing machine for beginners, I got your back y’all…
A ‘How to Use a Sewing Machine for Sewing Beginners’ Tutorial
First, we need to consider what machine you have. Yours will be one of three different sewing machine types:
- Mechanical
- Electronic
- Computerised
I have a great guide to the 15 different types of sewing machine here!
My Machine

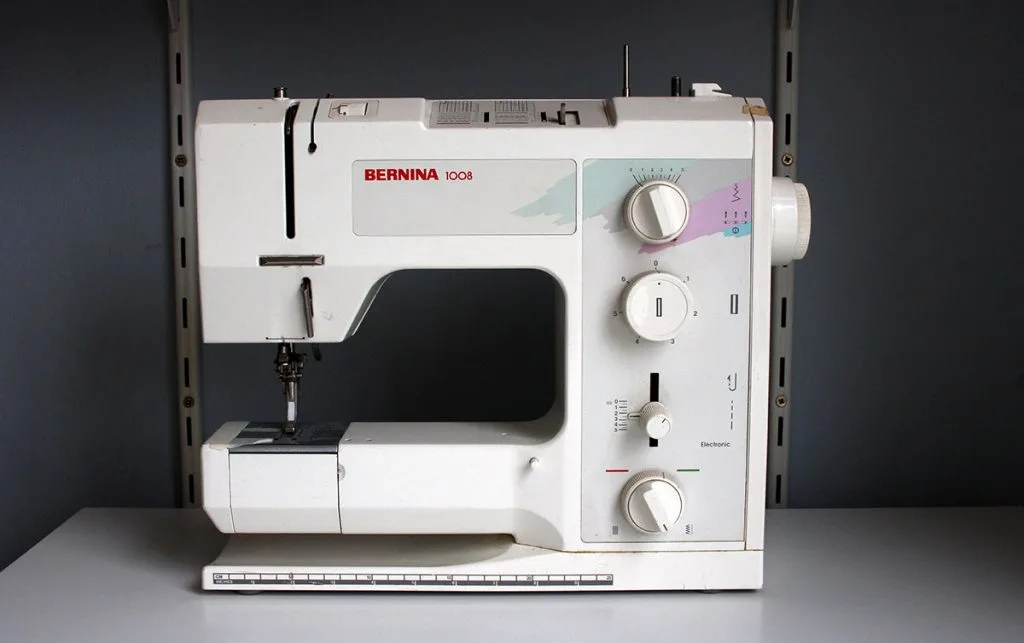
I have a Bernina 1008 – which is referred to an an ‘electronic’ sewing machine, but is technically a mechanical machine! I LOVE it. I’ve had her for about twenty years now and the ‘beast’ continues to power through.
I also have a rather cool Singer 66 hand cranked machine, and a Brother 1034D overlocker.


I have to be honest, and say… I’ve never owned a non-mechanical machine… I know! Shocking right? So many of you probably have, but my reasoning has always been that if most of my readers will only ever have a fairly basic sewing machine, it’s better for me to teach them on the same type of machine so they know what I’m sewing is achievable for them too…
Using a Mechanical Sewing Machine
If you have a sewing machine that is mechanical, you’re in the right house.
The most important steps are
- Learning how to thread your sewing machine correctly
- Learning how to load a bobbin
And lets keep it real.. Every type of sewing machine used by the home sewer needs a bobbin.
What’s A Bobbin?
A bobbin is the little thread holder – usually metal or clear plastic – that goes into the lower section of your sewing machine. This area I call the ‘bobbin house’ and it is located directly underneath where the needle would drop below the needle plate.
The bobbin provides the ‘bottom’ thread when you are sewing. It’s easy to remember as – bobbin in the bottom. The bobbin is inserted into a bobbin case which has a special slot and screw to control the bobbin tension.


You wind thread onto the bobbin, using a bobbin winder, and load it into your machine ready to be ‘scooped’ up and connected to the upper thread.
This is where knowing how to thread your sewing machine is important!
How Do You Fill A Bobbin?


To fill a bobbin there are several steps to follow!
Step 1: Load Thread Spool Holder
Start by loading the chosen thread onto the thread spool holder. Mine points upward, but if your spool holder lays across the top of your machine, you will find it often comes with a little cap, to hold it in place.
Step 2: Guide The Thread
Run the thread from the spool and along to the thread guide on the top of the machine. Usually you would wind the thread anti-clockwise around this, it helps to maintain good tension! But check in case YOUR machine has an arrow showing the way!
Pick up the bobbin in one hand, and take the thread in your other hand. You want to wind the end of the thread around the centre shaft of the bobbin several times. I always leave a ‘tail’ hanging over and hold it in place with my thumb while I am hand winding a few rotations.
Step 3: Load The Bobbin On The Bobbin Winder
You then need to pop the bobbin onto the bobbin winder. Make sure to do it so that the bobbin winds in the right direction – you don’t want the thread you just wound on to come undone!
Click the bobbin in towards the side of your machine – it should click into position. This engages the bobbin winding operation.
You may also need to disengage the hand wheel too. I have to on my Bernina. This stops the needle from moving up and down while you’re loading the bobbin with thread.
Step 4: Wind The Thread Onto The Bobbin
Carefully press down on the foot treadle so that the bobbin winder starts turning and loading thread evenly onto your bobbin.
When the bobbin is full, snip the thread. Slide the bobbin away to disengage the winding mechanism.
Return the hand wheel to it’s usual way of working so that the needle returns to moving up and down when the hand wheel is turned.
You’re now ready to thread your machine!
How Do You ‘Thread’ A Sewing Machine?
Learning how to thread your sewing machine isn’t as tricky as you think.
Your sewing machine will have come with basic – and usually underwhelming – instructions which will consist of a line drawing, numbers, arrows and words. But this is not such an enthralling way to learn, right? If your instruction manual doesn’t make sense, this section may help!
But I also have a tutorial on how to thread a sewing machine here!
An overview here would be:
- Place your spool of thread on the spool holder
- Drag the thread along the top of the machine
- Run it between the tension discs and down
- Follow the upper thread guide
- Position it in the take up lever
- Continue down through the thread guide
- Pop the end through the needle eye
- Push the thread under the presser foot
If this is all a little overwhelming, I do have an amazing online sewing course that you can work through at your own pace. You’ll learn how a sewing machine works, the different sewing machine feet and needles that can be used, creating a stitch library for your sewing machine and how to care for your machine too.
Yet, I bet reading that has astonished you? Because some of those words won’t mean anything to you.
I mean.. What is a take up lever??? Er, hello? And how are you even supposed to know what a tension disc looks like right?
So let’s REALLY break down this How to use a sewing machine for beginners tutorial step by step!
Threading Your Machine – Step By Step
This is what my mechanical Bernina 1008 looks like from straight on


This is what it looks like from above


I always load my upper thread first and then bring in the bobbin
- Start by placing your spool of thread on the spool holder
- Drag the thread from the spool along the top of the machine to the first thread guide on top of the machine. This guide works to control where the thread is directed.
- Next, run the thread between the tension discs and down. The tensions discs work like a sandwich, with the thread being the cheese inside. When the discs are pushed together, it makes it harder for the thread to move through. That’s tight tension. When the discs are further apart, the thread can move through easily. That’s loose tension!
- Hold the thread tightly and follow the upper thread guide back up again towards the take up lever.
- Position the thread in the take up lever – there will be a ‘dip’ in the lever for the thread to sit in. Make sure it does! This is connected to the needle and will move up and down when you use your machine.
- Continue to run the thread down through the thread guide towards the needle. This guide is to help maintain the tension!
- Snip the end of the thread at an angle so you have a sharp point and pass this end through the needle eye. Some machines have a built in needle threader. If your does, feel free to make use of it! I often wet my thread with a bit of spit too, it really helps to get the thread through that little eye!
- Feed the thread through the slit in the presser foot so that it can connect more easily with the bobbin, and you’re almost ready to start stitching!
That’s it – your machine is threaded!
But…
Sewing requires two threads, which is why we have a bobbin thread and an upper thread. So how do we get these to work together?
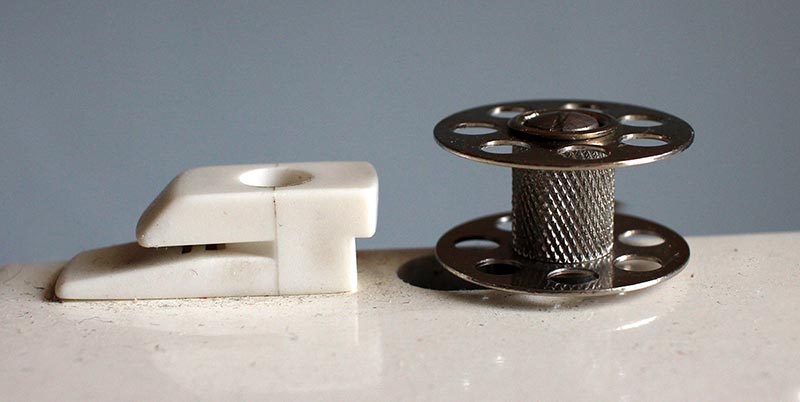
Loading The Bobbin


Electronic and computerised machines usually come with a diagram of how to load your bobbin. For those of you using a mechanical machine like me, you will need to pop your bobbin into a bobbin case.
These two pieces need to work together, not against each other.
- Take the bobbin case up with your left hand.
- Take the evenly filled bobbin up in your right hand.
- You want the thread to be falling off the bobbin in the same direction that the slot runs on the bobbin case. On my machine this means the thread and the bobbin make a number ‘9’ when facing me.
- I then place the bobbin into the bobbin case.
- Taking the thread that is hanging down – the tail – I feed it through the bobbin slot.
- This slot helps to control the tension of the bobbin thread.
- I use my left hand to hold the bobbin still within the case while my right hand pulls the thread along the slit, under the tension plate and clicks out at the bottom of the slot.
- The bobbin is now ready to insert.
- If your bobbin case has a latch, hold this to insert the bobbin case into the bobbin house and release, so that it clicks into place.
- Use the hand wheel on your machine to pass the needle down through the needle plate in order to connect with the shuttle hook underneath and form a stitch.
- As you complete the rotation, the bobbin thread will have connected with the upper thread
- I carefully pull the upper thread at the back of the machine to encourage the bobbin thread to appear in the needle plate hole. A pair of scissors comes in handy to scoop the bobbin thread out and towards the back of the machine with the upper thread.


Voila! You did it. Successful threading of a sewing machine!!
The next thing of course is to actually practise making stitches on the machine…
Getting Started Sewing
Briefly, as this post is already quite long, to get started sewing you need fabric:
- Place fabric under the the presser foot
- Lower the presser foot to hold the fabric in place
- Drop your needle into the machine using the hand wheel
- Put your foot down on the treadle!
That’s it! There is of course a lot more to learn and take in. Things like what fabrics to use for different projects, the different types of sewing needles to use, the different seams to use too…
Pat
Friday 1st of January 2021
Trying to sew on my moms sewing machine that has not been used in a while. It’s a Benina. When I start to sew thread is just wadding up on bottom material. Can it be threaded wrong or maybe needs servicing.
June
Friday 29th of May 2020
I am new to sewing and am familiar (just about) with threading a sewing machine, but I don’t always get it right. Describing the position of the bobbin as making a “number 9” when laying it in front of you is a great tip because inserting the bobbin incorrectly can cause tension problems and even cause the thread to break. So, it’s a handy hint to help me remember. I do have a problem with tension though. I want to use my machine for patchwork and quilting mostly and I will always use 100% cotton fabric for that. Do you have any similar handy tips to help me remember how to ensure I have the correct tension and how to adjust it if it is incorrect? What is the best size needle for stitching cotton? I have also found that if I have not inserted the needle far enough, it will affect the stitches in the same way as having the incorrect tension. A bent needle may also have the same effect.
Ev R
Wednesday 5th of August 2020
I see this hasn't been answered. May I add that if you have a drop-in bobbin (top loading) the bobbin position is the opposite.... like the letter 'p'. Your observation about the needle being in far enough is a good one. I once had to replace some plastic parts in the bobbin assembly because the needle had damaged them.
Barbara Harris
Thursday 17th of October 2019
I bought a sewing machine about 6 or 7 years ago, the instruction book was nigh on impossible to understand (and looked like a very bad photocopy) so the sewing machine was stored away and never used. I want to try again, not having sewn for over 30 years, the last time in a needlework class at school (I can't remember the basics) can anyone recommend a book. I've bought a couple and they all assume you can thread a machine and know the basics and I don't, I'm not even sure if all machines thread the same? :) Thanks!
So you bought a machine, what next!! Part 1 – Sew with SO
Tuesday 26th of September 2017
[…] Video Pictoral […]