A serger sewing machine is a type of sewing machine that is used to finish the raw edges of fabric or to sew knitted fabrics. You can learn more about what a serger sewing machine is and how it works, but today I’m going to teach you how to thread a serger sewing machine.
Threading a serger sewing machine can be a bit tricky – I know I struggled the first few times when I had to do it, which is why I made a note of the order of threading on the inside of my serger! – but once you get the hang of it, it’s really not that difficult.
Here are some step-by-step instructions on how to thread a serger sewing machine.


Note: Some of the links in this post are affiliate links, which means I may receive a commission if you make a purchase at no further cost to you.
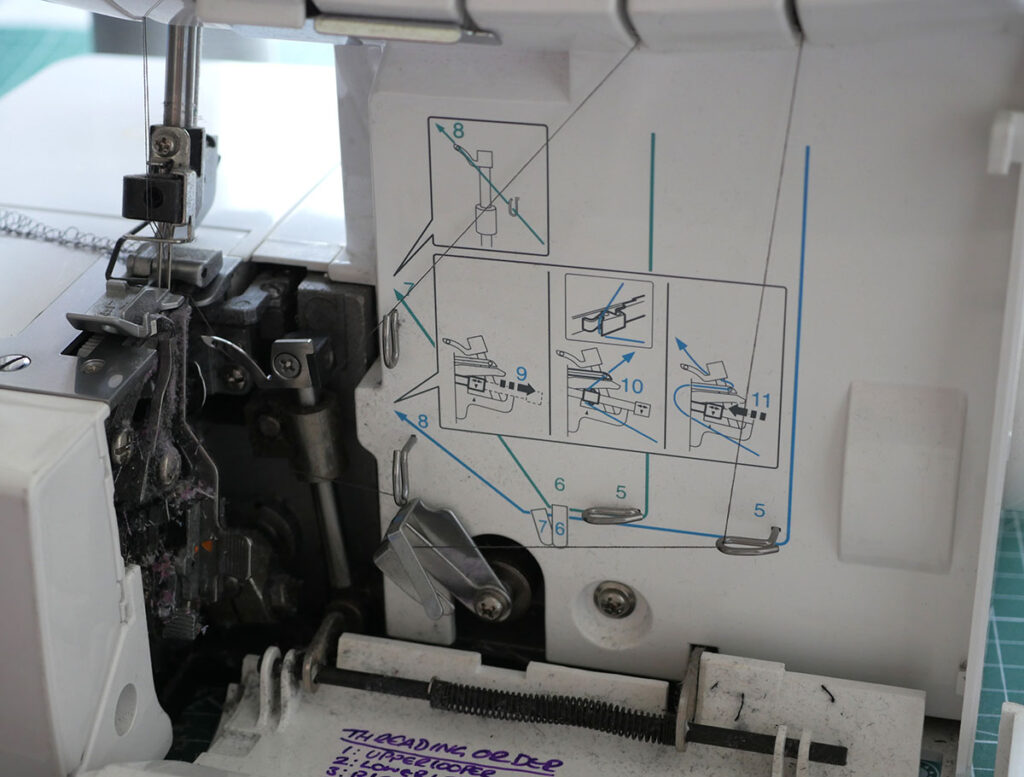
The Threading Order For Threading A Serger
You’re probably not surprised to know that there is a right way and a wrong way when it comes to threading a serger.
The serger uses multiple threads – mine has space for four! – and there is a specific order that the threads need to be threaded through because if you don’t thread your serger correctly, the stitches will be loose, uneven and quite possibly snap.
Here’s the order that you need to follow when threading a serger:
- Upper looper
- Lower looper
- Right needle
- Left needle
The serger that I have – the Brother 1034D – has color-coded threading guides which make it easier to know which thread goes where. If your serger doesn’t have these, don’t worry, you’ll still be able to figure it out using the instructions below!
Upper Looper


The upper looper is the top loop of thread on the serger. It sits on top of the fabric when you’re looking at it under the needle. This thread is usually third from the left, and needs to go through the following path:
- Up through the thread guide
- Down through its tension disc – if your machine has it, push the tension button to one side before threading the thread through
- Through the thread guides – mine has four which form a corner of a square
- Through the eye of the upper looper
Then, you’ll want to pull the thread all the way to the back of the serger until it’s about 6″ / 15cm long.
Now that the upper looper is threaded, you can move on to threading the lower looper.
Lower Looper

The spool of thread for the lower looper is usually on the far right. The lower looper is the bottom loop of thread, and when sewn it is not visible, as it lies underneath the fabric.
This thread needs to go through the following path:
- Up through the thread guide
- Down through its tension disc
- Through the three thread guides – these are different guides to the upper looper!
- Through the lower looper eye – mine has a lever which I need to pull out to find the eye, and then push back into place
Like the upper looper you’ll now need to pull the thread all the way through until it’s about 6″ / 15cm long.
Right Needle


The right needle is the needle on the right side of the serger. It is used for overlocking / serging the edges of woven fabric, but also plays its part when two needles are in position.
The spool of thread for the right needle is second in from the left and needs to go through the following path:
- Up through the thread guide
- Down through the tension disc
- Up and around the second thread guide
- Through the eye of the right hand side needle
Again, pull the thread all the way through and under the presser foot until it is about 6″ / 15cm long.
Left Needle
The last step is to thread the left needle. The spool of thread for this is the first one on the left, and it needs to go through the following path:
- Up and through the thread guide
- Down through the tension disc
- Up and around the second thread guide
- Through the eye of the left hand needle
Finally, pull the thread all the way through and under the presser foot until it’s the same length as the others.
Sewing The Chain


And that’s it! You’ve now successfully threaded your serger sewing machine but you need to sew the chain before you can start serging on your machine. Here’s how:
- Turn on the power
- Lower the presser foot
- Take hold of the four different threads in your left hand
- Apply a little tension to the threads
- Press the foot treadle to start sewing
- Pull gently on the threads so that they create an even chain of stitches.
You’re now ready to get serging!
If you enjoyed this and are interested in learning more about sewing machines I have a great category full of sewing machine articles that you’ll love, including how to buy a used sewing machine (handy if you’re thinking of buying a used serger!) and the best sewing machines for advanced sewers too!