I found THE BEST Brother Sewing Machine For Beginners!
I have owned a Brother sewing machine of some sort several times over the many years that I have been sewing. The best one was of course the Brother DBII lockstitch industrial sewing machine that I had for quite a few years. I loved that machine, but leaving London meant gifting it to someone else who could benefit from its fabulousness.
In recent months my readers have been asking me about more beginner friendly sewing machines, and I felt like the time had come for me to get another Brother sewing machine.
Only this time I wanted to spend as little money as possible, to really see if one of my favorite sewing machine brands could actually provide a good machine as an entry level option.

Some of the links in this article are affiliate links. This means that I may receive a fee at no extra cost to you if you purchase a recommended product.
And so with this in mind, I went out and bought a very basic sewing machine and put it through its paces. Grab a cuppa friends, as this is quite an in-depth review of a basic model sewing machine that cost just $100!
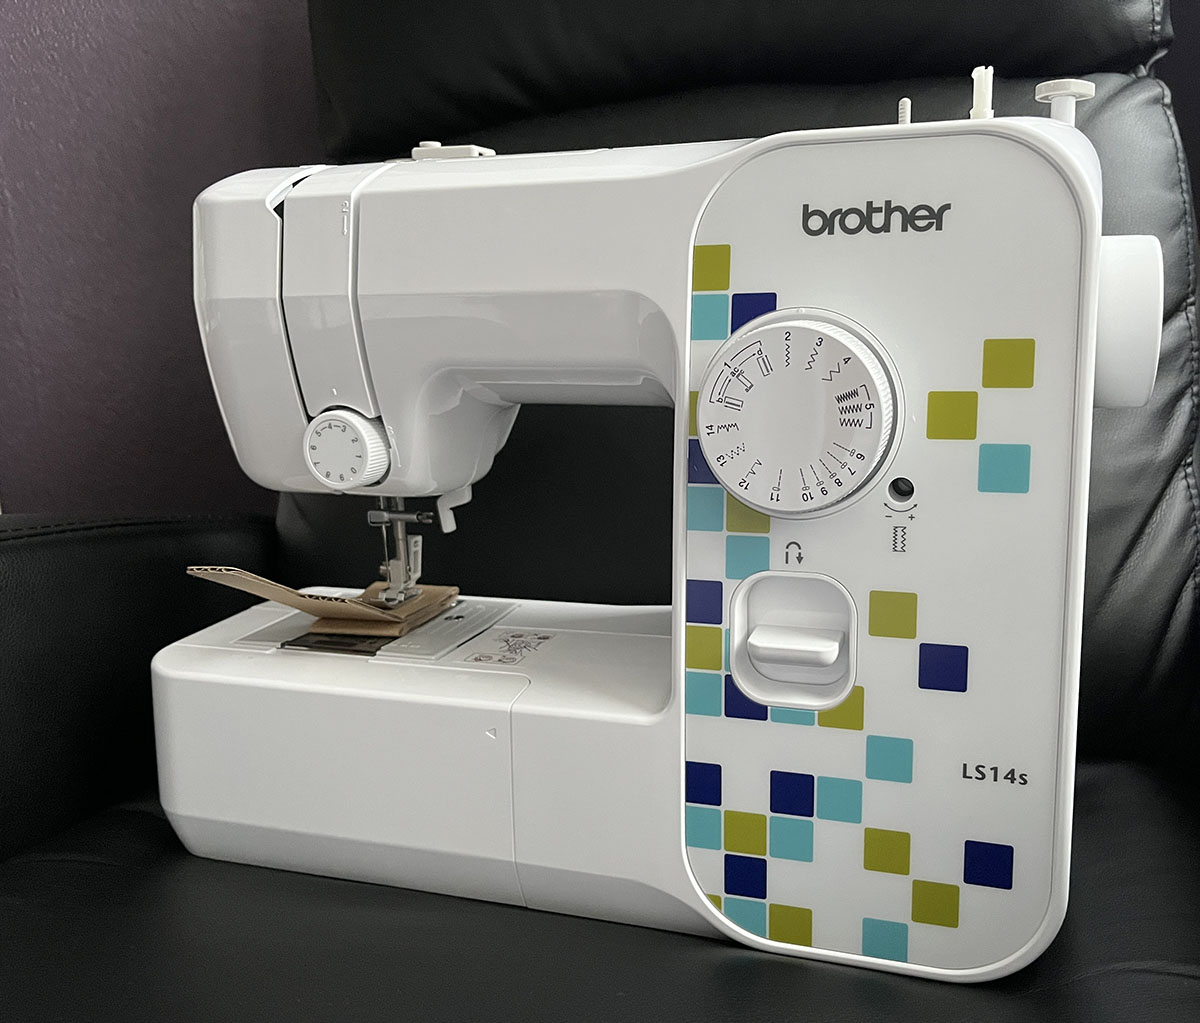
The Brother SM1400 / LS14S Machine
This sewing machine from Brother is known as the SM1400 in the US and LS14S in the UK, but it is the same machine with just different decorative details on the shell.
Its a very basic mechanical sewing machine, which is why I consider it to be the best low cost sewing machine.
When you’re new to sewing, you don’t need one of the best sewing machines that ever existed, with all the bells and whistles like an automatic needle threader and a hundred decorative stitches – that’s what we get in a computerized sewing machine, much later on, once we’ve achieved a certain skill level with our sewing and know that we’re in it for the long game.
For beginner sewers, the Brother SM1400 / LS14s is absolutely perfect with its basic features – and did I mention that it’s one of the most inexpensive sewing machines available from a reputable sewing machine brand? Let’s take a look at it now.
Metal Chassis

I have used a Bernina 1008 for a fair few years, but they recently discontinued this model. One of the things I love about it is it’s all metal. Yes this makes it heavy, but it also feels solid enough to be the workhorse that it has been.
The Brother SM1400 / LS14S is similar in that it has a completely metal chassis at its core. This means that it has some solidness to it, but the actual housing that you see is all plastic. Which for a first sewing machine is perfectly acceptable.
The benefit to this metal chassis / plastic housing is that it makes your new sewing machine lighter in weight than many others – I could very easily pick this machine up with just one hand, its that light and small – but the downside is that the plastic does give it that cheap feeling (which it is) and picking it up ‘incorrectly’ does make you feel like you might break the top of the machine. More on that below.
Portability

As hinted at above, the lower weight of this mechanical machine is that it is significantly more portable than others which are marketed as portable sewing machines at higher price points. It weighs in at just under 13lb / 5kg, making it easier to pick up from floor level to table height, but also suitable for moving from room to room or taking it out and about for sewing classes or meet-ups.
In the sewing photos further down, you’ll see that I didn’t even bother finding out a table for the sewing machine, and instead sewed with it on the box it arrived in.
Something to note is that the sewing machine does not come with any kind of case or cover, and there’s no extending handle like the one on my Bernina. Instead, there is a ‘cut out’ handle. I place my thumb in that cut out area, and the rest of my hand wraps around the top of the machine with my fingers in the throat area. My hand then provides more support when carrying the sewing machine.
14 Stitch Options

I think this may be my favorite – and perhaps one of the most important features of this Brother machine – but there are only 14 stitch options! As someone who is very experienced with different types of sewing machines, we can often get caught up in buying the one with all the built-in stitches, and all the built-in embroidery designs, but actually, the stitches you will find yourself needing when you’re just starting your sewing journey add up to just a handful.
The stitches included in this basic sewing machine are:
- The four step buttonhole (1a,1b,1c,1d)
- The narrow zig zag
- The standard zig zag
- The wide zig zag
- Zig zag with 3 changeable lengths
- Smallest length straight stitch (central needle position)
- Small length straight stitch (central needle position)
- Medium length straight stitch (central needle position)
- Standard length straight stitch (central needle position)
- Longest length straight stitch – good for basting and gathering (with central needle position)
- Standard length straight stitch (with left needle position for zippers)
- Blind hem stitch (useful if you buy a blind hem foot, as its not supplied)
- Stretch stitch
- Decorative finish stitch
And in all honesty, while this does seem like a selection of very basic stitches, these are the only ones you need when learning to sew. I’m going to share with you further down how these stitches look when sewn on fabric – actual photos of me using this machine! – and for what reasons you might use each of them, so stick to the end for that!
Reverse Sewing

All sewing machines come with a back stitch / reverse sewing option, and this is no different. Whereas a modern computerized machine will have a simple button that you press, this mechanical machine has a very simple plastic reverse button that you press down and hold to sew backwards and release to sew forwards. It’s easy enough for us, and works.
Tension Dial

At some point, we all need to adjust the tension of our top thread, and this is why we have a tension dial. Normal tension is between 3 and 5, but in case you need to modify further, the tension dial goes as low as 0 and as high as 9. Remember that the tension should be tested on scrap fabric for each project to make sure that the stitches your sew are properly tensioned. If you don’t yet know much about sewing machine tension, you can read this article on …
Thread Cutter

It’s certainly not an auto thread cutter, but what we are presented with – on the far left side of the sewing machine – is a sharp blade which will do the job of creating a clean cut to your working threads. I used it only once to take a photo and show you, but that’s not because it’s inferior, just that I prefer cutting my threads with scissors.
Bobbin

The bobbin is filled using a peg on the top of the machine, and once filled it is placed in the drop-in bobbin house located just below the needle.
The bobbin thread is then guided along using the instructions on the plastic – visible in the below photo. I had read that this could be tricky to follow, but I had no issues. The benefit of a top-loading bobbin is that is less fiddly than side loading bobbins, but you can also see more easily the amount of thread that you have left on your bobbin

You may find loading and threading the bobbin a bit tricky to begin with but with a little practice you will get used to it.
If you already know that this is the beginner friendly sewing machine for you, you can buy it here in the US and here in the UK.
Included Accessories For Brother SM1400 / LS14S
That’s pretty much it for the actual sewing machine, let’s take a look at the accessories that come with the sewing machine. This sewing machine comes with a small selection of presser feet, but these will be more than suitable for the types of sewing projects you’ll work on as a sewing beginner.

Bobbins
My machine came with one bobbin already in the bobbin housing area, and three more in a plastic packet. The bobbins are the clear plastic variety, rather than the metal ones I use for my Bernina.
Buttonhole Foot
This is the foot that we use to create button holes using the four step buttonhole function. It’s a standard buttonhole foot, and I’ll walk you through how to use it further down.
Screwdriver
I’m not sure this can really be called a ‘screwdriver’. It seems the days are gone when a proper screwdriver was included with the purchase of a sewing machine, or at least this is the case at the $100 sewing machine price point. What I received was a flat piece of metal (pictured below) suitable for modifying the left hand side stitch line of the buttonhole. More on that later! Presser feet snap on, so there’s no need for a more substantial tool for screwing and sun crewing shanked feet.
Zig Zag Foot
This is the standard foot that most sewing machines come with, already clipped on and ready to sew. It has an opening which allows a needle to move from side to side for the zig zag and decorative stitch options, but we can also sew in a straight line too. Depending on where you purchase yours, the presser foot may come as either plastic or metal for the snap on foot part.
Zipper Foot
This presser foot is used to insert zippers. It won’t work perfectly for concealed / invisible zippers, as it is only designed to sit to one size of your zipper’s teeth, and this sewing machine only has the option of moving the stitched line to the left???
Optional Accessories For Brother SM1400 / LS14S
At the price point it is sold at, the Brother SM1400 / LS14s comes with very minimal accessories, which is the case for many sewing machines now. I know I’ve had to spend a few quid on accessories for my Bernina over the years, so I’m not surprised that so little is included with the Brother. Let’s look at the optional accessories you may want to buy for this sewing machine.
Blind Hem Foot
Although the Brother SM1400 / LS14s does have a blind hem stitch (option 12 on the stitch type dial) it doesn’t actually come with a blind hem foot. And it makes sense – I’ve used the one that came with my Bernina just a few times each year, so it isn’t a necessary presser foot.
Concealed / Invisible Zipper Foot
Again, this is a presser foot that you will have to buy separately if you plan to sew concealed zippers, however, for the most part I have found sewing beginners loathe to sew these as they can be tricky to get right.
Sewing With The SM1400 / LS14s
I have to be honest – I wasn’t actually expecting much from this sewing machine. Mostly, because I’m so used to using more expensive options. However the Brother SM1400 / LS14s is a fab sewing machine that was able to handle three layers of denim. I was stunned!

Lifting the machine upon delivery, I was surprised by how light the box was. It had been delivered with the packaging fully visible – this is something to be aware of if you order it online and intend to give it as a gift! – and so the amount of packaging inside the box had little impact on the overall weight. It’s certainly noticeable upon picking it up that this sewing machine is in no way heavy duty. And that’s ok. It weighs in at 13 lb / 5 kg and I was able to lift it with ease, and I felt like it did not rattle around when I increased the sewing speed with the foot pedal.
It’s important to reiterate that the ‘handle’ with which you lift the machine is just a cut out in the top of the plastic, and as such it does feel more than a tad flimsy. I found that placing my thumb in this section and wrapping the rest of my hand under the ‘arm’ of the sewing machine was a much more secure way to lift it up.
With the sewing machine being a mechanical one, the only real learning curve is threading it up correctly and then understanding the different stitch functions.

To thread this machine, you should follow the diagrams that come on the sewing machine – everything is well ‘signposted’ with directional arrows to help you thread up the sewing machine and load the bobbin in the correct way.. As well, there is a large single page printed with instructions that you can follow.
I’ve already covered the stitch options further up, so I’ll share some photos of the various stitches sewn on the Brother SM1400 (US) / Brother LS14s (UK).

I used 100% cotton for the different stitch types and the 4 step buttonhole, which doesn’t produce the most perfect buttonholes, but for a $99 machine, I wouldn’t expect it to.

That said, I did discover that if you use the tiny enclosed ‘screwdriver’ to tighten the button hold tension (ts a small hole next to the stitch dial, which has a screw tucked inside) then you can get a much tighter stitch length for the left hand side of the buttonhole.
This does not modify the stitch length of the right hand side, so you would need to do some maneuvering to get both sides looking beautiful.

Finally, I put the machine through its paces repairing a few areas on my favorite denim jeans. We know that different fabrics will require different stitches and needles, but as denim is a heavier weight fabric that most people end up sewing with, it seemed an appropriate choice to test with.
The needle supplied (a size 90/14) was definitely up to the task, and I used a range or straight and zigzag stitches with no issues. The waistband of my jeans is patchwork with a thick elastic too, and the sewing machine was able to handle these heavier fabrics without distress.
I also want to mention that I was really astonished by how small the ‘work area’ was on the sewing machine. You can see in the photo below that there was only just enough space for my hand.

I did think I would have to be more mindful of the amount of fabric I placed in the throat area of the sewing machine, but in actual practice it wasn’t an issue, even with the amount of bulk in a pair of denim jeans.
The only negative to the experience was the free arm aspect – the part that we removed in order to make the work area smaller for sleeves and hems, was so narrow that it made very little difference.
Why It’s The Best Beginner Sewing Machine
Overall this is a very good sewing machine for the price that is charged. It isn’t really the best sewing machine for someone who has been sewing for some time – if that is you, then you’ll probably find yourself chomping at the bit for more functionality than this more basic one can provide.
There are enough features to satisfy the needs of someone who really wants to learn to sew. The ease of use is one of the biggest selling points for me, and I consider it to be the perfect choice for a sewing beginner. And the best bit? It will very easily find a place as a backup sewing machine once your skills have progressed.
Oh, and did I mention that it really is the best beginner sewing machine in the sub $100 / £100 price range?


