When learning how to sew your own clothes, there will come a time when you’ll need to sew a pin hem. Pin hems are sewn on lightweight or sheer fabrics such as chiffon.
There are two ways to sew a pin hem using the regular sewing machine foot. You can also sew a pin hem using the rolled hem foot!
Don’ forget to bookmark this page if you need more sewing tutorials!
One of the methods is an expanded upon way I learnt a few years back, and every time I sew a pin hem, it works perfectly. Not sure if that’s just luck, nor whether this trick is widely known, but I’m gonna share it with you here so that you too can sew a perfect pin hem!
Some of the links in this article are affiliate links. This means that I may receive a fee at no extra cost to you if you purchase a recommended product.


What Is A Hem?
A hem is defined as a the edge of a piece of fabric. To create a clean hem, we usually turn the fabric edge under and stitch it in place. However, not all hems ARE stitched. It really depends on how you finish a hemline!
Why Do We Finish Hems?


Hems on woven and knitted fabrics will mostly need finishing in some way, so that they don’t fray or unravel.
Fabrics with no grain to them – leather, plastics etc – could be left with a raw hem finish as they do not fray.
Some knit fabrics are also suitable for a raw hem finish, and this is a technique seen quite often now on ready to wear garments available from the high street and higher end brands.
When A Pin Hem Is Needed
First up, let’s consider when a pin hem may be needed. You’ll notice the technique has the word ‘hem’ in it which gives away a pretty big clue. 😉
It is used on hems, mostly with fine fabrics such as chiffon. And when we think of hem, we usually think of the ‘bottom’ of the garment right? Like the trouser hem sitting at the ankle.. or the skirt hem falling to the knee or calf… or even the shirt hem stopping at hip level…
That said, is a pin hem just used on hems..?
Alas, no! I have used a fine pin hem to finish a sleeveless armhole before, when I haven’t had the time nor inclination to sew a facing.
I’ve also had to sew a pin hem on the neckline of a draped silk top which would have looked odd if I had added a facing or binding.
There are many ways to get creative with the pin hem technique!
Fabrics For Successful Sewing Of A Pin Hem
Another key clue is the word ‘pin’! The pin hem is a fine hem, that when finished can be as narrow as a pin!
Therefore, it works best on lightweight fabrics such as chiffon, and if you are using a pin hem on a fabric that easily frays easily, it would be best to use a 1.5 cm or 2 cm seam allowance to start!
I’m rubbish and always use a 1 cm or smaller seam allowance which can make it tricky to cut down!
Also, as the hem is very narrow, it really isn’t suitable for thick fabrics. This is because it is just too tricky to turn under, stitch and press a thick fabric nicely with such a fine hem; it’ll just look bulky and messy!
Stitch Length For A Pin Hem
You should also be using a stitch length that is appropriate! The standard is 1-2mm long for a pin hem.
It is, however, harder to unpick such a small stitch, so be sure to work nice and slowly; this hemming technique has multiple steps, which takes time, and you probably don’t want to add unpicking time to the process! 😉
For this step by step tutorial, I’m using a 3 stitch length in a contrasting colour so that you can more clearly see the stitches.
My Old Method
Back when I was at uni, a technician by the name of Sue told me to ‘go and sew a pin hem on that dress’! She was referring to a GHASTLY brown sheer crepe thing I had to knock up quickly to satisfy the project leader. I’d never sewn a pin hem at that point, so her brief instruction went along the lines of:
- Stitch a line 0.5 cm from the hem all the way around.
- Turn the hem under with the stitch line sitting just on the underneath edge.
- Stitch along that line, so it is a double stitch line.
- Trim the excess fabric close to the stitch line.
- Press the hem. Voila!
Now, this by itself doesn’t work. I discovered this about a year after finishing uni when I used the technique on a lightweight top.
Popped it in the wash and when it came out the machine, there were thread wisps all over the place. Yuck!
My guess is, Sue probably expanded on her technique, but I presumably didn’t listen in my eagerness to dash off and get started! 😉
My Tried And Tested Pin Hem Method
The version I use now is the same that Sue taught me, but with one extra step: turning the finished hem over and stitching it AGAIN. That makes three lines of stitching!
I will also point out that it is also the technique recommended by Claire Schaeffer in her fabric sewing guide!
It works like this.
Step 1: Sew Your First Line
Use a hem allowance of 1.6 cm / ⅝ inch on your pattern
Place the garment under the machine with the right side up and sew all the way along the hem at 1.25 cm / ½ inch from the edge


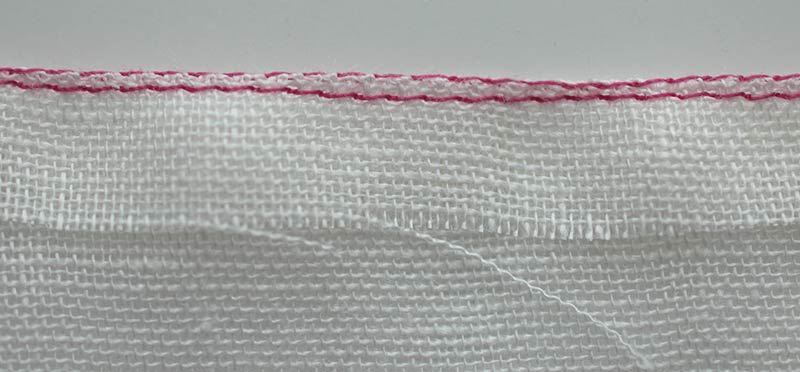
Step 2: Sew Your Second Line
Once your first stitch line is complete, lift the foot, and keeping the garment right side up, turn under the hem allowance so that the line you just stitched is right on the edge.
Lower the foot and needle, and stitch on the edge – also known as edge stitching – all the way along the hem!
Below is how the second stitch line looks from the wrong side.

And this is how the folded edge looks when seen straight on.


Step 3: Trim The Excess Fabric
When the second line of stitching is complete, you need to remove the fabric from the machine, and use small scissors to trim the fabric as close as you can to this new stitched line.


Try to trim as close to the second stitch line as you can without actually catching the stitches.


Step 4: Final Stitch Line
Finally, fold this hem again, and either by machine or by hand along the existing stitch line.


I prefer to sew right side up so that I can monitor the ‘look’ of my visible stitch line, but you may find it easier to sew wrong side up.


The actual final step is to press the hem lightly so it isn’t wrinkled or crinkled. Voila!
Right then… That method uses THREE lines of stitching! Some would say it’s too much. But, if you really want to sew a pin hem, I find this technique to work really well!
And, I actually use it for single or double hemming other garments too, such as a shirt hem. It just helps me keep a nice finish when hemming anything.
A simpler method is demonstrated with photos below.
Step by Step Photo Tutorial: How to Sew A Pin Hem
If you’re keen to have a go, and want to use a simpler method, this two step technique for sewing a pin hem should sort you out! 🙂
Add between 1.2 cm – 1.5 cm allowance to your pattern hemline areas. If it is curved, you’ll want it on the lower end to make it easier to manipulate the fabric.
Place the garment right side down / wrong side up and turn half the allowance up and over towards you. I’ve actually turned 1 cm in the photo below, as it’ll give me more room to trim away!


Sew along, as close to the edge of the fold as possible – this is an edge stitch, like I talked about further up the post! IN the photo below, I COULD have gotten even closer to the edge, but this silk fabric has been tricky to work with so far – I didn’t wanna push my luck! 😉


When done, take your scissors and trim back the excess fabric without getting too close to the stitching. We don’t want it to come undone! 😉 You can see from this photo that I’ve trimmed a good amount off – about 7 or 8mm!


Pop the garment back in place – so the wrong side is still facing up at you. Now turn the hem up and over again, and stitch on top of the previous stitch line.


This means that the stitching visible on the right side of the garment will be the bobbin thread, not the top thread. You therefore need to make sure that the bobbin tension is good, and that you have matching coloured thread in your bobbin. I’ve used white so that you can see more clearly!


You can see from the photo above that my bobbin thread isn’t looking amazing. Need to tweak it before I sew my Jude Shirt!
The photo below shows the wrong side of the pin hem. We can just see that there are two lines of stitching.


That’s it. All you need to do now is give the pin hem a light press so that it is set in place!
What Not To Do When Sewing a Pin Hem


You can see in the photo above that I didn’t edge stitch close enough on the first line of stitching, and the second line is WAY over from the first. This is because I decided to test sewing this with the right side of the fabric up, essentially sewing blind as I turn the hem under and stitched.


Another thing you shouldn’t be doing is using a thread that doesn’t match your fabric colour – unless it is intentional as a design feature! This white thread on black sandwiched silk shot is purely so you can see the three more clearly.


Be very careful NOT to cut the thread of the stitches you just made. It’ll all unravel, and you will have to start again!
Lesley Rood
Thursday 2nd of June 2022
Thanks for that, have a dress to take up for my sons wedding and was a bit worried about it.
Eve Tokens
Thursday 2nd of June 2022
Happy to have helped Lesley. It's a great hem when you want a beautiful finish.
George-Anne
Thursday 2nd of February 2017
Thanks, Eve. That's a very clear, commonsense explanation of how to do a pin hem. i shall use it!
Eve Tokens
Wednesday 15th of February 2017
Hi George-Anne! I'm glad you found it helpful... Let me know how you get on! :)